PowerToys is a set of multiple utilities that lets you get more out of your Windows computer.
Do you want to have a window manager to have a keyboard-centric workflow? Check. Want to change shortcuts? You have it. Want to remap the keys of the keyboard? You got it!
Getting a macOS-like launcher faster than the traditional start menu and doing much more than just searching for an application is crazy 🤯.
So in this tutorial, I will walk you through the installation and then will walk you through each feature of PowerToys in detail, including what it is meant for and how you can use it.
Install PowerToys on a Windows machine
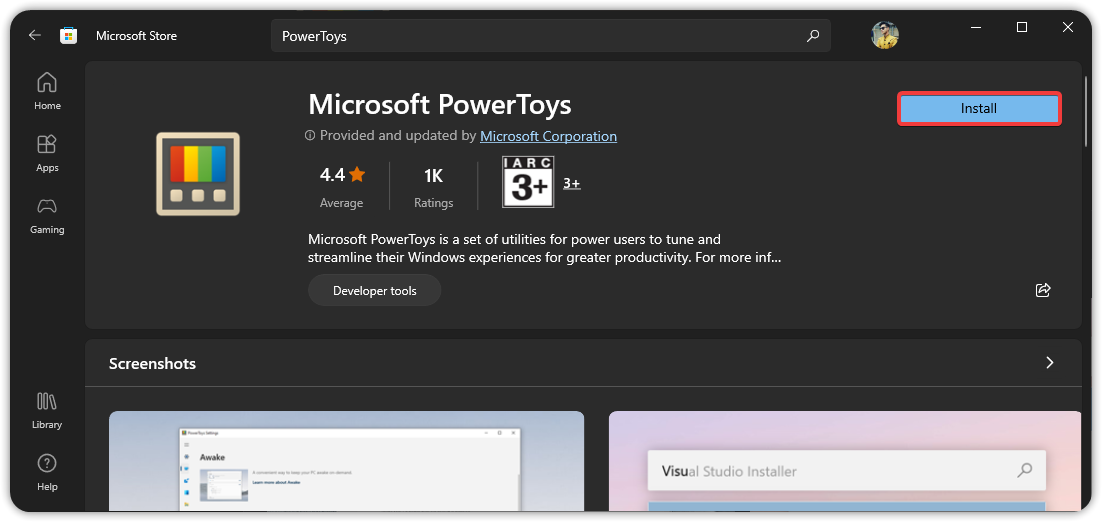
The easiest and recommended way to install PowerToys is to use Microsoft Store.
First, visit the official download page of the PowerToys on the Microsoft store and hit the Install button to start the installation process:

Yep, that’s it!
How to use PowerToys utilities
In this section, I will walk you through how you can use each utility and get the most out of every utility possible.
Let’s start with the first one.
Always On Top
The Always On Top is a systemwide utility that lets you pin windows above other windows. In simple terms, your pinned window will always be on top.
So even if you change windows, switch apps, or even open a new application, your pinned window will always be prioritized over others and will be shown above every window.
To use this utility, first, open the PowerToys from the Windows start menu and enable this feature (if not already enabled):
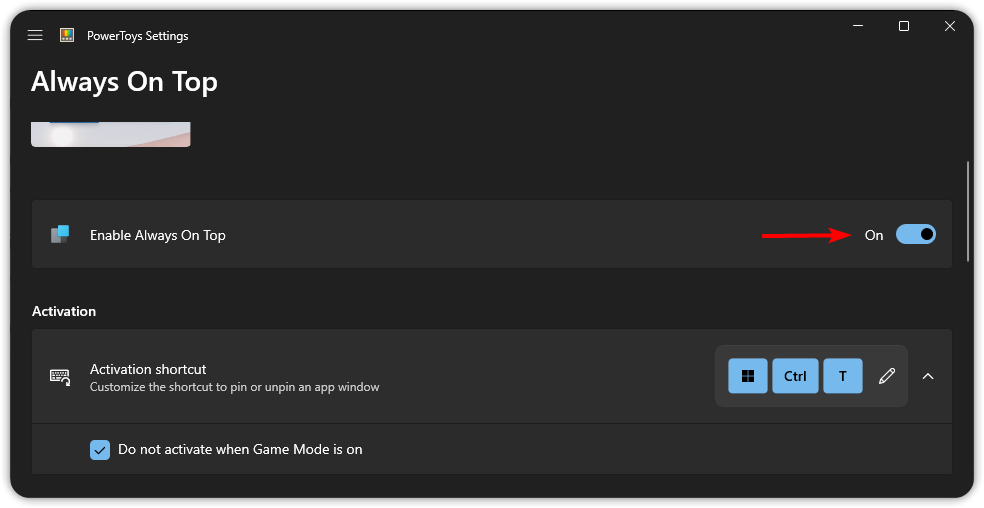

Once you enable Always On Top, switch to the window that you want to pin above the other windows (using the Alt + Tab) and then press Win + Ctrl + T and you will hear a sound indicating the window is now pinned.
Awake
Note: keeping the system awake prevents the entire computer from going into sleep mode, while keeping the display on only prevents the screen from turning off.
Generally, we use customized power plans to wake our Windows PC longer, but what if I tell you that you can do it without touching power settings?
You can use a simple utility called Awake from PowerToys that does that, with multiple options to suit your demands.
First, enable the Awake utility from the PowerToys menu:
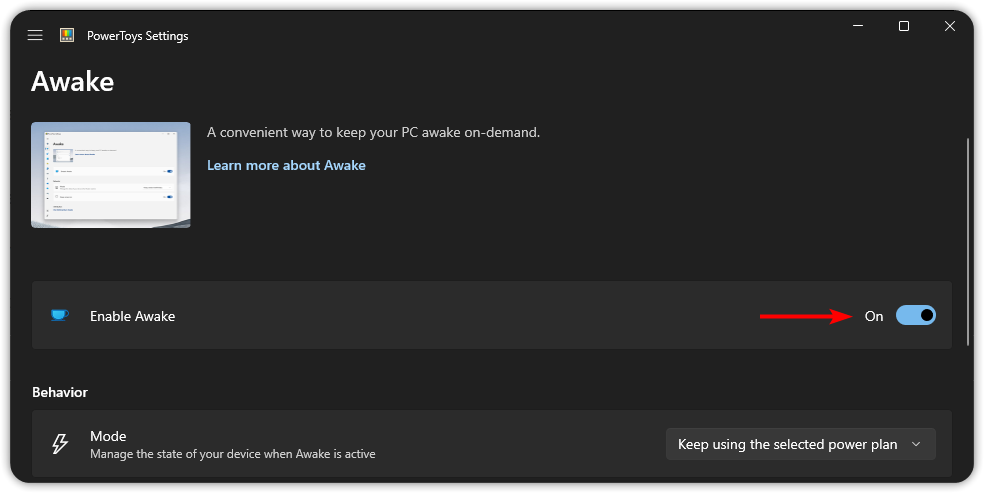

Here, you have 3 options to keep the screen awake:`
awake indefinitely: Keep the system awake until you turn it off.awake for a time interval: Keep the system awake for a defined time. Once the time is over, it will switch back to your system’s power plan instructions.awake until expiration: Keep the system awake till the specific date and time. In simple terms, you can specify the date and time to keep your system awake.
Below the Mode option, you will see a toggle for Keep screen on. When enabled, it will turn the screen on until you disable it:
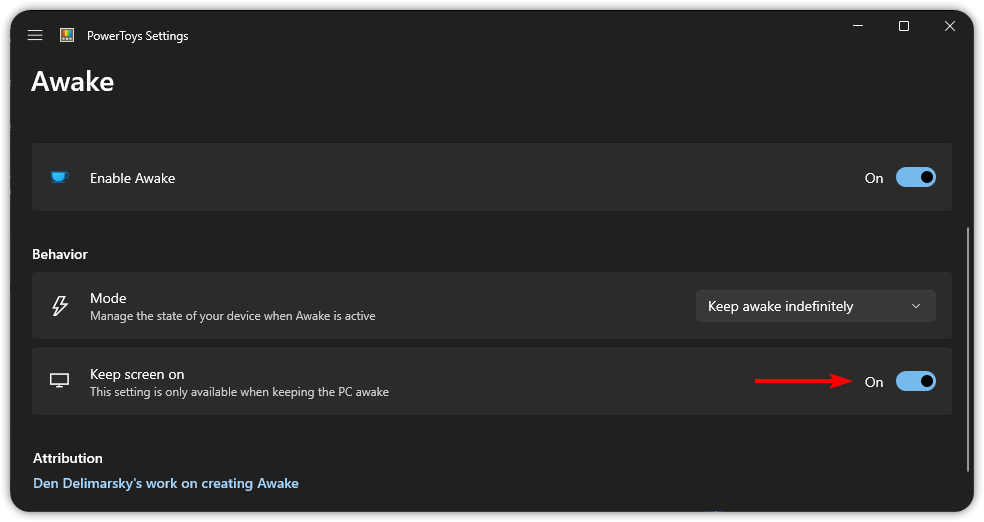

That’s it!
Color Picker
I know what you are thinking. A color picker! Seriously?
But unlike the other color pickers, this works system-wide and has multiple features like the ability to get the color value in multiple formats such as RGB and HEX.
Once enabled, press Win+Shift+C and you will see a color picker activated on the global level.
Now, move your cursor, and you will see it identifying the exact color where the cursor moves:


But it goes one step further by letting you zoom into the picture and select color from pixels of the image itself.
For that, all you have to do is point your cursor to enlarge that part and then scroll your mouse wheel, and it will zoom into the point, letting you select colors with almost precision:


Once you find that color, right-click, and it will share more details of the picked color and will also show colors that are 2 strokes lighter and brighter than the picked one:
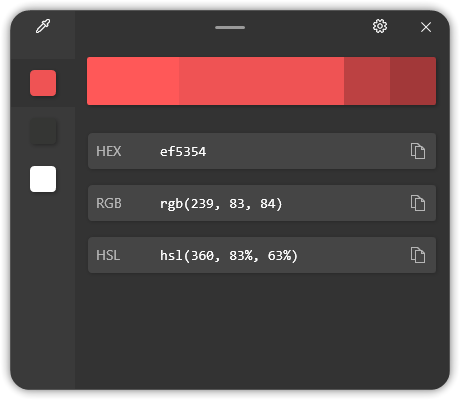

As you can see, it shows color values in HEX, RGB, and HSL formats which can be easily copied to the clipboard for further use.
Crop and Lock
Want to resize the application window to the desired size? Or do you want to create a thumbnail and monitor that area? Crop and Lock will do that for you.
It does only two things but in the most effective way possible:
- Create a thumbnail from the selected area and monitor that selected area (non-interactive)
- Create a window of the desired aspect area by cropping it (interactive).
Let’s explore them one by one.
Create a live thumbnail
The thumbnail you get with this utility is a little different from your general thumbnails, which are nothing but screenshots, and that’s why I call it a live thumbnail.
It provides an active thumbnail by which you can monitor a specific part of that window.
To use this, press Win+Ctrl+Shift+T and select the area to create the thumbnail:
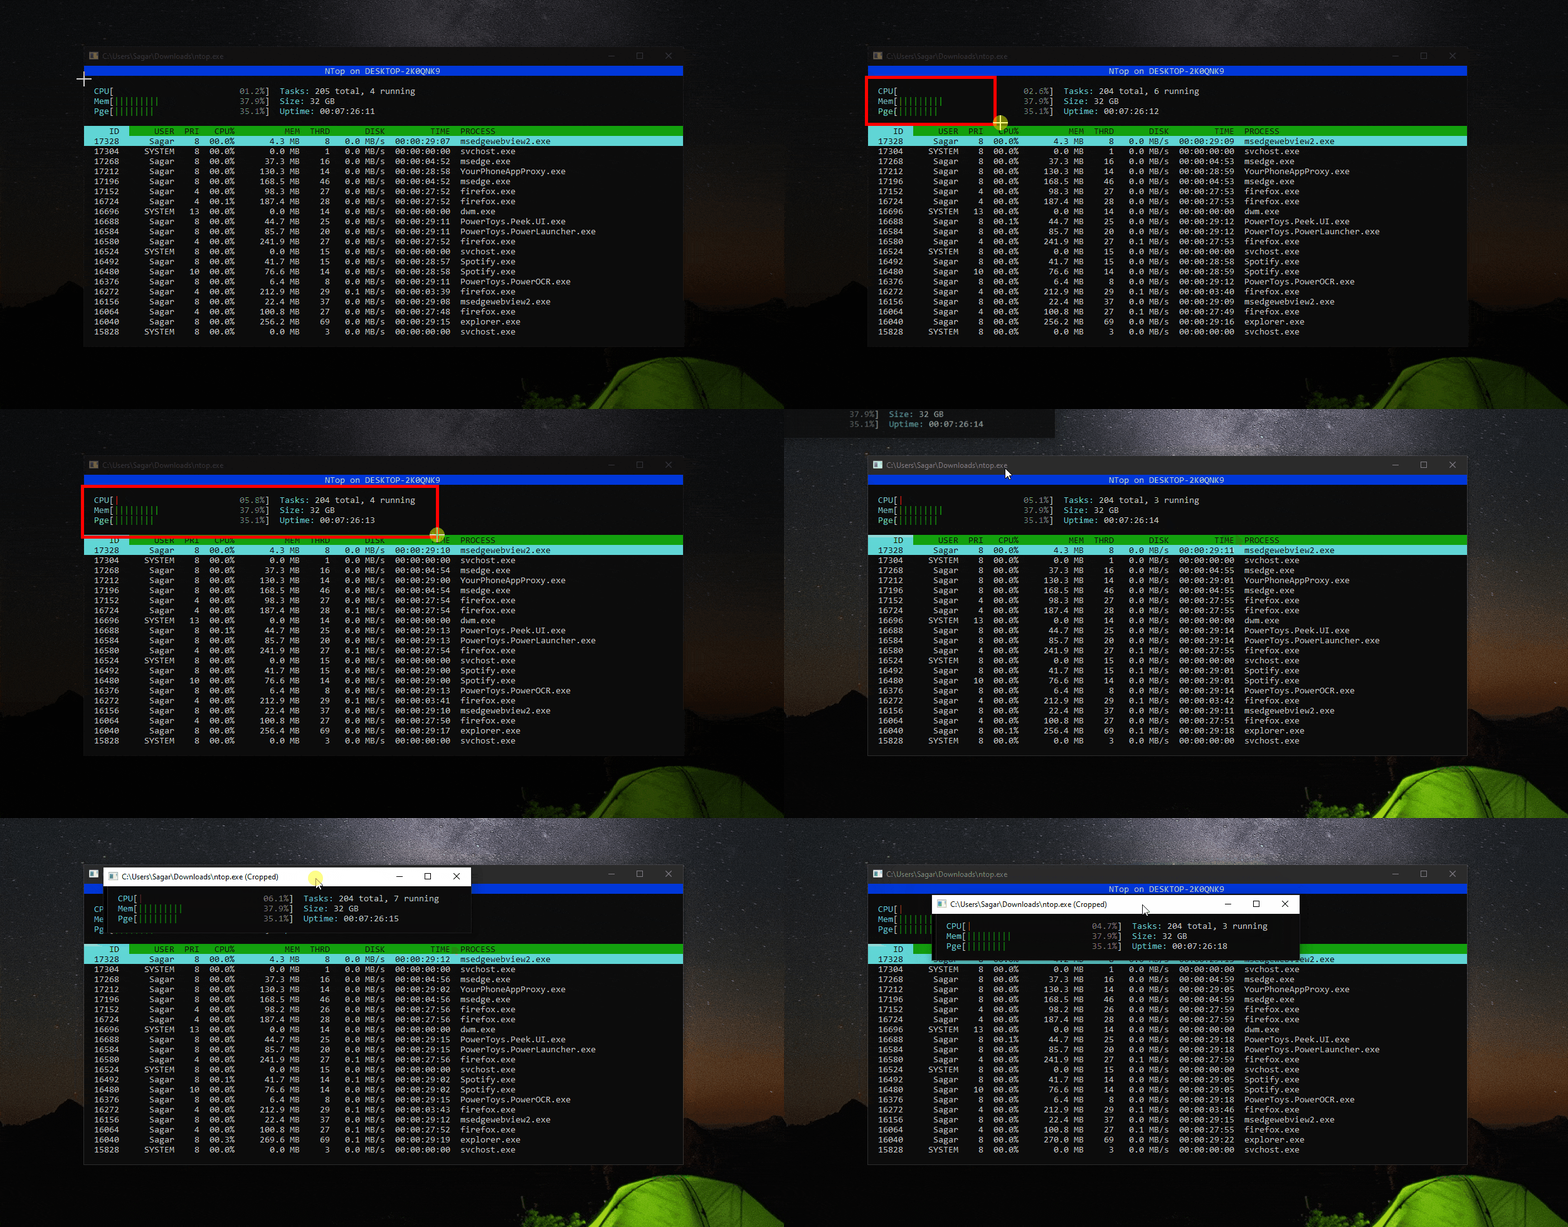

In the above GIF, you can see that I created an active thumbnail of the CPU usage, and it actively shows the CPU consumption.
Pretty helpful. Right?
Create cropped windows
Using this feature, you can create a cropped version of a default window.
I use it for Spotify to create a copped window of a player.
To use this feature, press Win+Ctrl+Shift+R and select the area to create the cropped window. Soon, the entire window will be replaced with the selected area.
For example, here, I created a cropped window of Spotify player control:
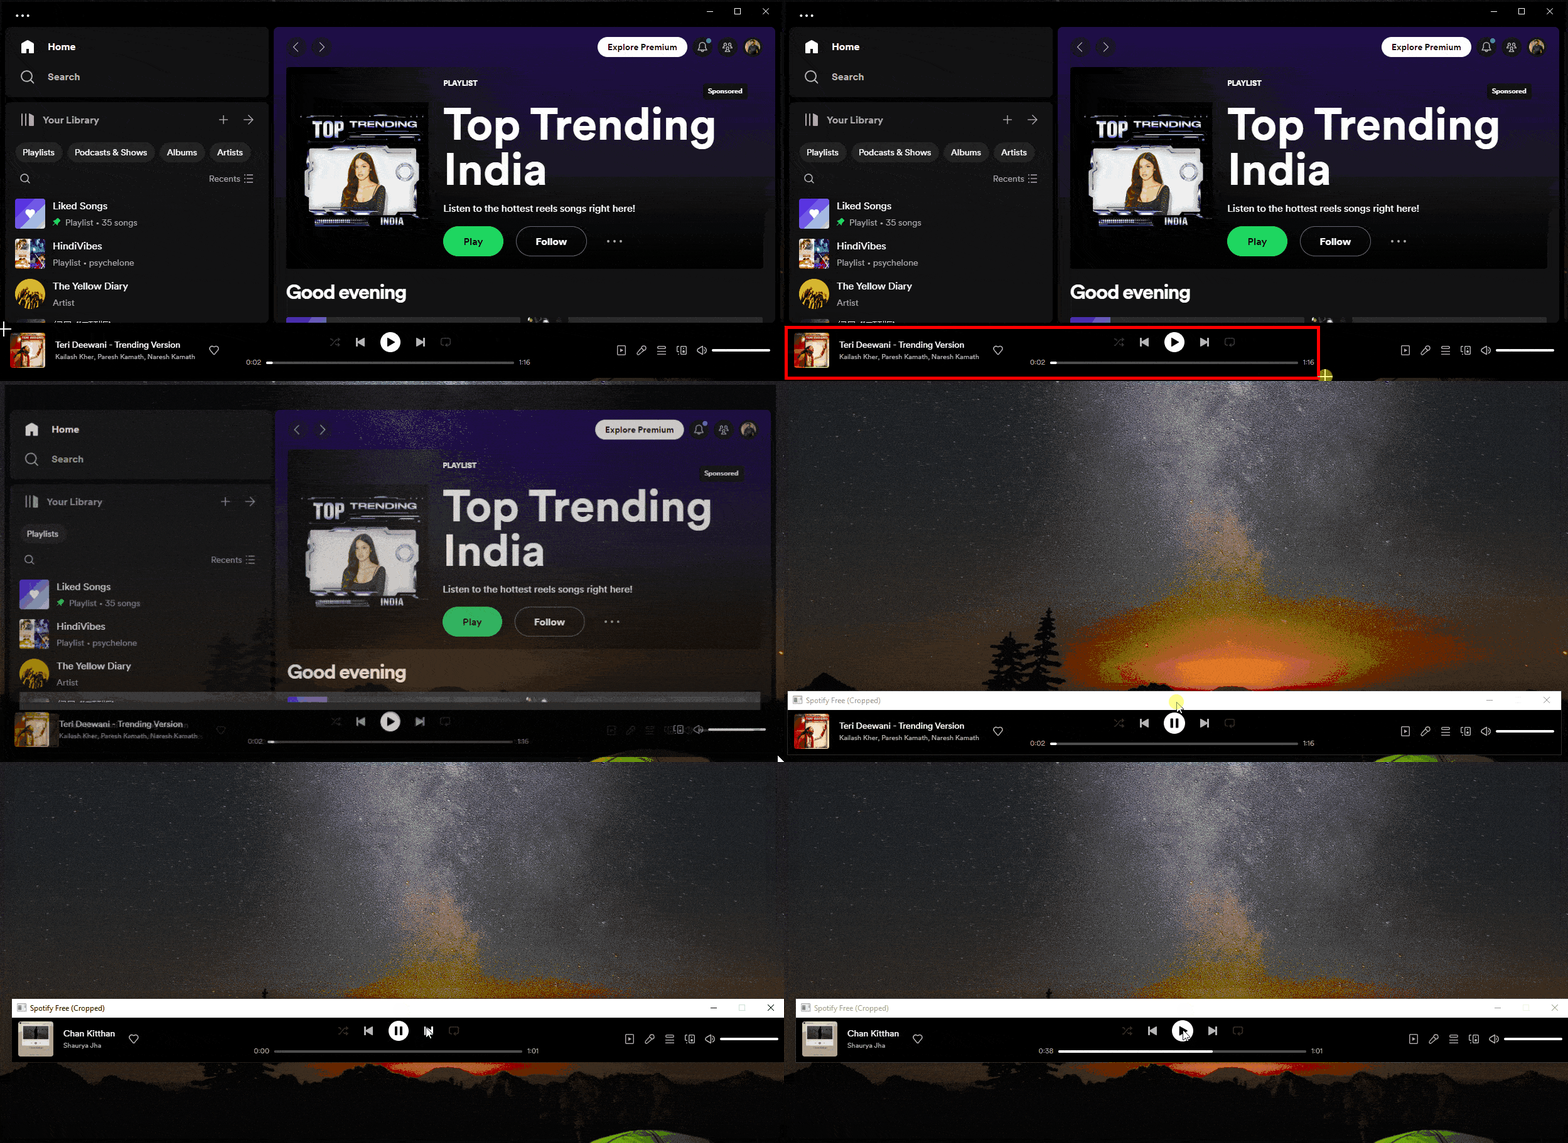

To revert to the previous state, close the window.
Environment Variables
Using this utility, you can create a profile for selective environment variables, and with one click, you can enable them, which will have precedence over User and System variables.
First, launch the Environment Variables from the PowerToys and you will a list of all the environment variables (on the right side) and 2 options showing user and system variables:
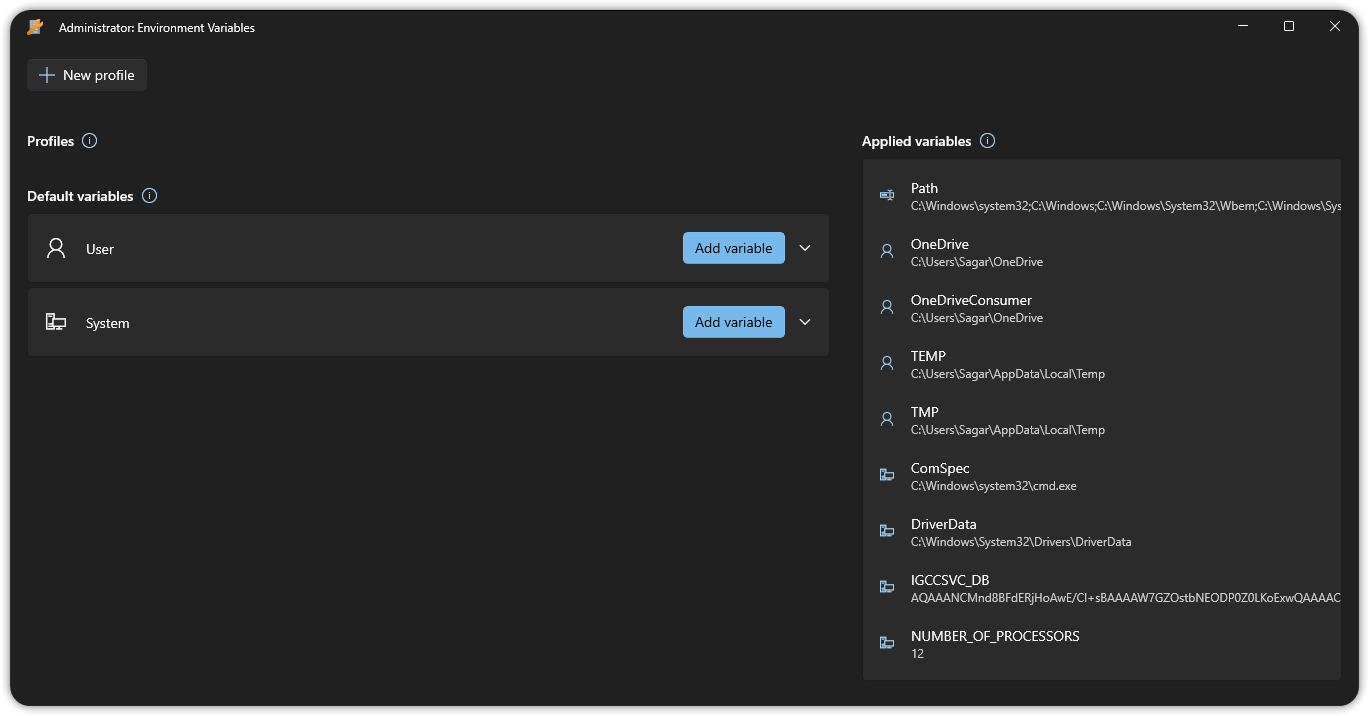

You can add more variables in User and System profiles so I won’t be getting into that but will show you the key highlight of this utility, which lets you add new profiles.
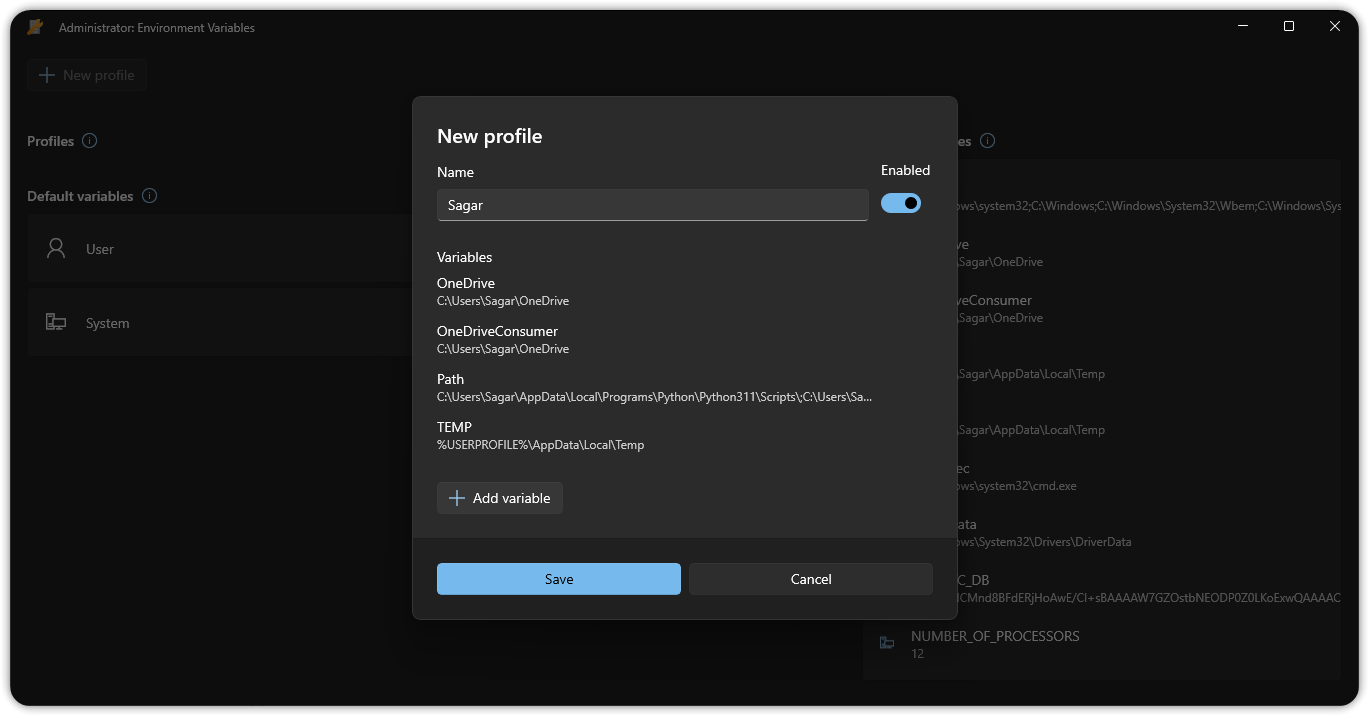
To create a new profile, click on New profile and it will open a prompt where you can add variables, name the profile, and switch to enable that profile instantly:
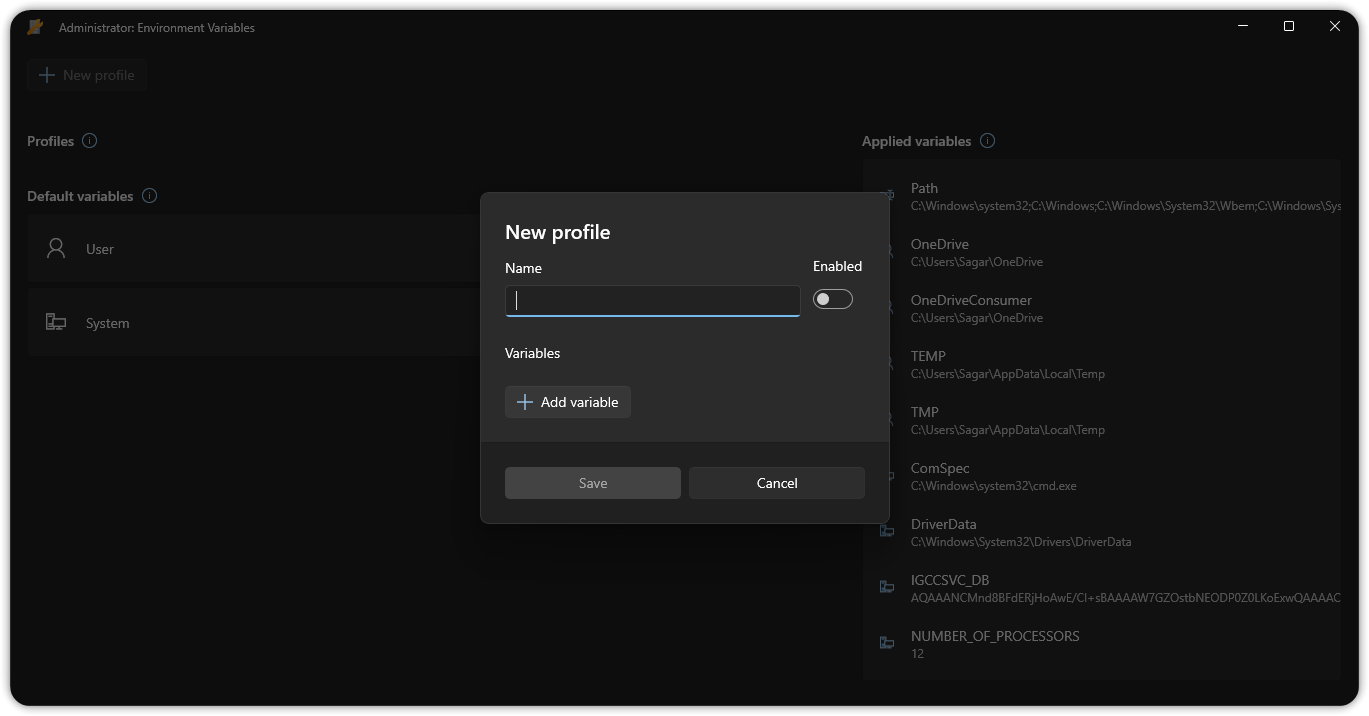

To add variables to the profile, you can either use the existing variable or add new variables.
For example, here, I added 4 existing variables to my new profile:
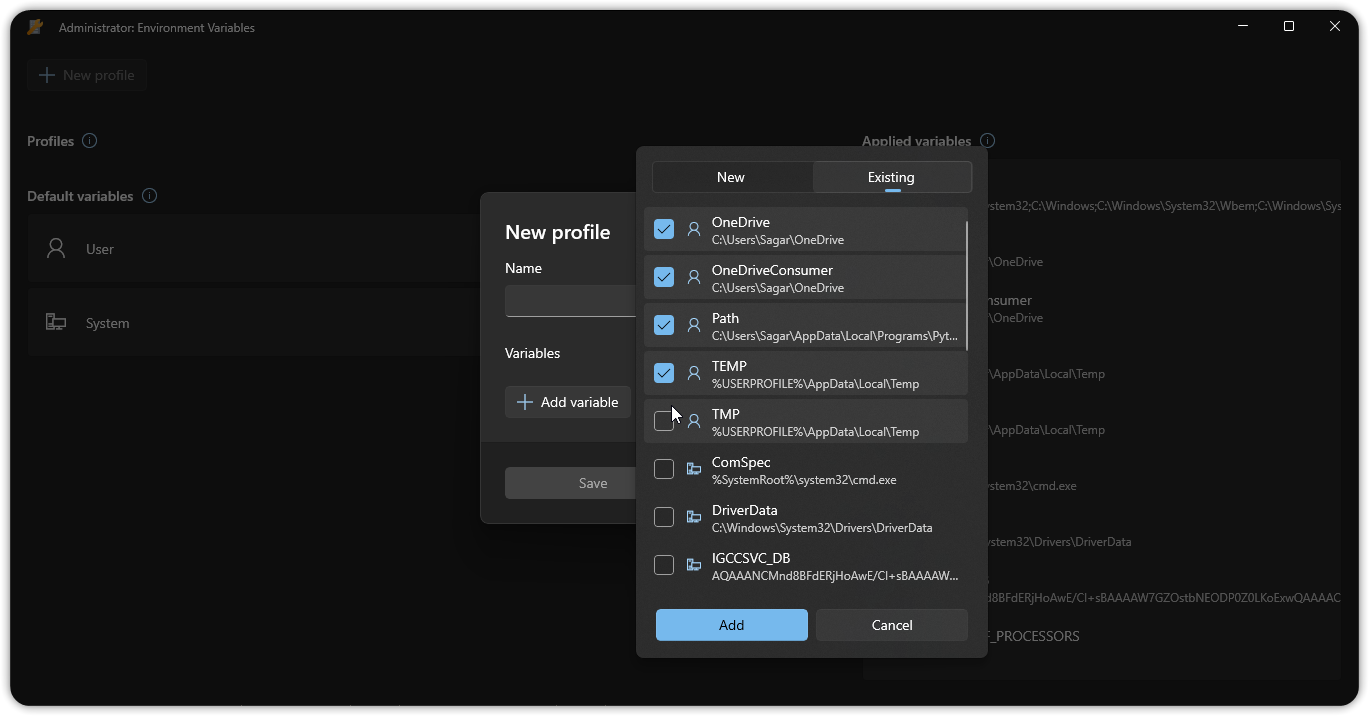

Once you are done selecting them, it will show the chosen environment variable and the option to enable it right away.
I named my profile Sagar and enabled it right away:

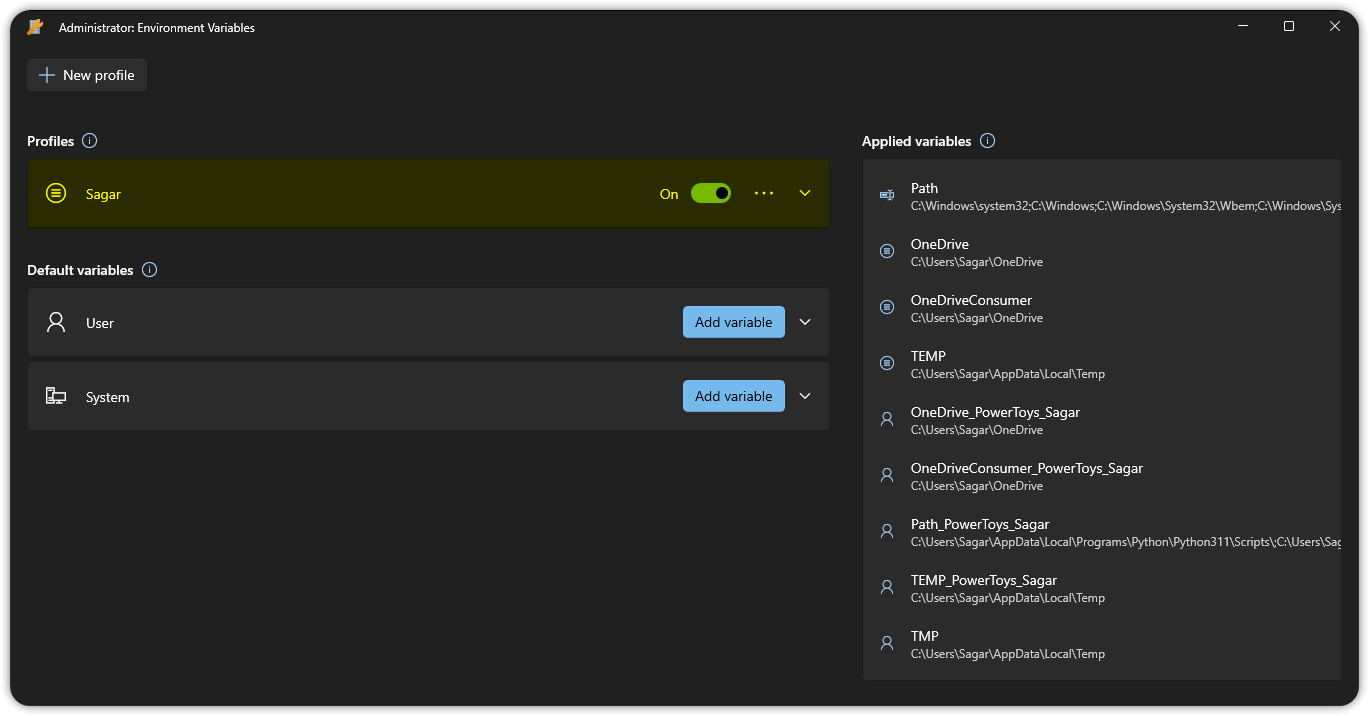
Once you save it, it will be listed in the Profiles section for ease of access:

Pretty helpful. Right?
FancyZones
By far, this is my favorite utility from the entire catalog of PowerToys and there are multiple reasons why.
Using FancyZones, you can arrange your windows in a defined layout, which you can customize by yourself to get the most out of it.
Ever used a window manager on Linux? FanzyZones is pretty close to that.
In this section of FancyZones, I will walk you through two ways you can use this utility:
- Using the default templates
- Create custom templates to suit your advanced workflow
Let’s start with utilizing the default templates.
Use default layout templates in FancyZones
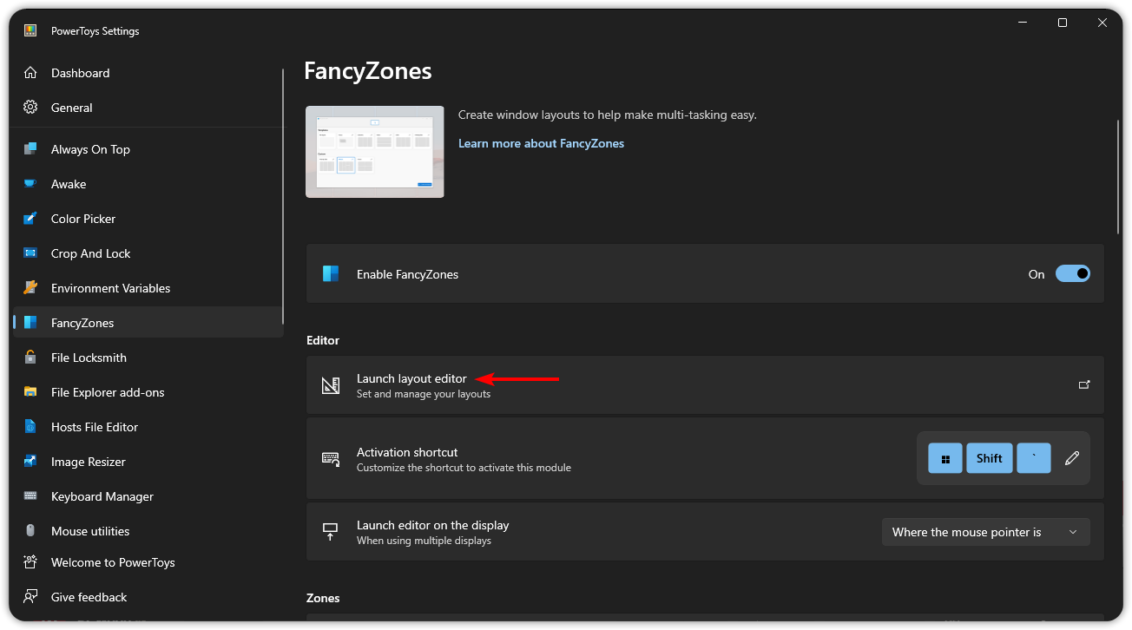
To activate the default layout, first, click on the Lauch layout editor button:

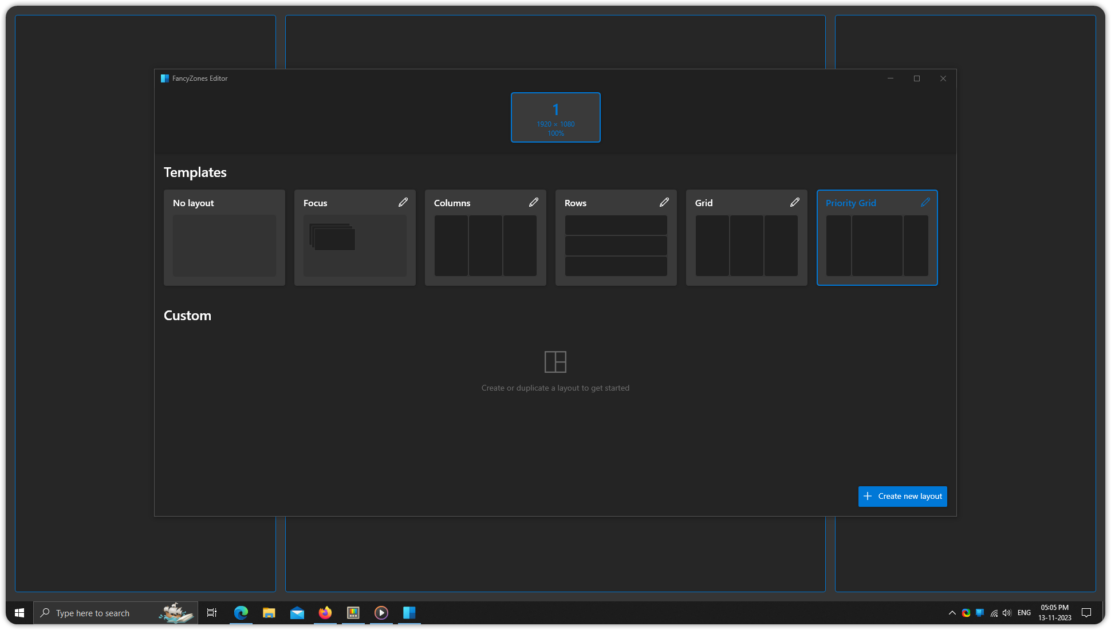
It will show you the available templates. To enable the preferred window arrangement, click on the option and that will do the job.
For example, here, I’ve selected the Priority Grid option, and it shows the preview of the window arrangement in the background (3 rectangles with blue borders):

Once you select the preferred layout, you have to follow three simple steps to arrange windows in the selected layout:
- Drag the window by pressing the left button and then press the
Shiftkey. - Move your window where you want it to be located.
- Release the left mouse key and then the Shift key.
Sounds complex? Here’s how you use those 3 steps:


Create custom templates
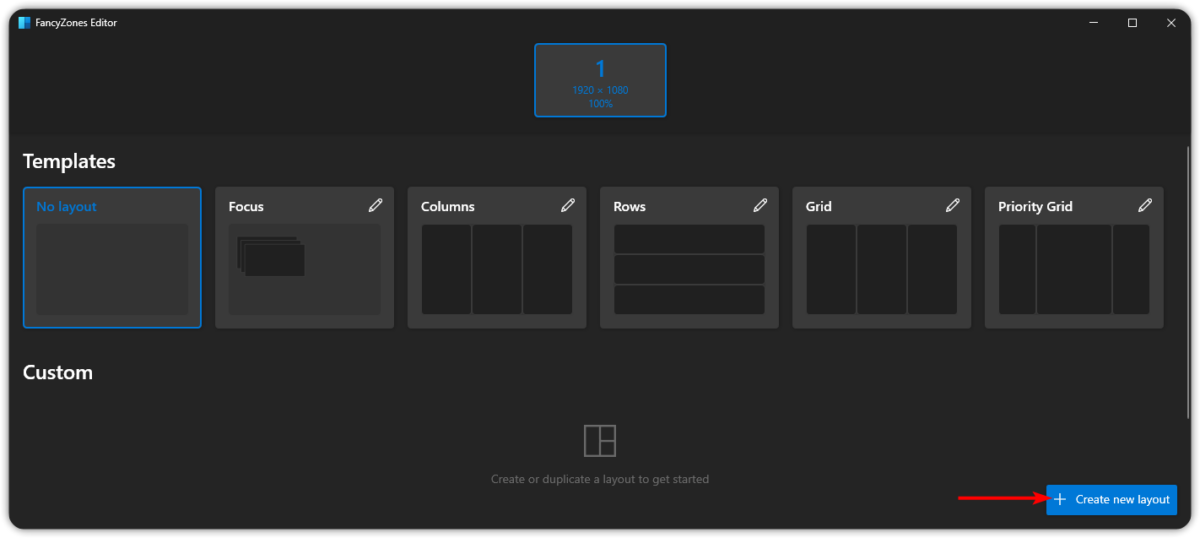
If you have a wide monitor and the default layout is not doing much justice, then you can create a custom template by clicking on the Create new layout button:

It will ask you to choose between two options: Grid and Canvas:
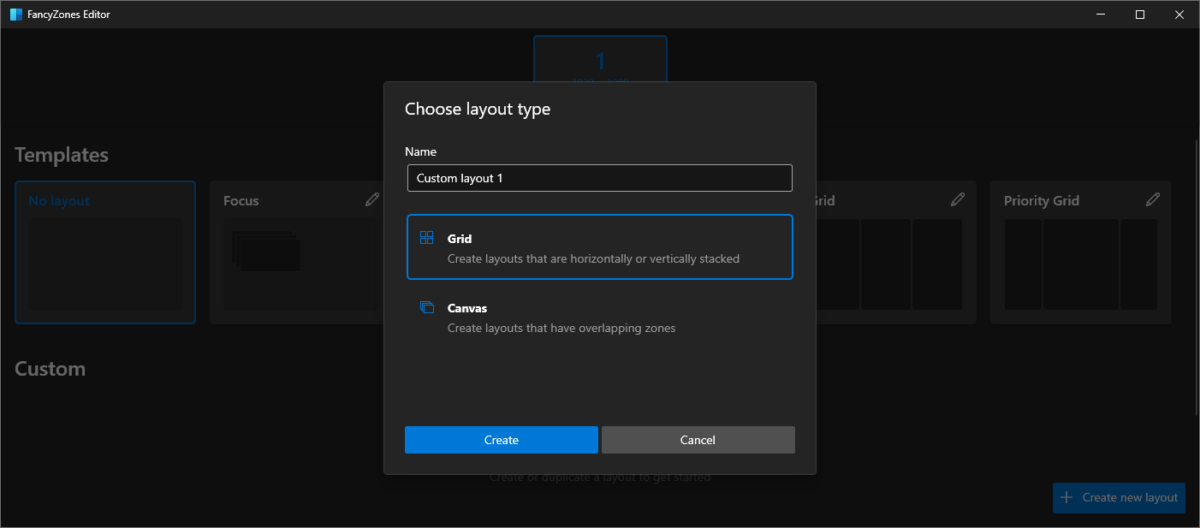

- Grid: This lets you divide the display into multiple parts and lets you take advantage of the maximum screen area.
- Canvas: It allows you to create floating windows. Sure, it won’t let you take advantage of the full display area but you get better control.
In this section, I will show you the set of the custom Grid layout. So first, choose the Grid option and there you can use your mouse cursor to divide the panes horizontally and vertically as shown here:
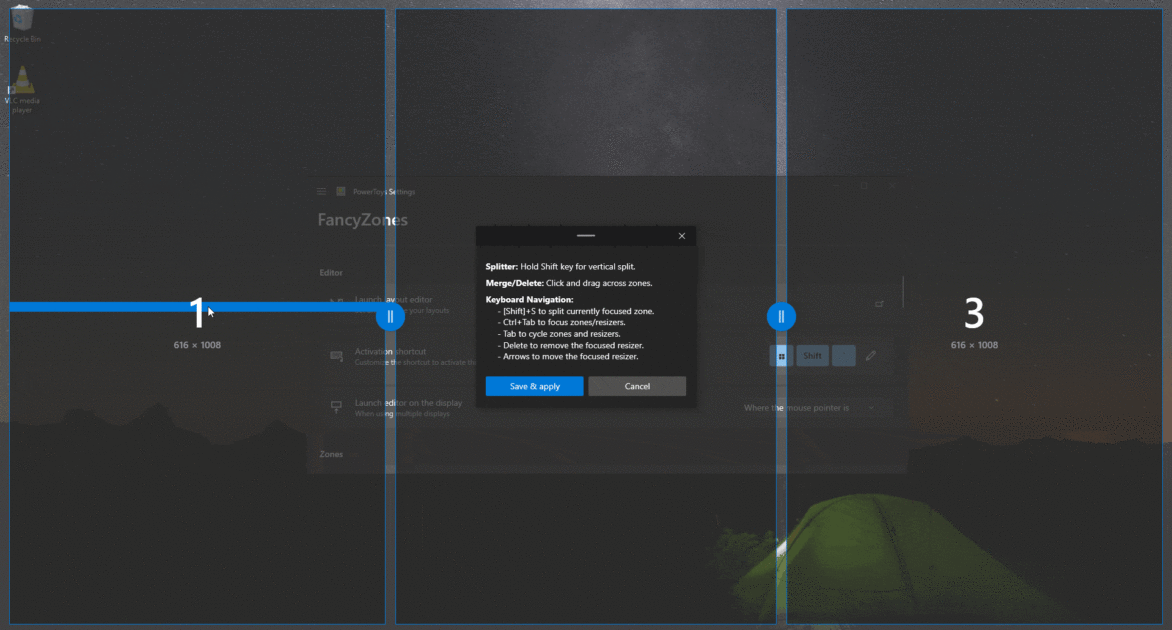

Once configured as per needs, hit the Save & apply button and now you can use this layout.
File Locksmith
There are times when you try to use an important file, but it is being utilized by another program, which is why you can’t access or make any changes to it.
But the question is how you find which program is utilizing that file. Well, File Locksmith does exactly that.
To use this utility, open your file manager and navigate to the target file. Now, select the file and press Shift + Right Click and you’ll see an option labeled What's using this file?:
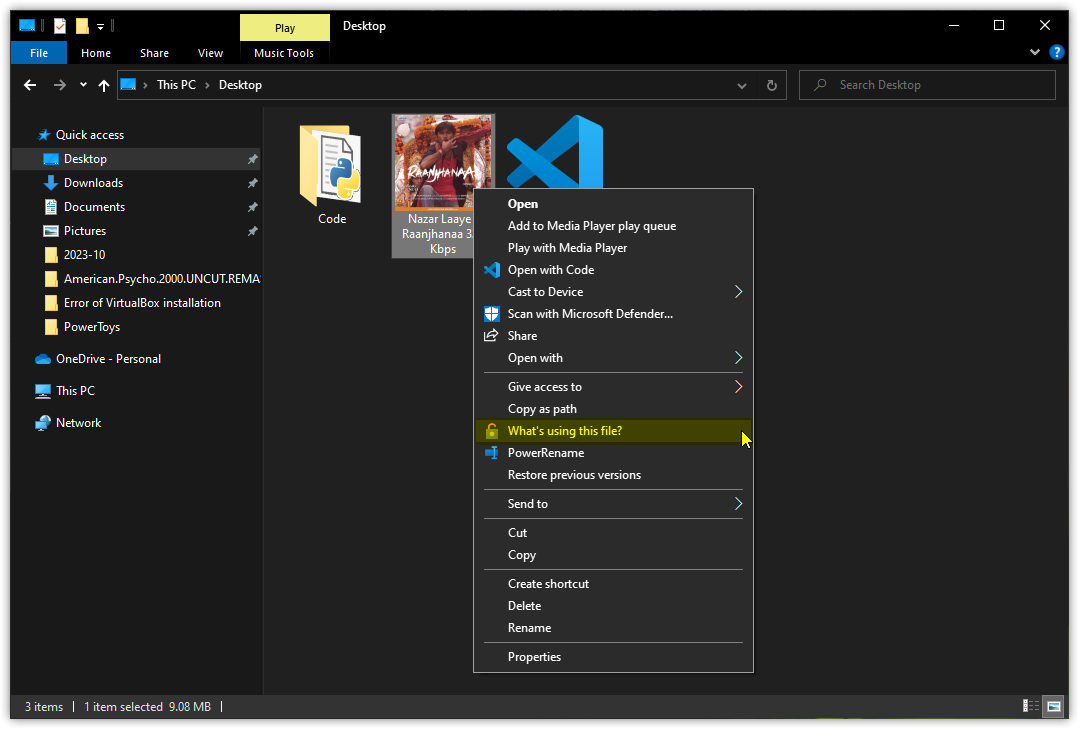

It will scan for programs using the specified file.
In my case, it was a music file being used by Windows Media Player and showed the following results:
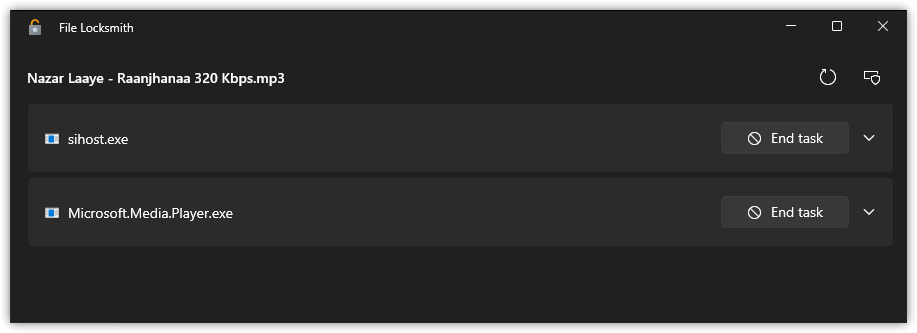

From here, you can end the task (by pressing the End task button) or know the PID of the process that held the file.
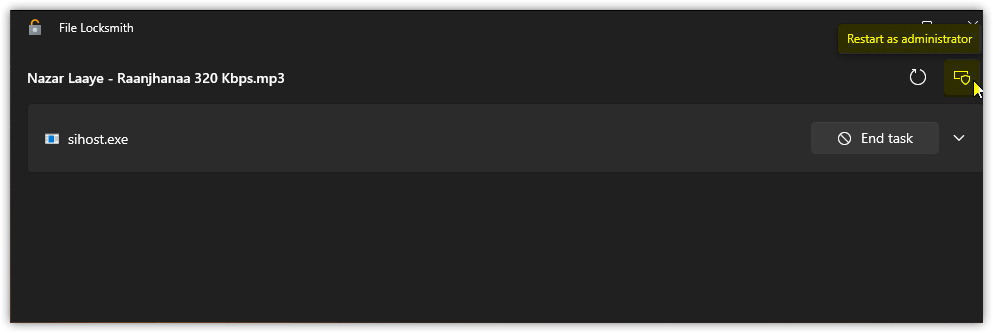
But if the file is held by another user, then it won’t be able to find out which program is holding that file and in that case, press the Restart as administrator button:

File Explorer add-ons utility
The file explorer add-on utility lets you preview your files in the file manager side panel and the thumbnail. Want to know how? There are two utilities for that purpose:
- Preview pane
- Thumbnail icon preview
So in this section, I will show you how you can access them one by one.
Using preview pane
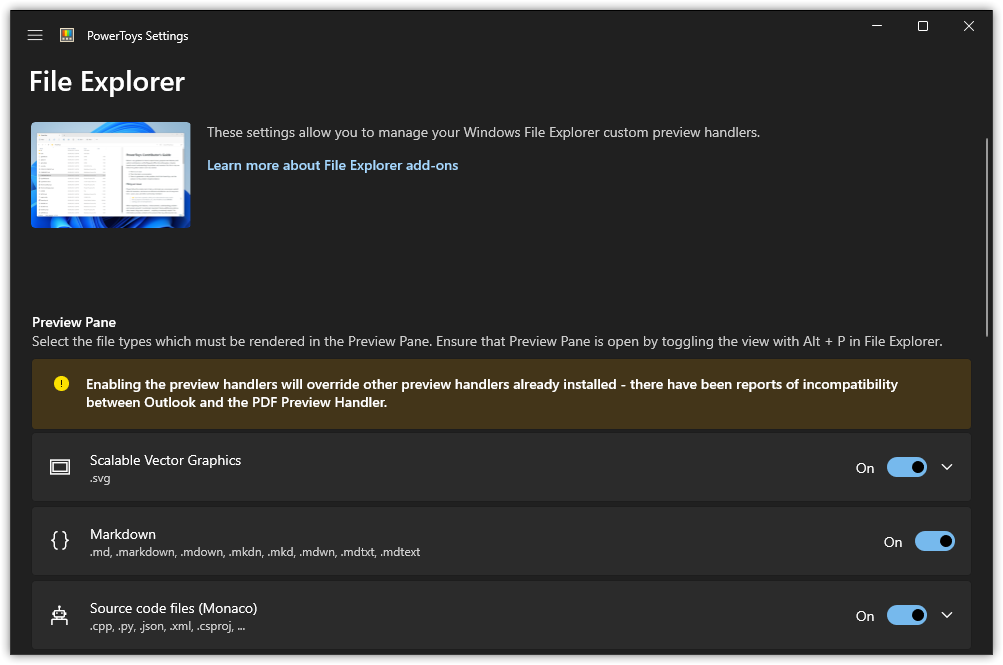
The first step is to enable preview for the preferred file types to show their preview:

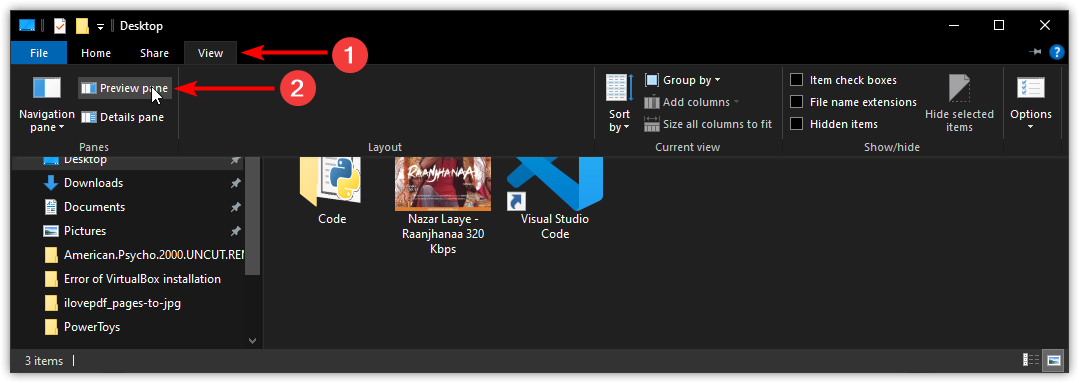
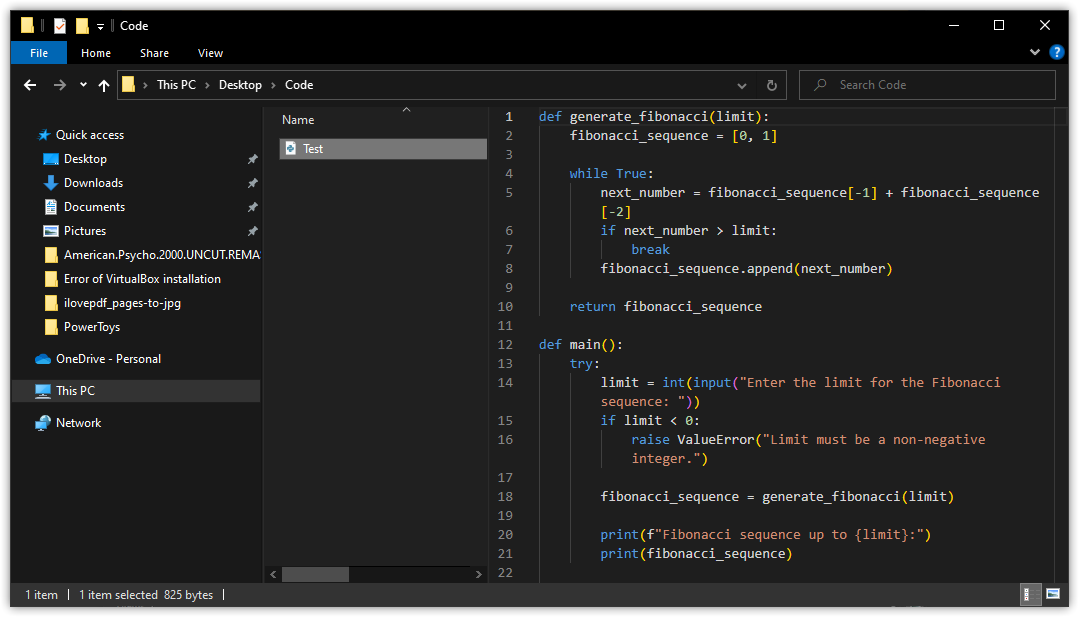
Now, open the file manager and go to view and choose Preview pane:

That’s it! From now on, it will show the preview of a selected field in the side panel. For example, here’s what a code preview looks like:

Using the thumbnail icon preview
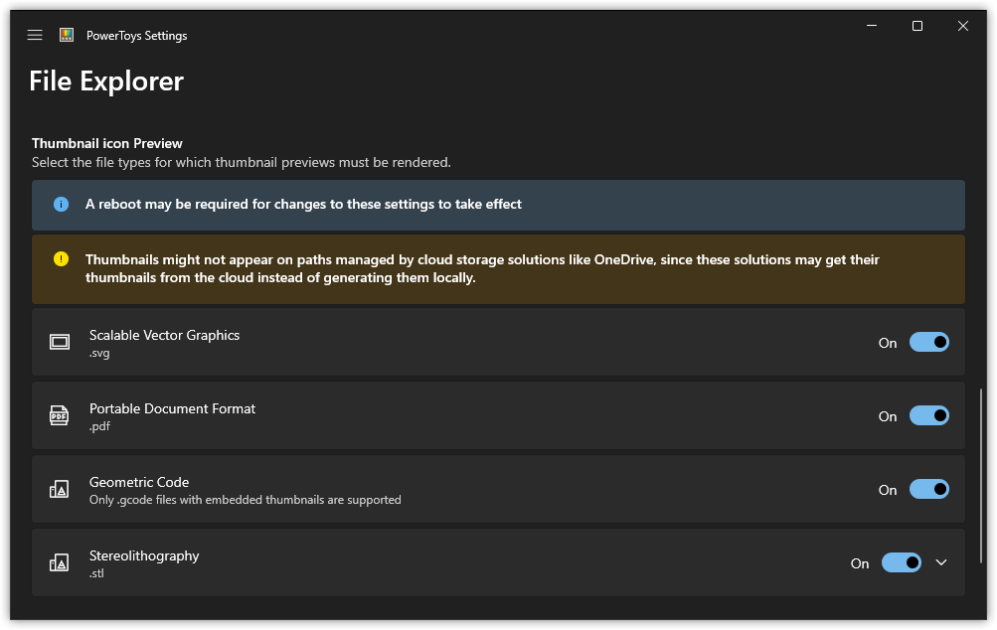
Unlike the previous option, there’s not much configuration needed. All you have to do is choose what file types need to be enabled for this feature from the menu:

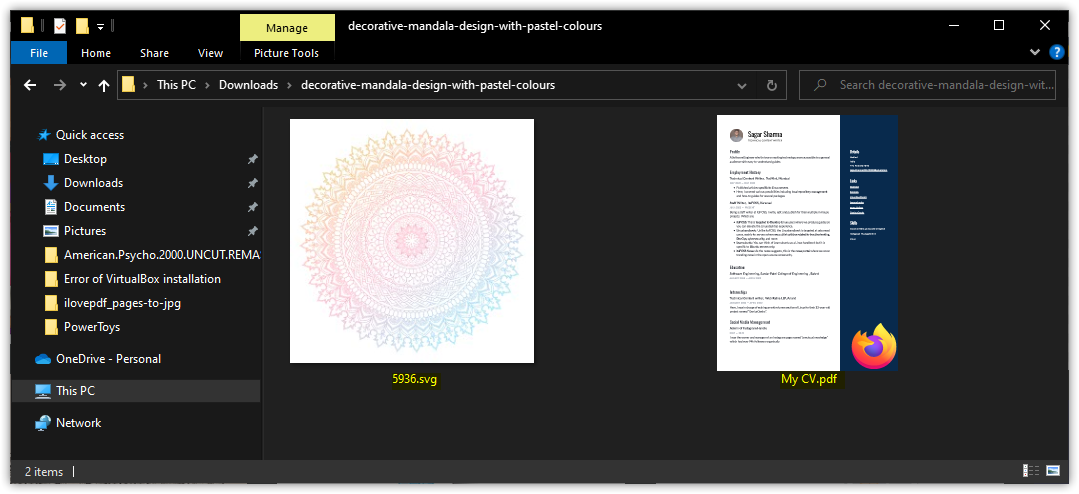
Once done, it starts showing the preview of the file in the icon itself (for the selected file types):

There you have it!
Hosts File Editor
The Hosts File Editor lets you modify the host file in the most convenient way possible.
First, enable the Hosts File Editor from PowerToys and make sure the Launch as administrator is enabled:
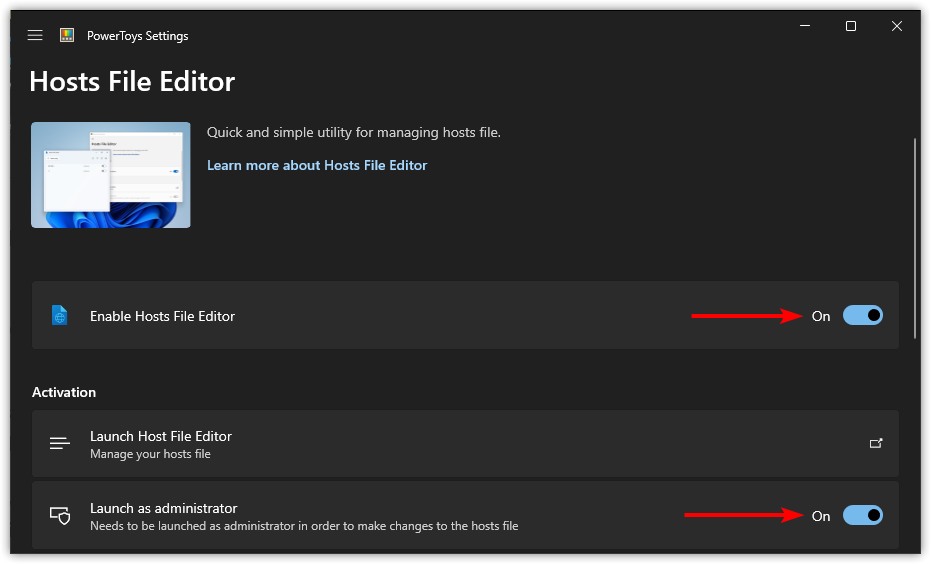

Now launch the Hosts File Editor from where you can enable/disable existing rules and create one to match your needs:
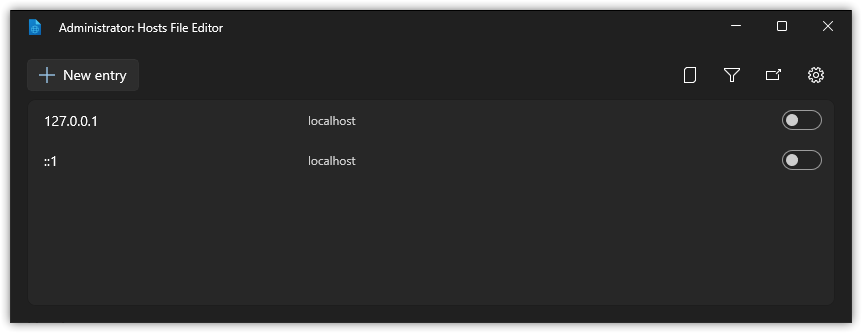

Image Resizer
Image Resizer is the easiest way to resize one or more images.
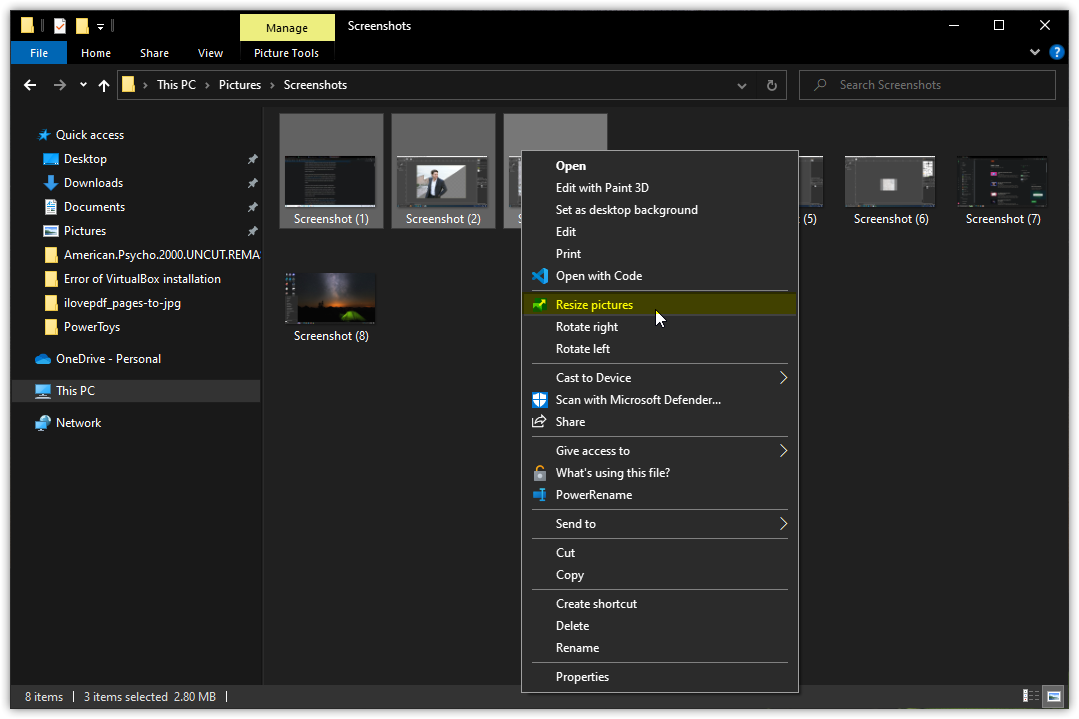
First, open the file manager and one or more images that need to be resized. Once selected, right-click and choose the Resize pictures option:

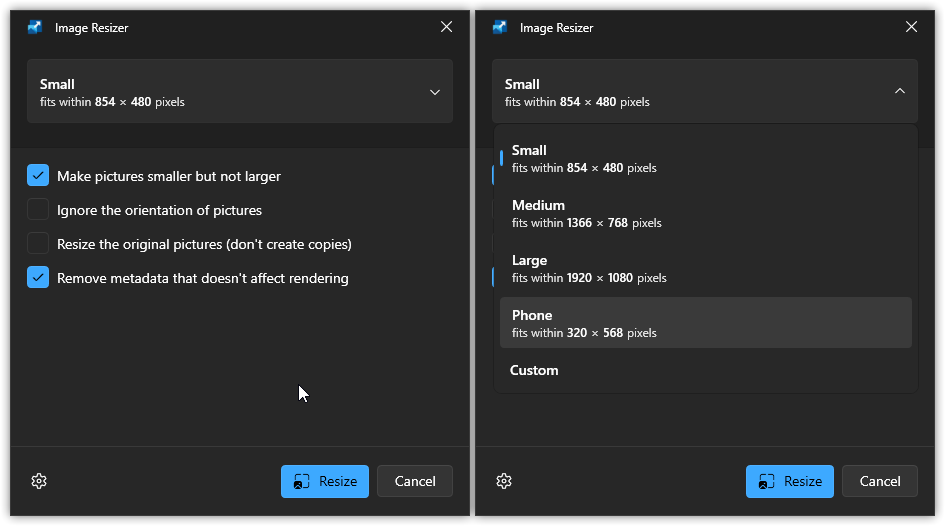
Once selected, it will show the available options to resize the selected options such as small, medium, and large. There are other options as well, such as an option to remove metadata:

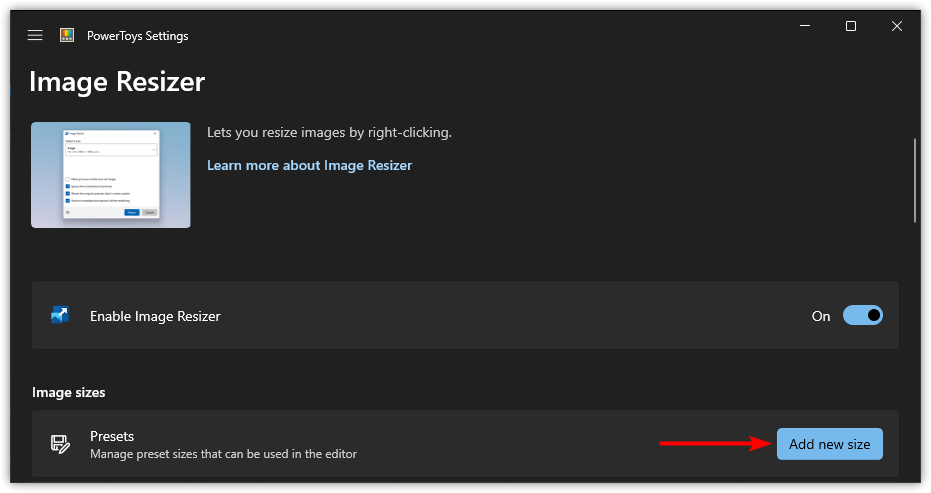
But what if you want to define custom presets? You can do that too. For that, head over to the Image Resizer section of PowerToys and click on Add new size button:

It will create a new preset at the end. Now, click on the Edit button, and there you will see different options.
While others are self-explanatory, there are 3 options under the Fit menu: Fill, Fit, and Stretch:


So let’s take a look at what they mean:
- Fill: Fill the entire image with the specified ratio, and crop the image if needed.
- Fit: Fit the image within the given dimensions, and it does not crop the image.
- Stretch: It will try to fill the entire image in the given dimensions, and sometimes, it may stretch the image, and it may look disproportioned.
(if you can’t decide what to choose, then go with the default one.)
Keyboard Manager
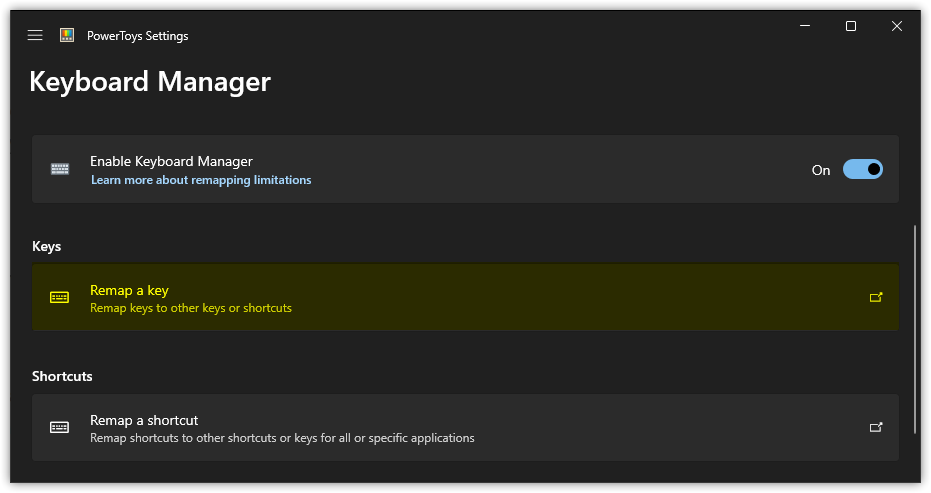
Using Keyboard Manager, you can remap the keys of your keyboard or remap the default shortcuts then this utility will do that for you. It provides you with 2 configuration options:
- Remap a key
- Remap a shortcut
So let’s discuss them one by one.
Remapping keys
Remapping of keys refers to changing the output of a keystroke by another key.
The first step is to open the key remapper from the Keyboard manager:

Now to replace the key, first press the + (plus) button and then click on the Select key:


It will open a prompt to enter the key that needs to be remapped. For example, here, I entered the S key:
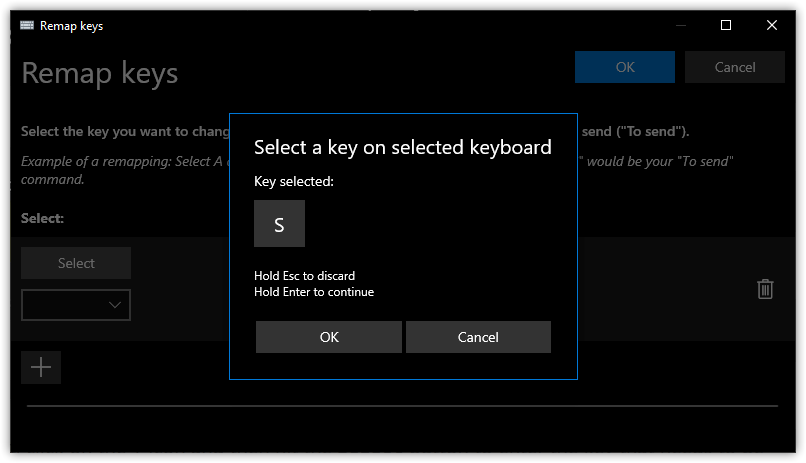

Once done, hit the OK button to confirm the target key,
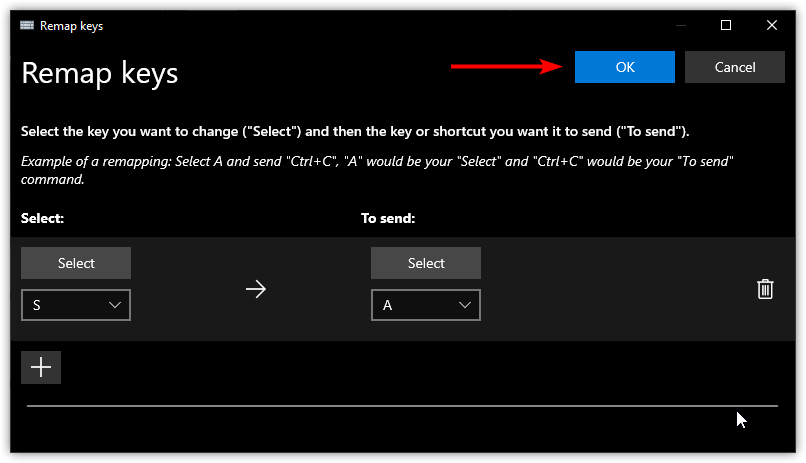
Repeat the same steps for the remapped key (labeled as To send). I went with the A keystroke. Once done, hit OK to confirm the key remapping:

Remapping of shortcuts
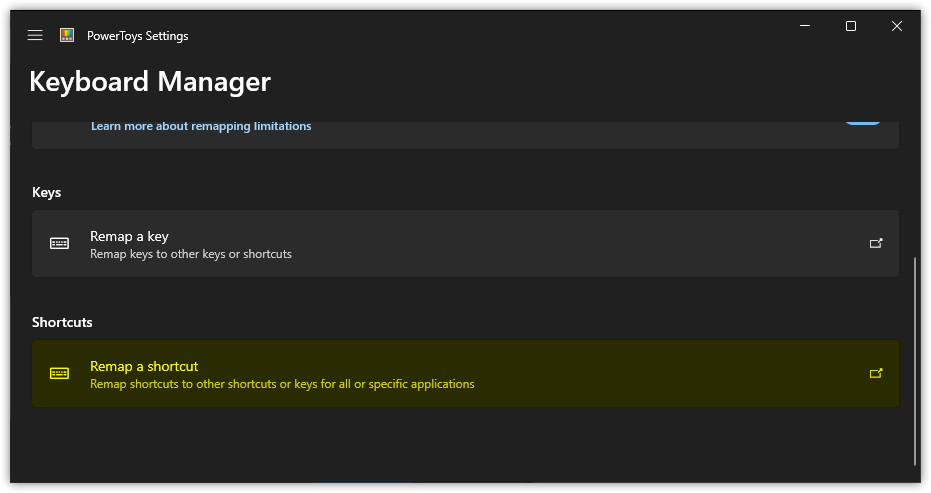
First, click on the Remap a shortcut option from the Remap Keys menu to get the prompt for remapping shortcuts:

It will land you on the prompt to remap shortcuts (obviously). Now, press the + (plus) key and hit the Select button:


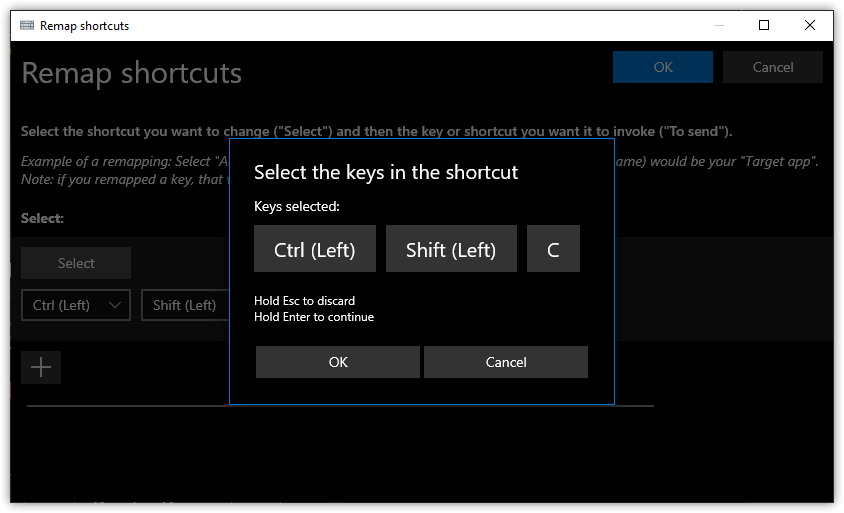
Now, press the shortcut that you want to remap (I’m going with Ctrl + Shift + C):

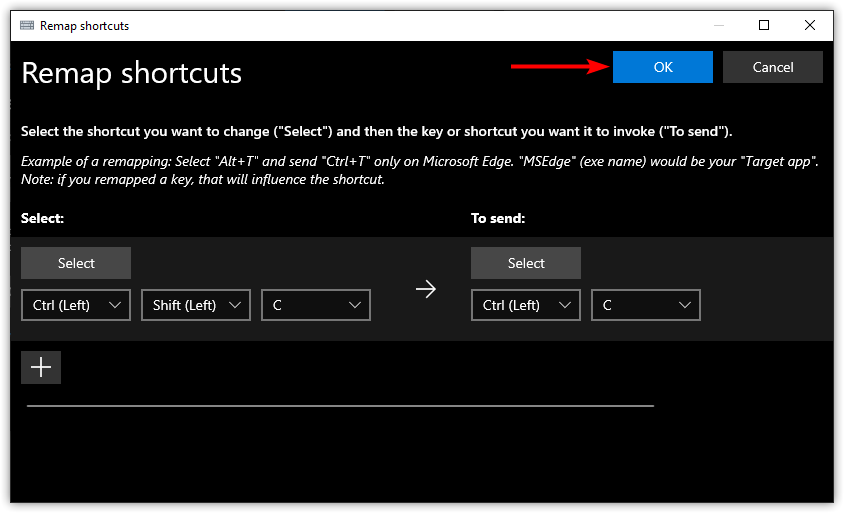
Repeat the same steps for the target shortcut. Here, I went with Ctrl + C and once done, press the OK button to finalize changes:

That’s it!
Mouse Utilities
We all use mouse for interacting with our computers, and as the name suggests, this is a set of mouse utilities that are meant to improve how you interact with the mouse.
While writing, there are 4 such tools you get in this set of utilities:
Using Find My Mouse
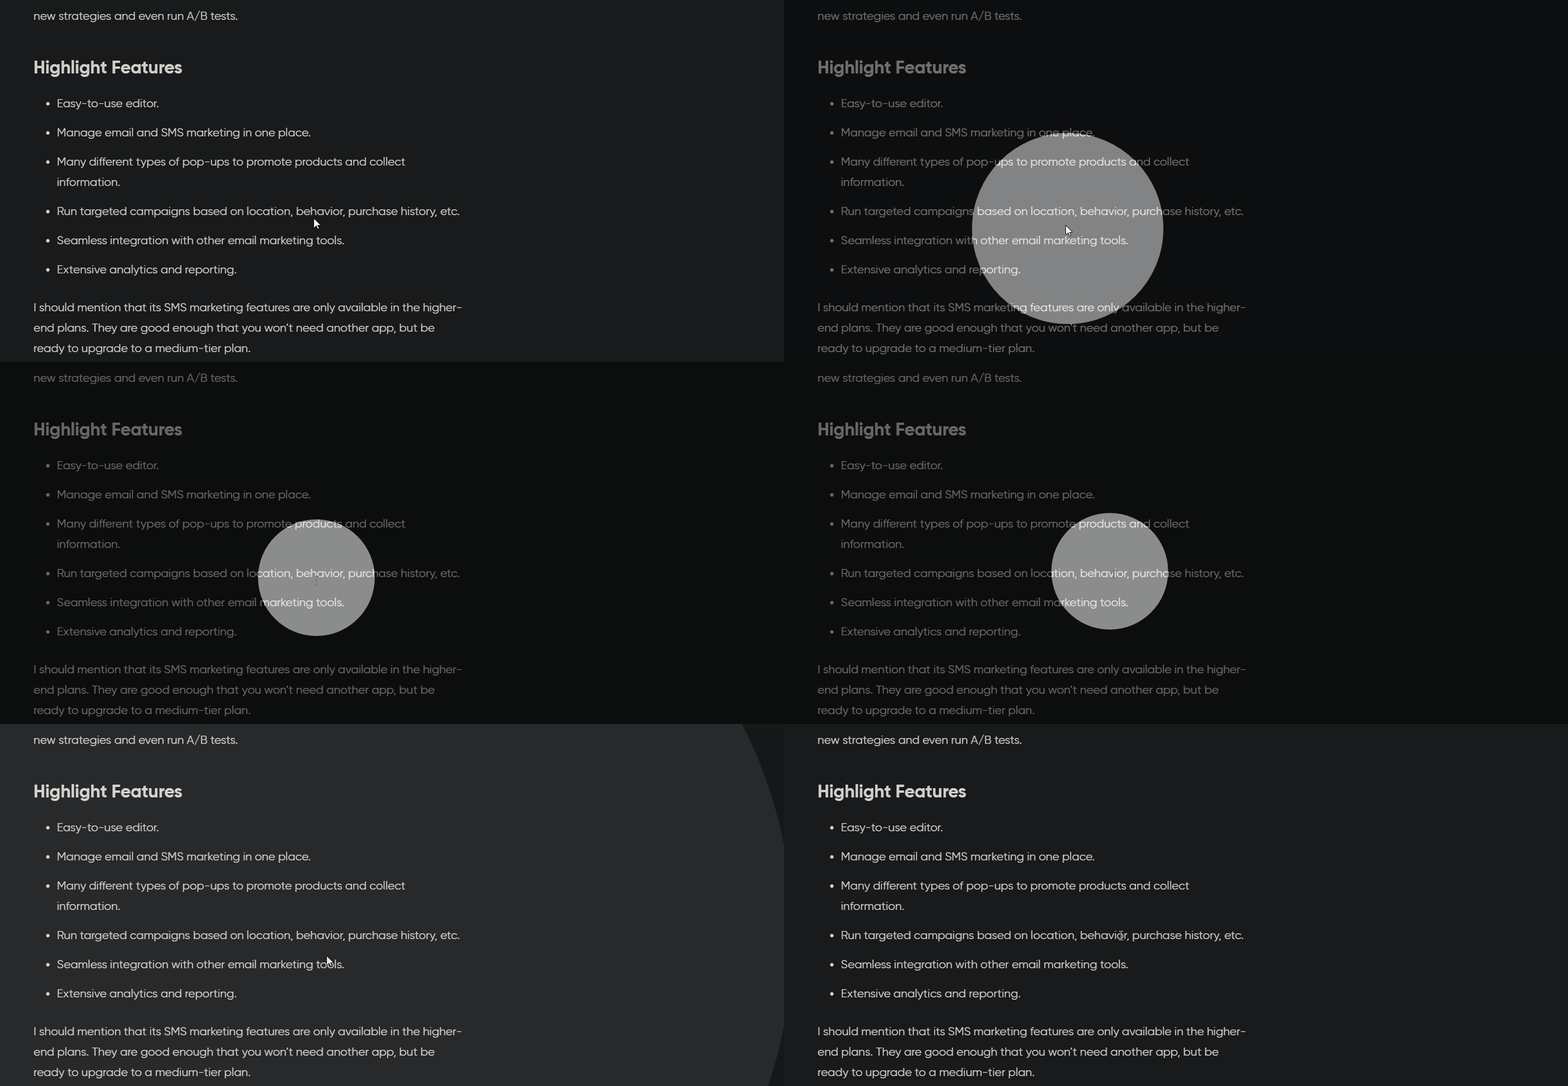
If you’ve ever used Mac, there’s one feature that is quite helpful. When you shake your mouse, it will enlarge the cursor on the display to find where it is.
But this time, you get a better alternative that can be used by pressing the Left Ctrl button twice and once done, it will look like this:

Using mouse highlighter
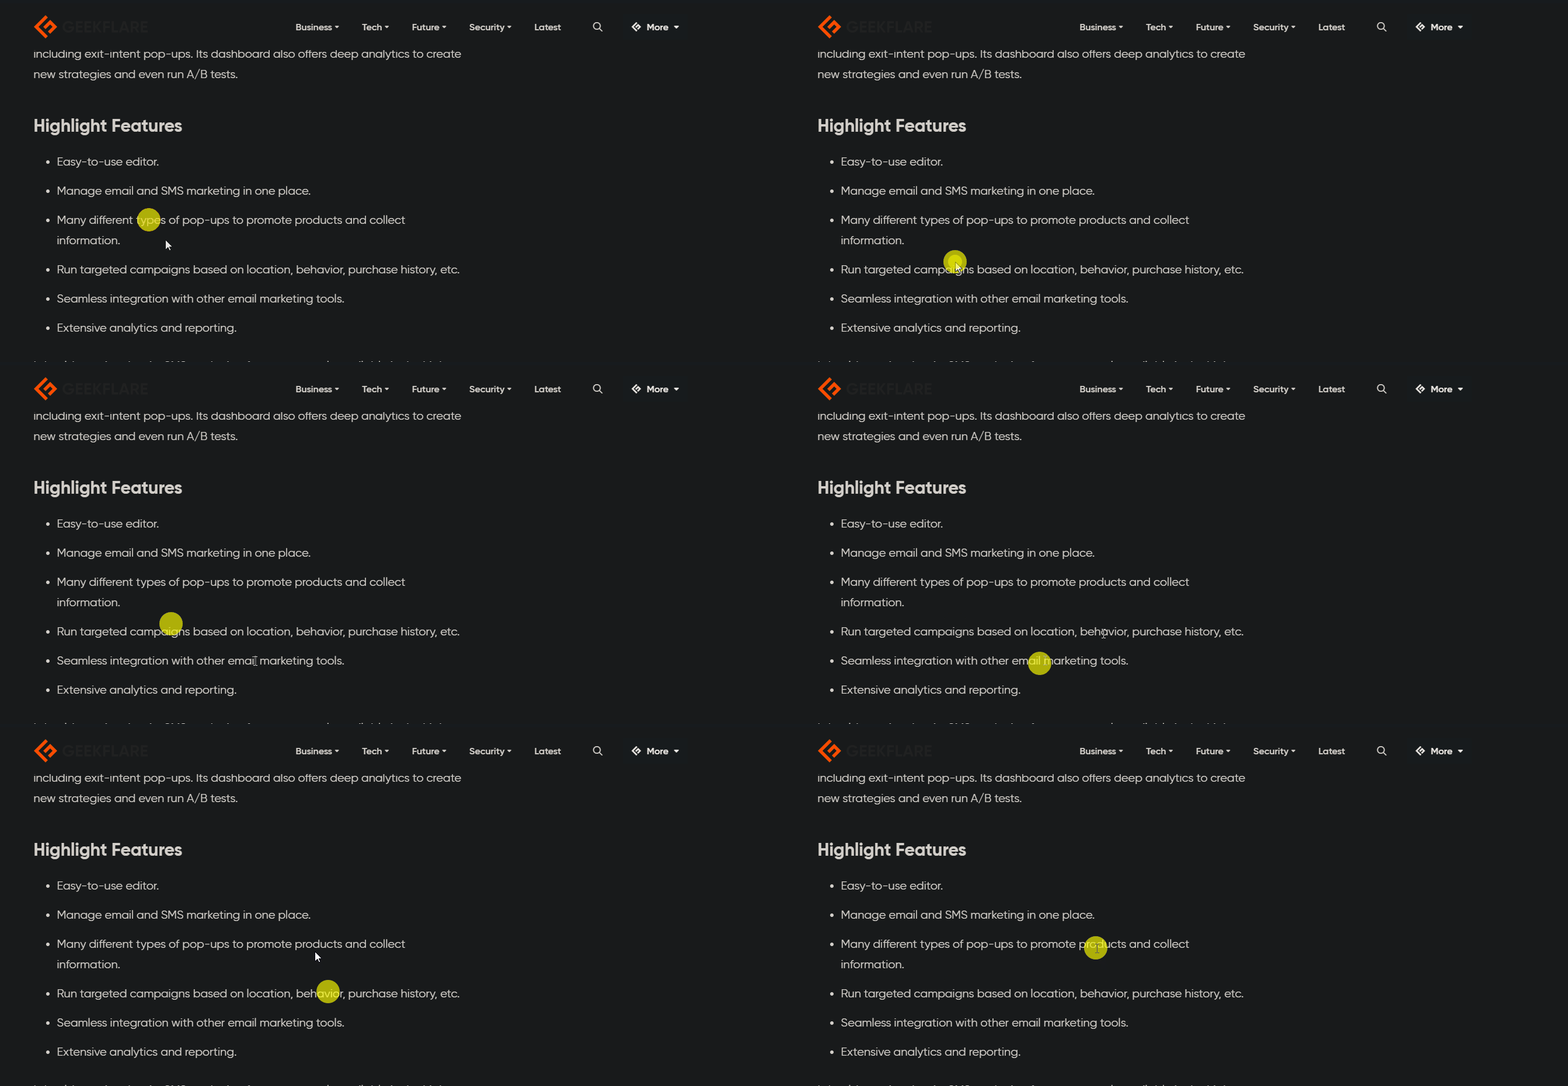
The mouse highlighter is used to highlight the area where you clicked, which is quite helpful while recording a tutorial on your machine.
To use it, press Win + Shift + H and do the same to disable it. Now, let me show you how it will work:

Using Mouse jump
Suppose you have a 32-inch monitor, and you want to reach the end of the display. It will take a large scroll of mouse which is not ideal whether you are dealing with a shortage of space or you’re into the “productivity” thing.
To get the most out of this utility, change the thumbnail size to 1080 x 1080:


The mouse jump will represent a mini version of your display where racing to the extreme ends is much easier and faster and once you press the left or right key, it will return the default view with your cursor placed at the end of the screen (if you want to):


Using the mouse pointer crosshairs
This is a simple crosshairs utility that is often used for precision and focus. To use this, all you have to do is press Win + Alt + P:
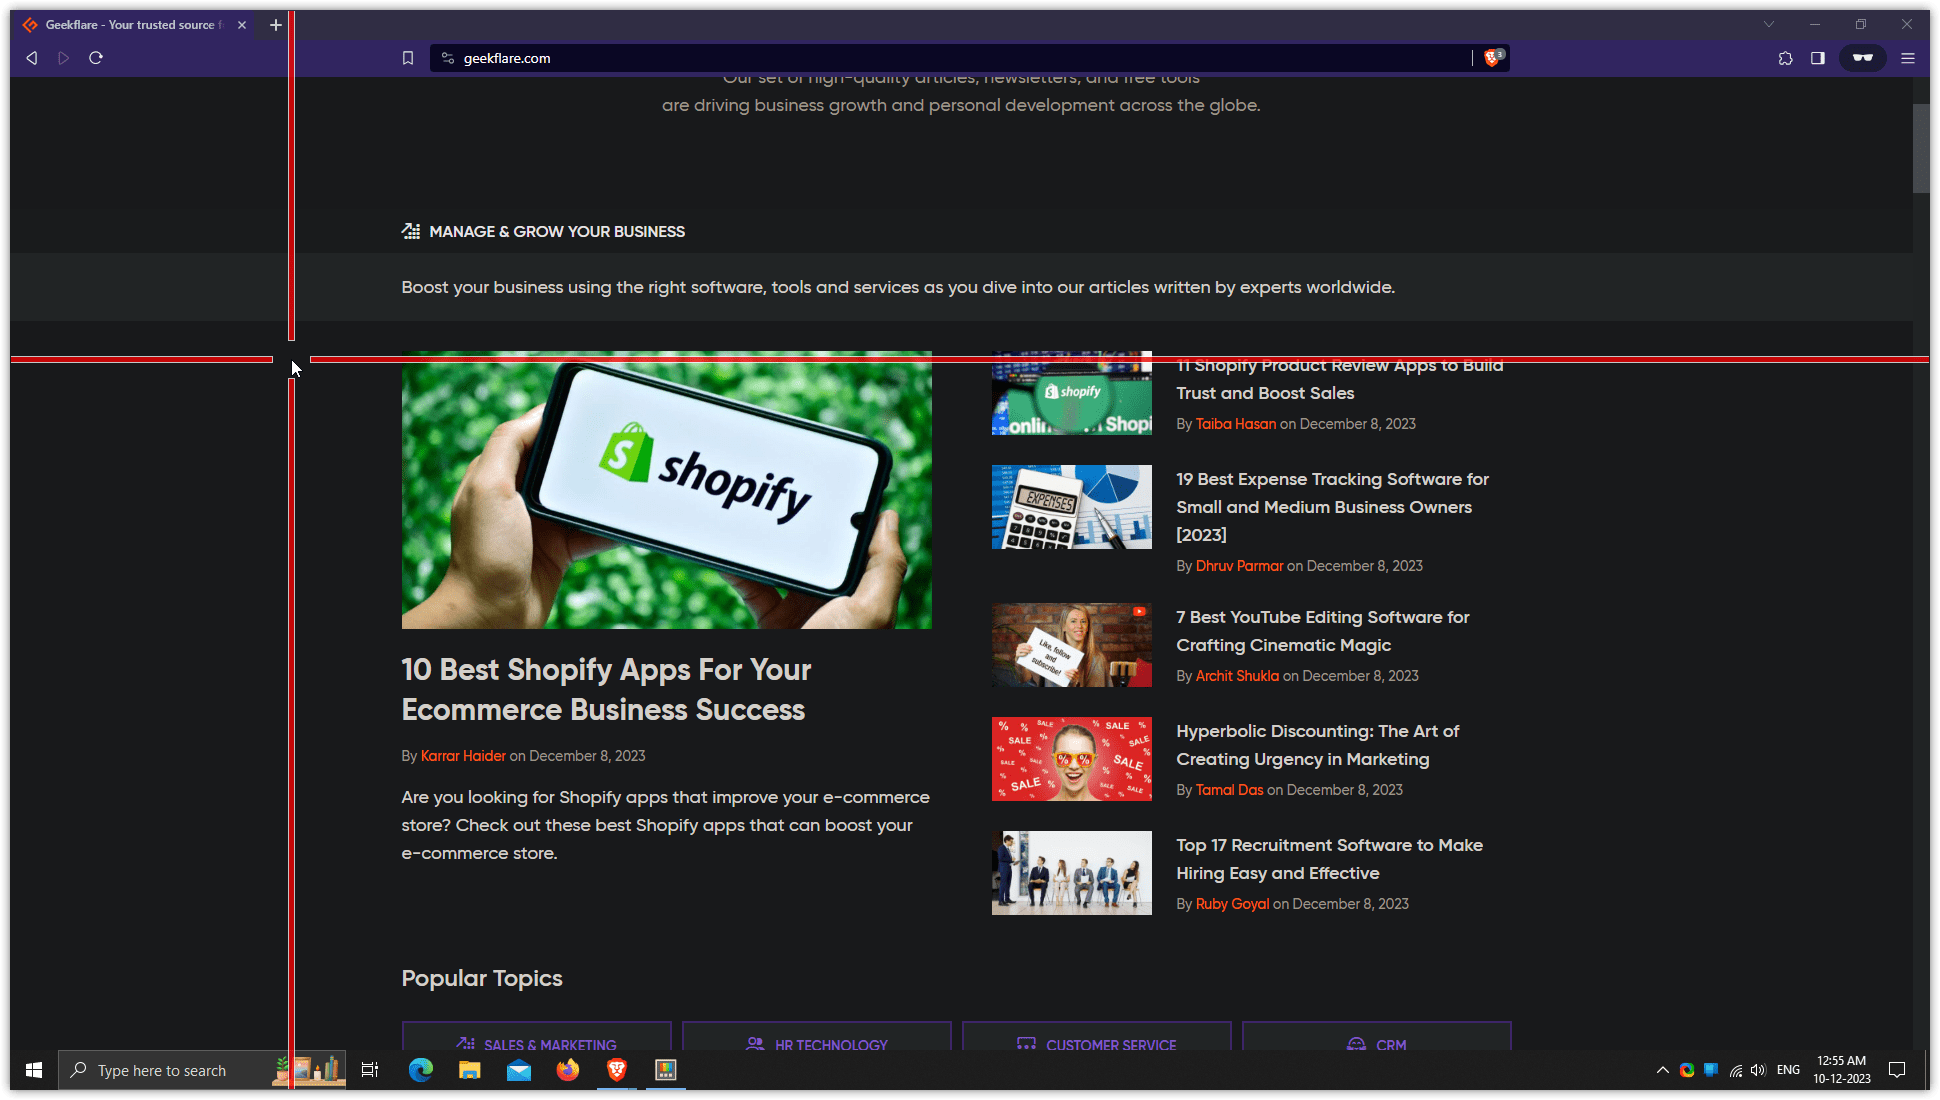

To disable it, use the same shortcut Win + Alt + P.
Mouse Without Borders
If you have multiple Windows computers and want to control both of them at the same time (using mouse and keyboard), then this utility is a blessing.
To set it up, all you have to do is generate a key and enter it into your target machine as shown here:
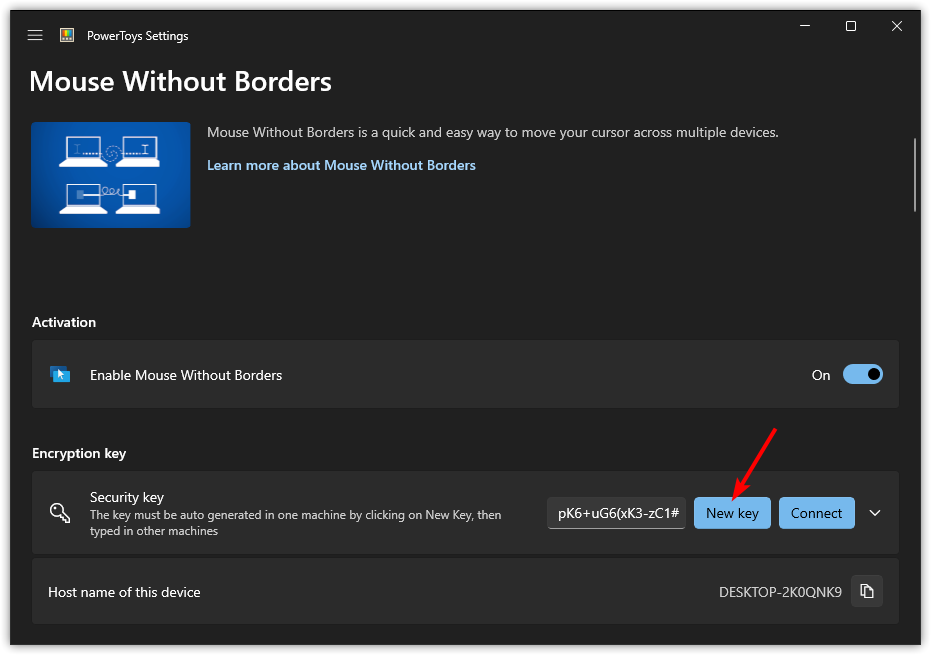

Enter the key and the hostname of the device on the other device by clicking on the down arrow button ﹀:


Once done, the connected device will be shown in the device layout section you can adjust the sequence of each device:
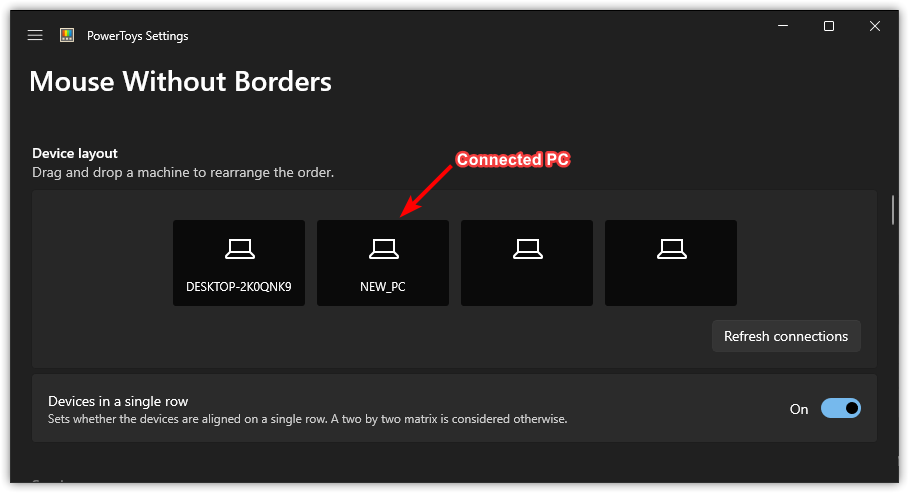

Once connected, you can perform the following operations:
- Share clipboard
- Send files up to 100 MB instantly
- Control multiple machines at once
- Re-arrange the order of devices
Pretty interesting. Right?
Paste As Plain Text
When you copy something from the web and try to paste using Ctrl + V, it will paste the formatted text with all the CSS attributes given to it such as fonts, color, heading, etc.
For example, I copied a heading from our site and pasted it Word file using the normal method and used the paste as plain text utility to show you the difference:
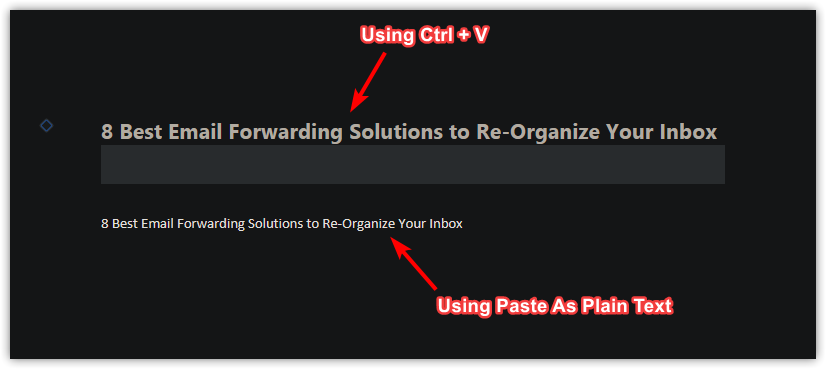

To use this utility, all you have to do is copy the text like you generally do by selecting the text and pressing Ctrl + C and then press Win + Ctrl + Alt + V.
Peek
If you are looking for the best way to preview your images, documents, markdown files, and programs, then Peek is one of the best ways to get there.
Once enabled, all you have to do is select the file and press Ctrl + Space and it will open a small window showing the preview of the selected file:
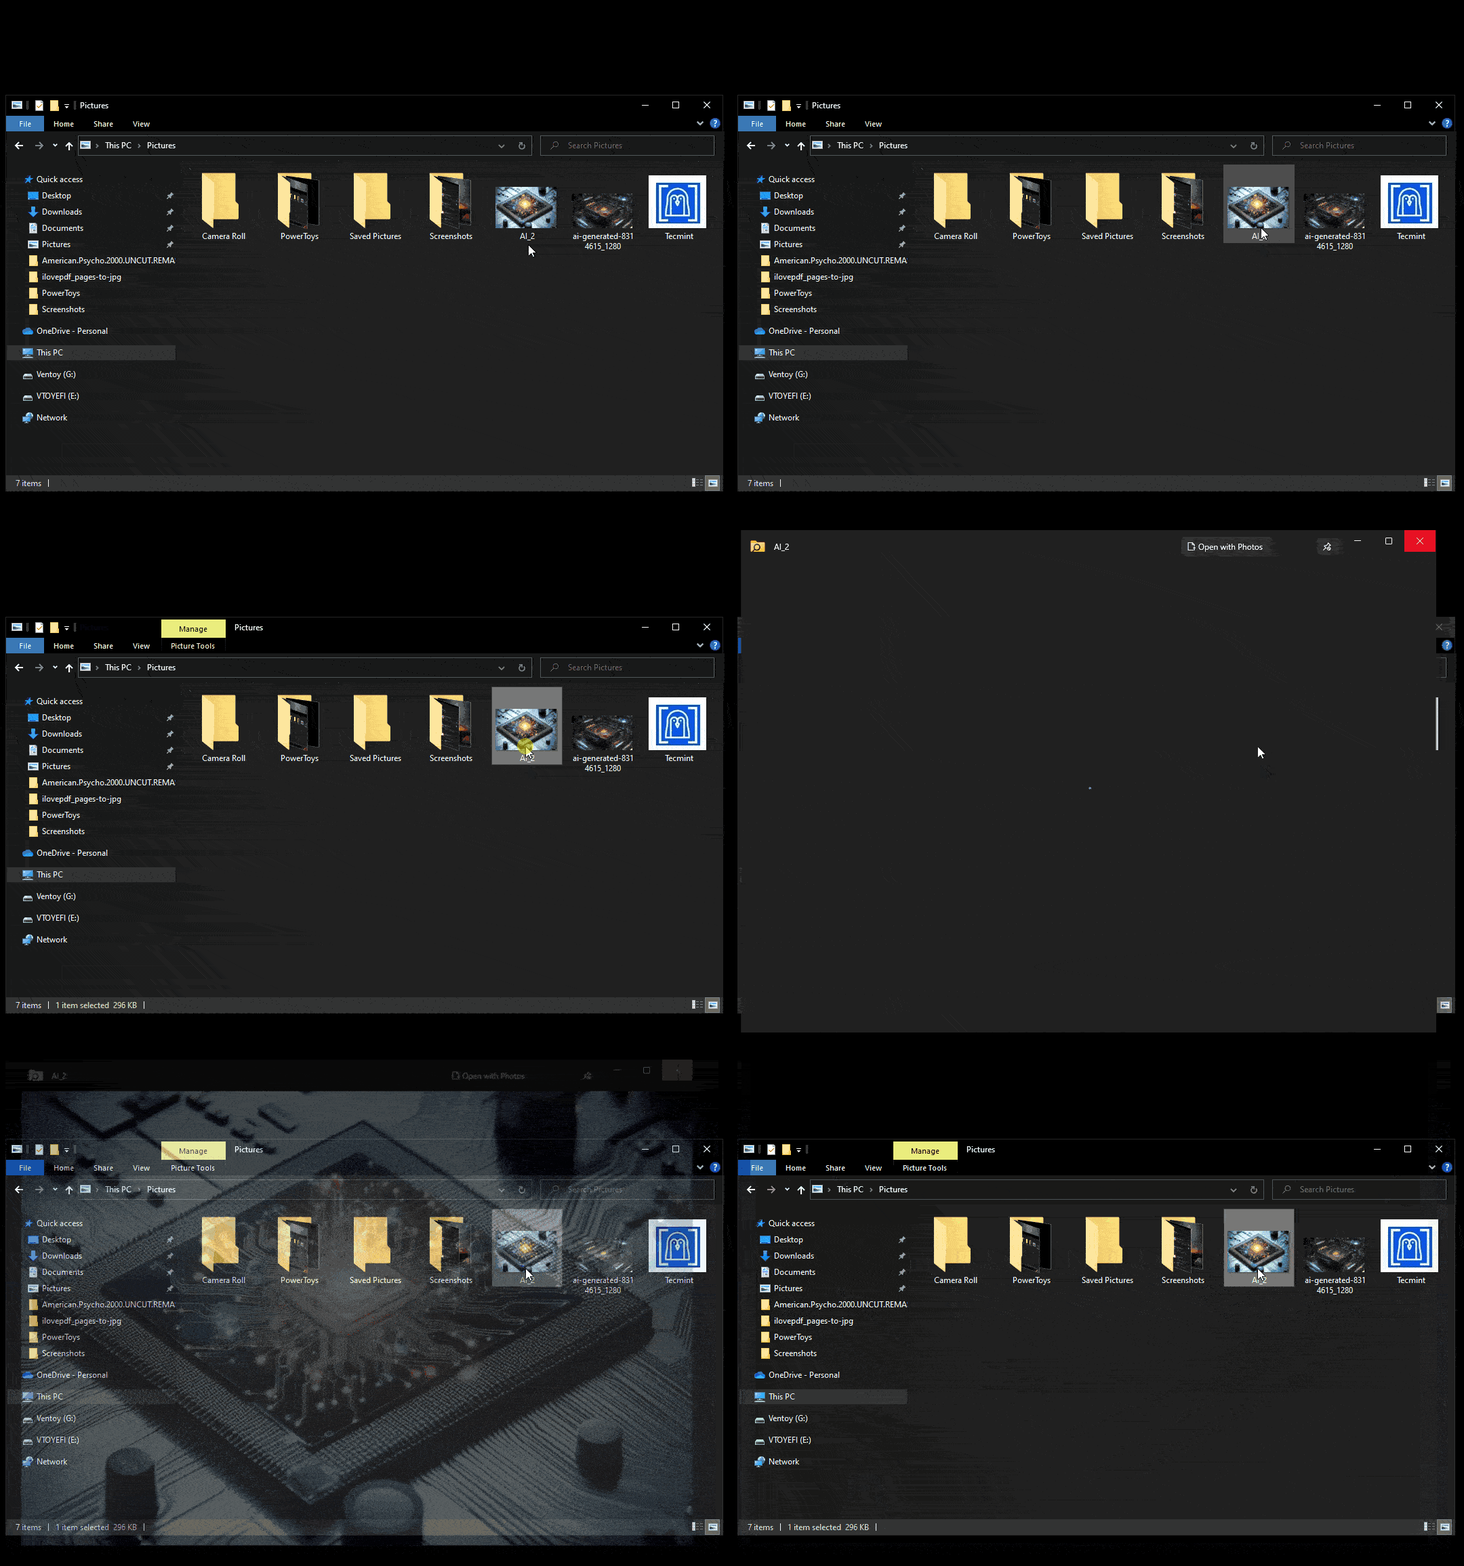

It can be helpful in cases where you don’t have much screen to waste and you want to get a preview in the least screen space possible (yes, it works like magic 🪄).
PowerRename
The PowerRename is used to rename multiple files at once solving a huge problem that most advanced users were facing.
Here, I will be showing you how you can rename multiple files in the easiest way possible.
First, enable this utility from PowerToys and then jump right into the folder, select multiple files, and then right-click and choose PowerRename option:
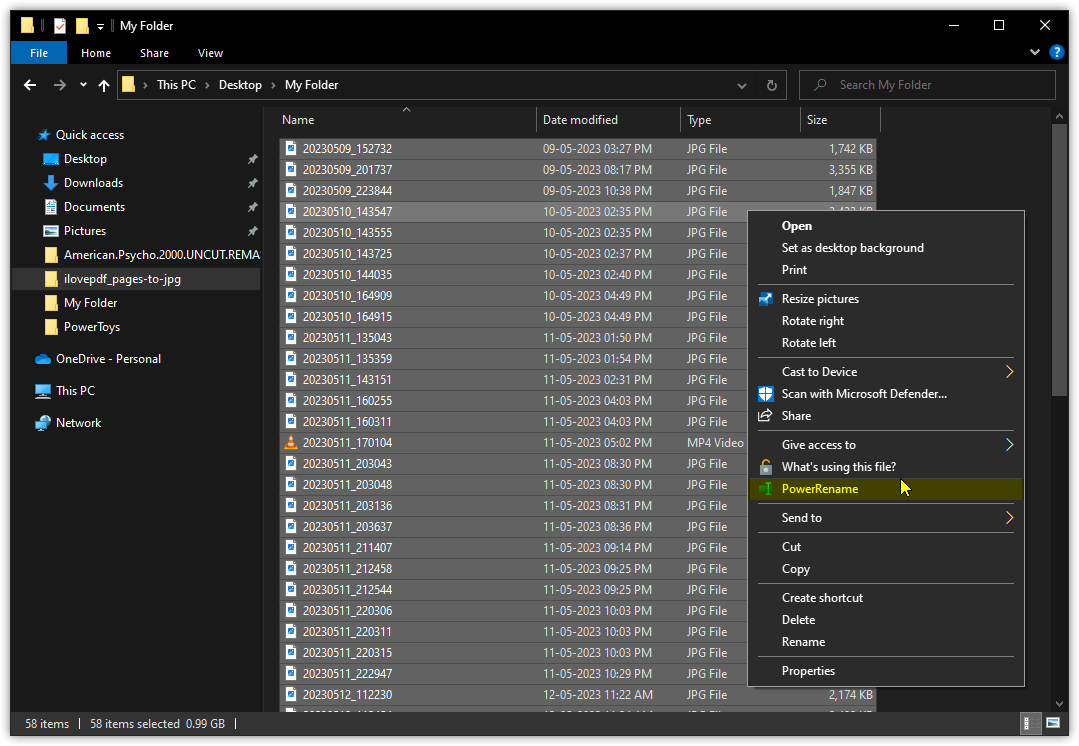

It will open a PowerRename prompt showing selected files that you want to rename:
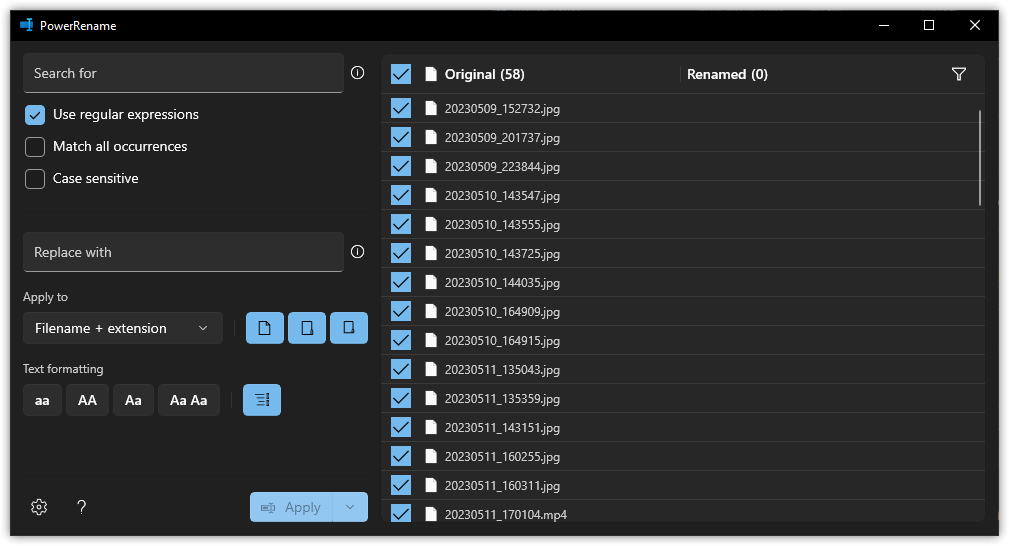

If you selected the wrong file type, you can specify an image extension or filename pattern for further selection.
For example, I selected 3 video files that I don’t want to be renamed so I will enter .*jpg in the Search for section to only select images:
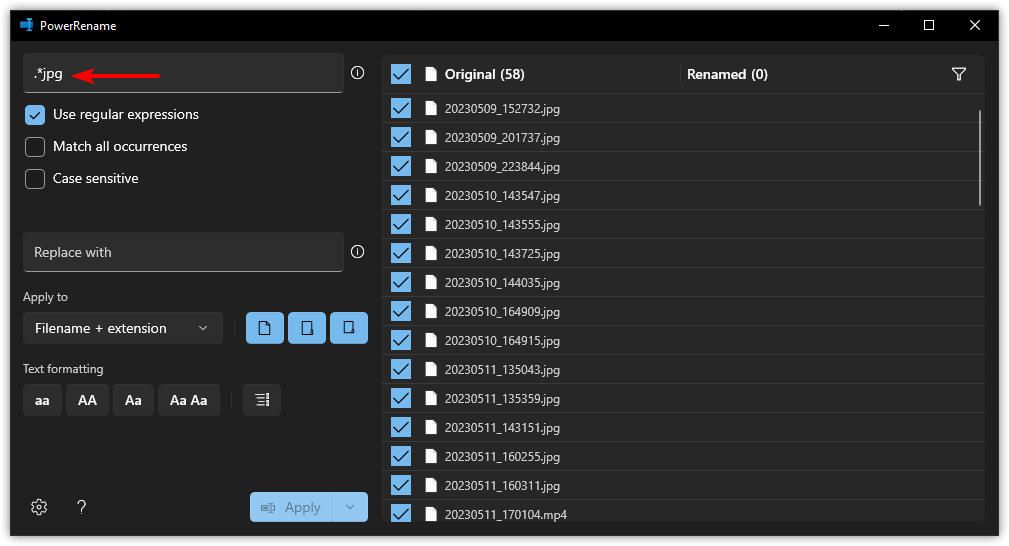

Now, you can enter the renaming term but I wanted images to have the same name and end with a number so for that purpose, I used $1 symbol in the following manner:
New Year images$1.jpg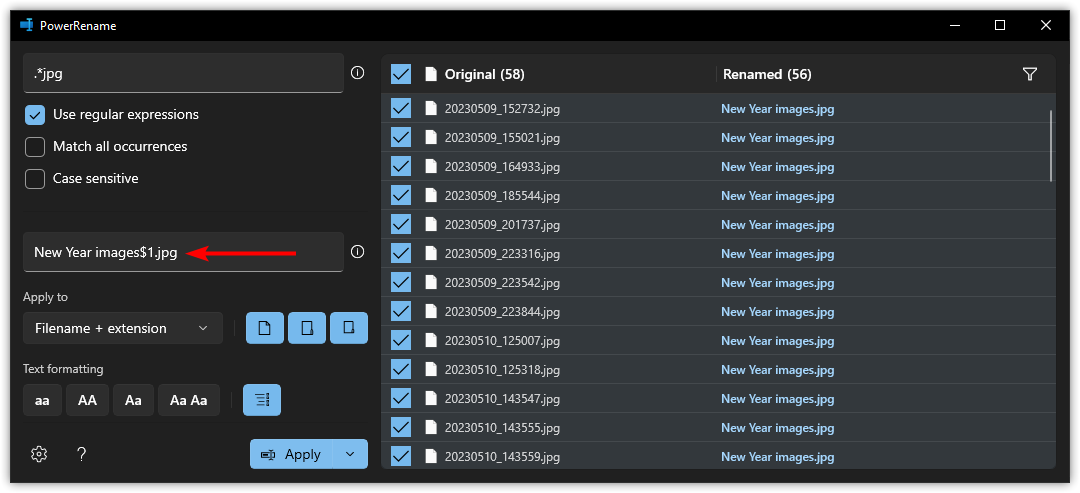

Now hit the Apply button and open file manager and renamed images should look like this:
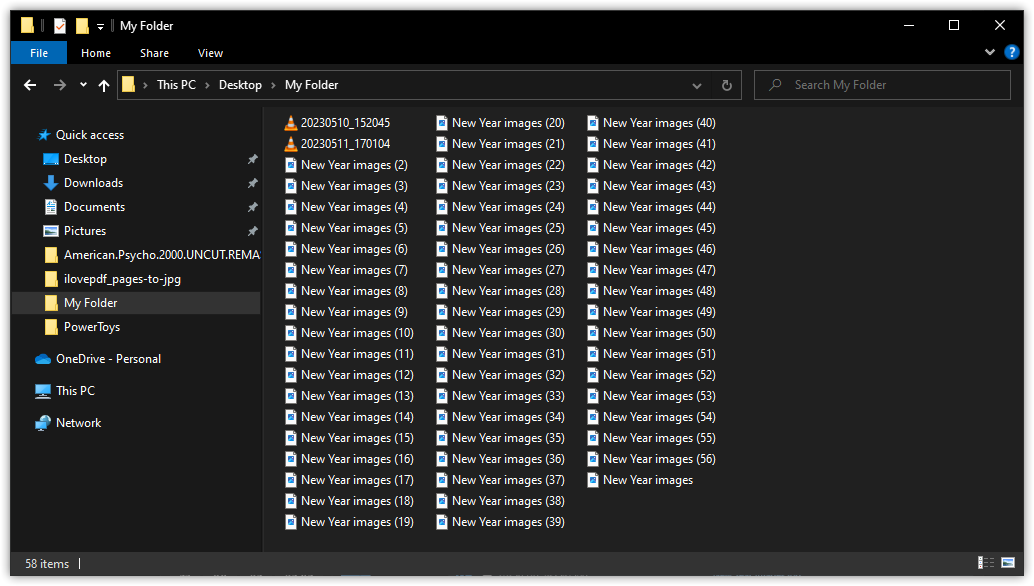

There you have it!
PowerToys Run
Want a similar app launcher to macOS but with more features and speed? PowerToys Run is your answer.
Once enabled, you can press Alt + Space to launch the PowerToys Run and type the name of the app, folder, or utility you are searching for and it will get back to you instantly.
You can enable multiple extensions from the PowerToys Run menu to more ways to search anything across the system:
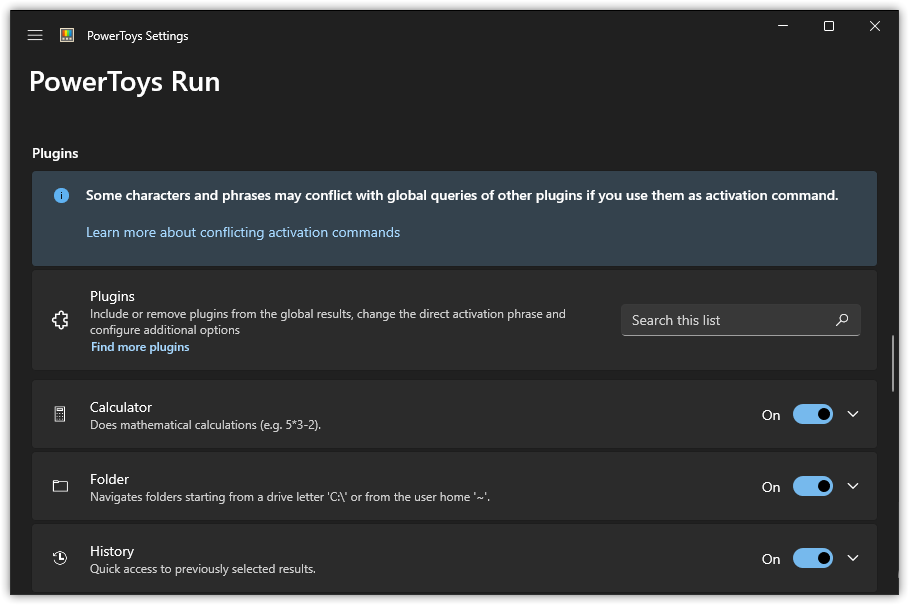

Searching for files and applications is all good but the best part of using PowerToys Run is you can execute system commands directly.
For example, if I want to reboot into the UEFI firmware settings, then, I will use the following command:
UEFI Firmware Settings

Quick Accent
The Quick Accent is the easiest way to write accented characters. For those who don’t know, accented characters look like this: šàğãŕ.
To use this utility, first enable this from the PowerToys:
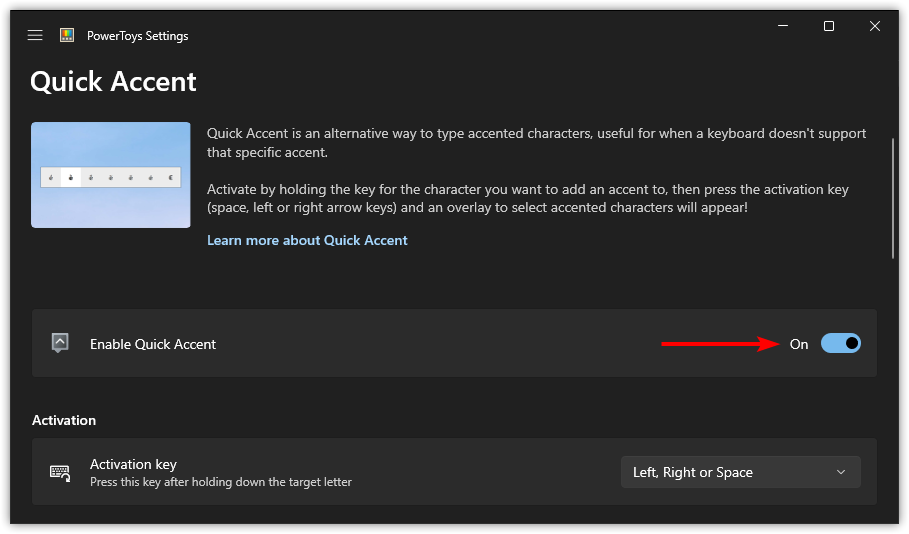

Once enabled, you can use this utility by pressing the key to be accented with the space bar:
Alphabet + SpacebarFor example, if I want an accented character for the letter s then I will press S + Spacebar and will look like this:
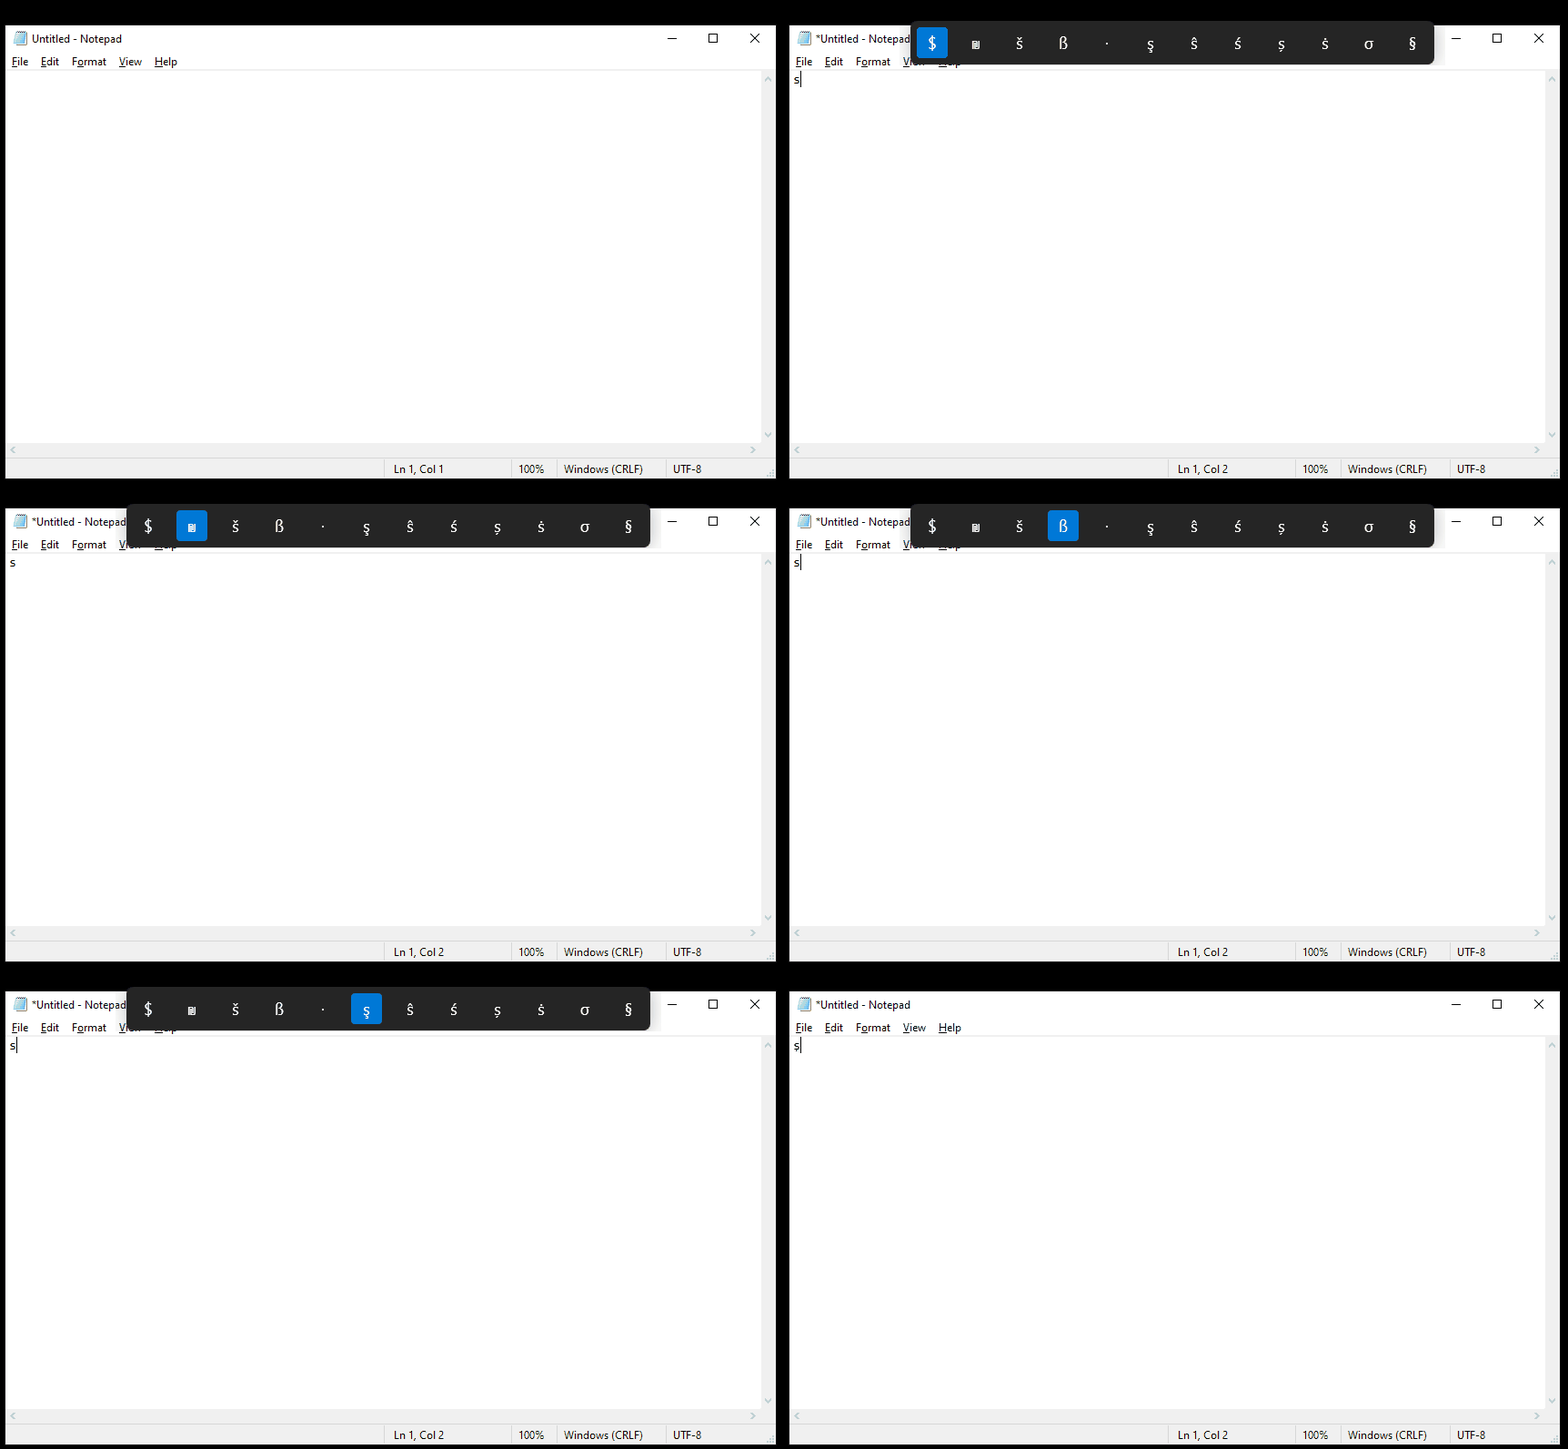

To switch between accented characters you can either press the Spacebar multiple times or use the left or right arrow keys.
Registry Preview
If you’ve ever tried editing the registry, you know the pain and how cautious you have to be while modifying it.
The Registry Preview makes it a little easier to edit the registry files.
To use this utility, first, launch it from the Registry Preview section:
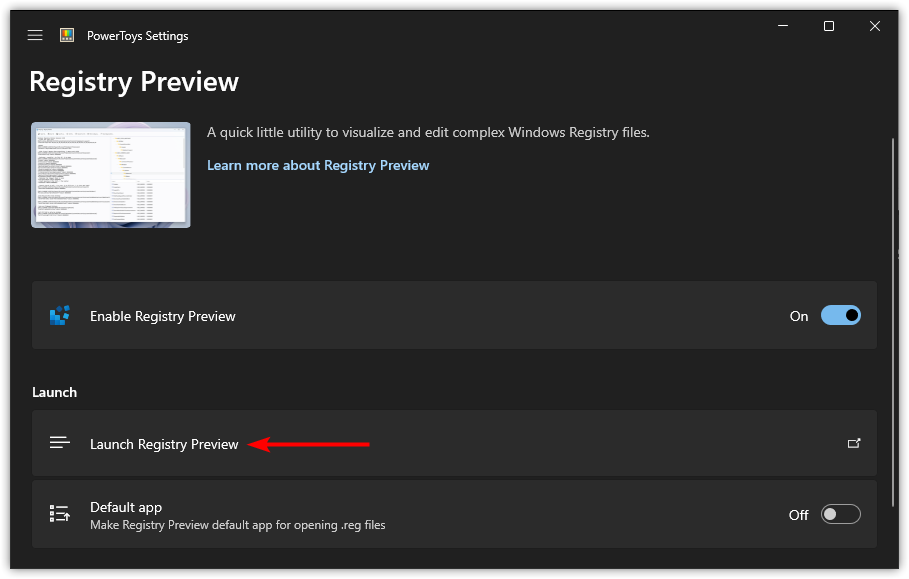

It will open a Registry Preview where you can open a registry file or even open the default registry editor.
Once you open a registry file, it shows the content of the file (on the left section), the hierarchy of the file (upper right section), and the filename with the filetype and its data (bottom right section):
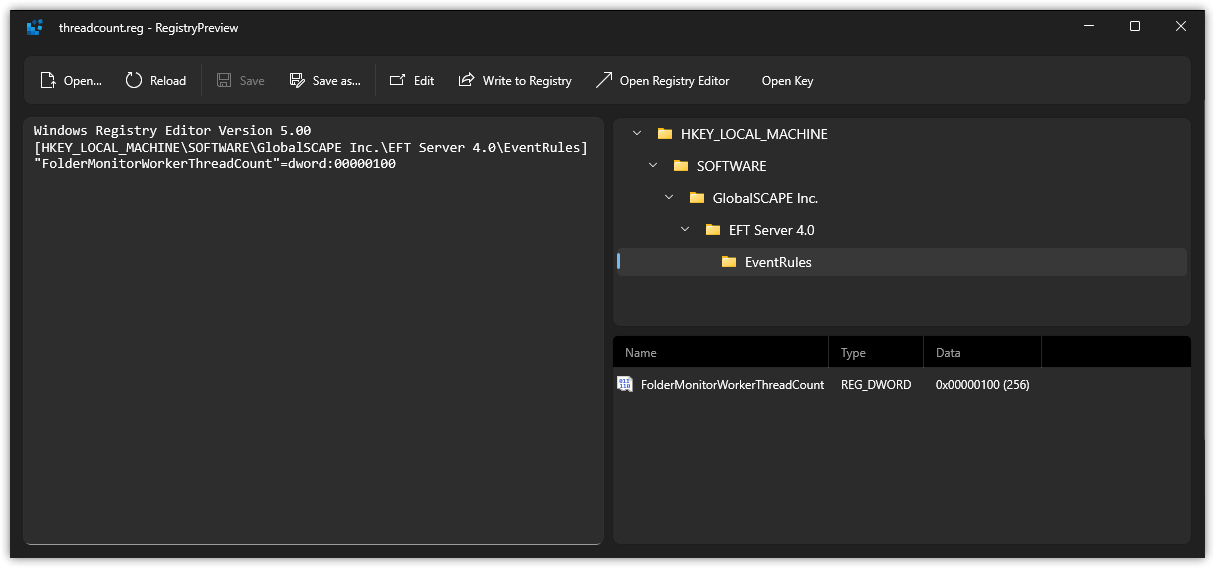

From here, you can change the file, and it will show the changes in the right pane. If the changes are satisfactory, you can save them by pressing the Save button.
That’s how easy it is to modify the registry files!
Screen Ruler
Using the Screen Ruler, you can make a selection and know the dimensions of the selected area, or use the horizontal and vertical ruler to know the dimensions.
Once enabled, press the Ctrl + Shift + M and it will present you with 4 different options:
- Manual selection (dashed square symbol): Select the area manually to know the exact dimensions.
- Horizontal + Vertical ruler (the
+symbol): It will measure vertical can horizontal spacing altogether. - Horizontal (the
—symbol): It will measure the horizontal spacing. - Vertical (the
|symbol): It will measure the vertical spacing in the given area.
For your reference, here, I explained how you can use the manual selection:


Also, if you choose to use the other 3 options, you can expect the following behavior:


Shortcut Guide
This is a simple guide that will show you a list of common shortcuts that involve the usage of the Windows key with other key combinations.
To display the shortcut guide, press Win + Shoft + / and it will show a shortcut guide with a brief description of each shortcut:
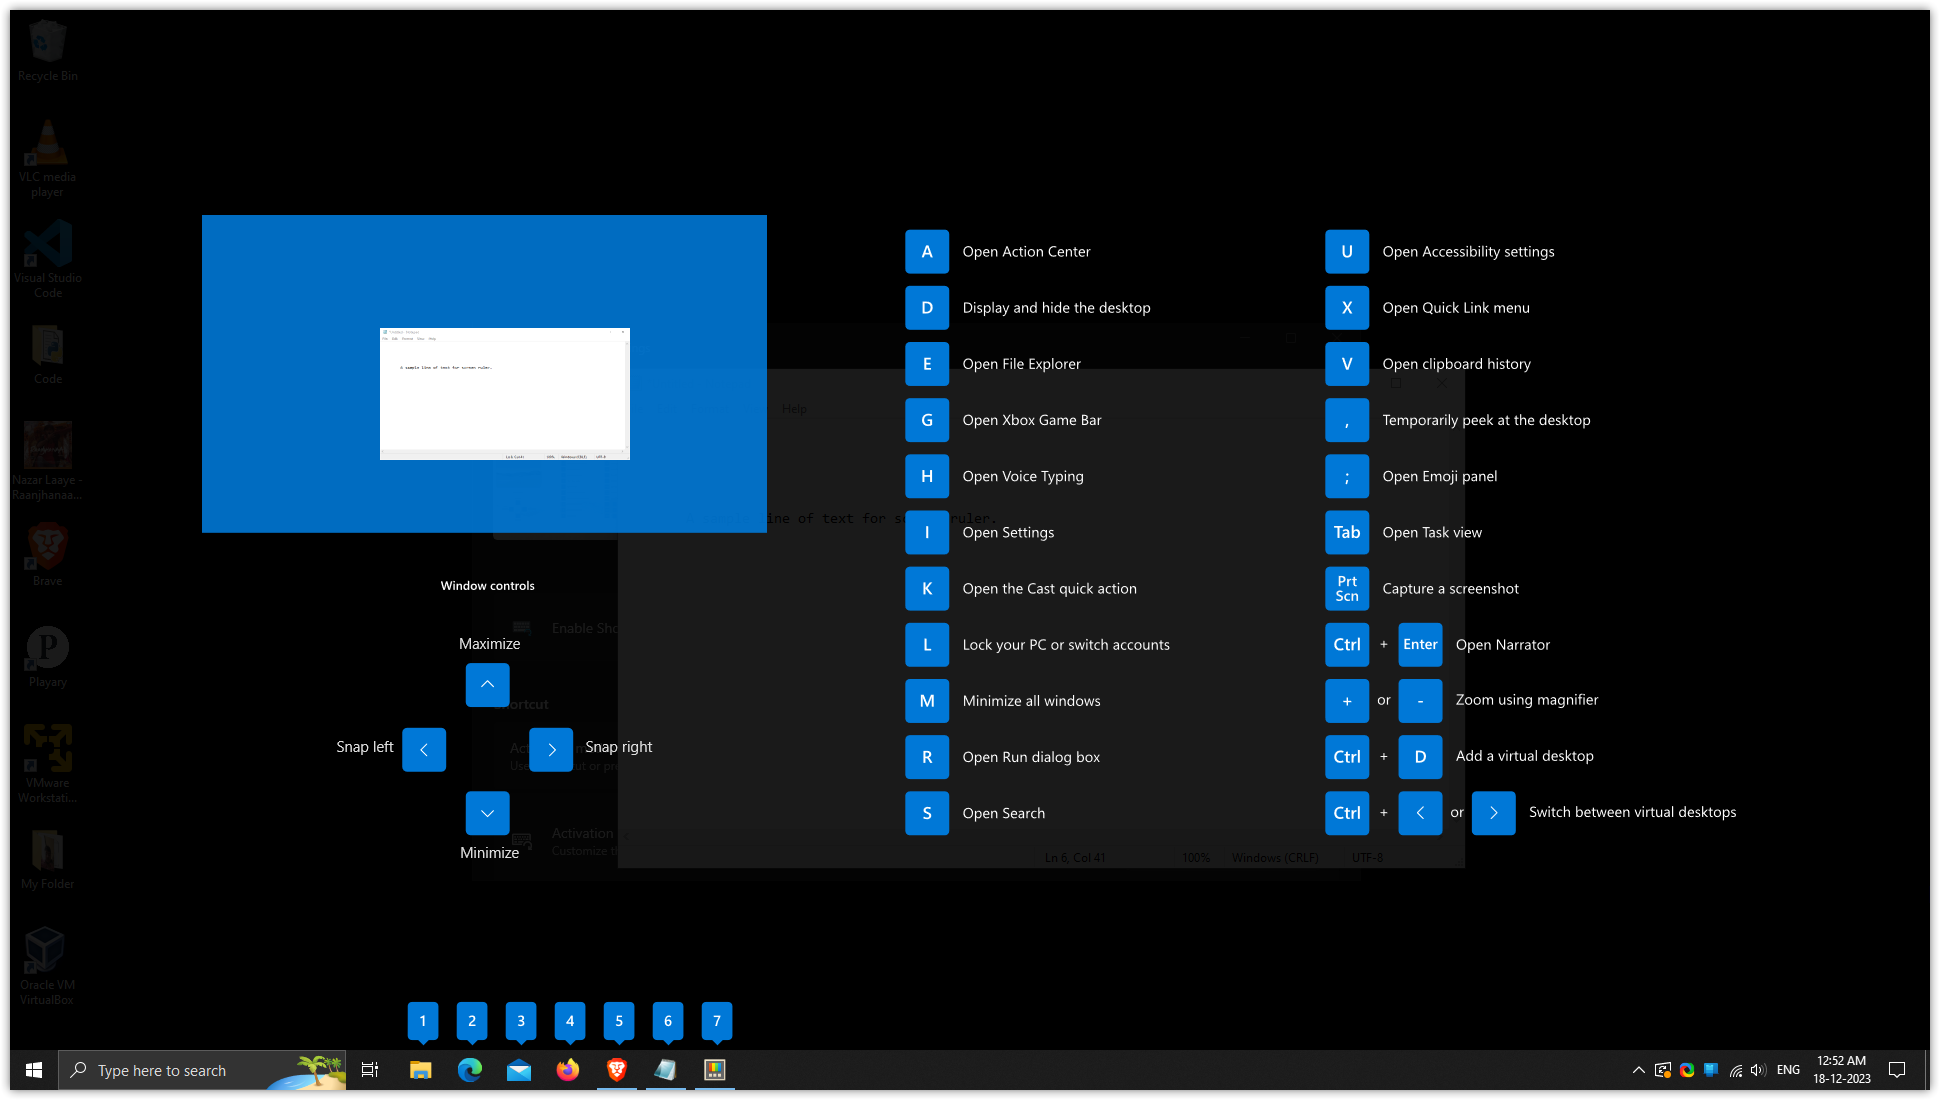

Note: Make sure to use the Windows key with the shown shortcuts.
This is a systemwide OCR that can be used to extract text from anything ranging from images to videos (when paused, of course).
Once enabled, press Win + Shift + T to launch the Text Extractor, select the area, and it will copy the text to the system clipboard.
You can paste this text like you normally do.
You can also toggle between single-line mode (enabled by pressing S) and table mode (enabled by pressing T) to meet your requirements.
For your reference, here, I used the table mode to extract text from a table:
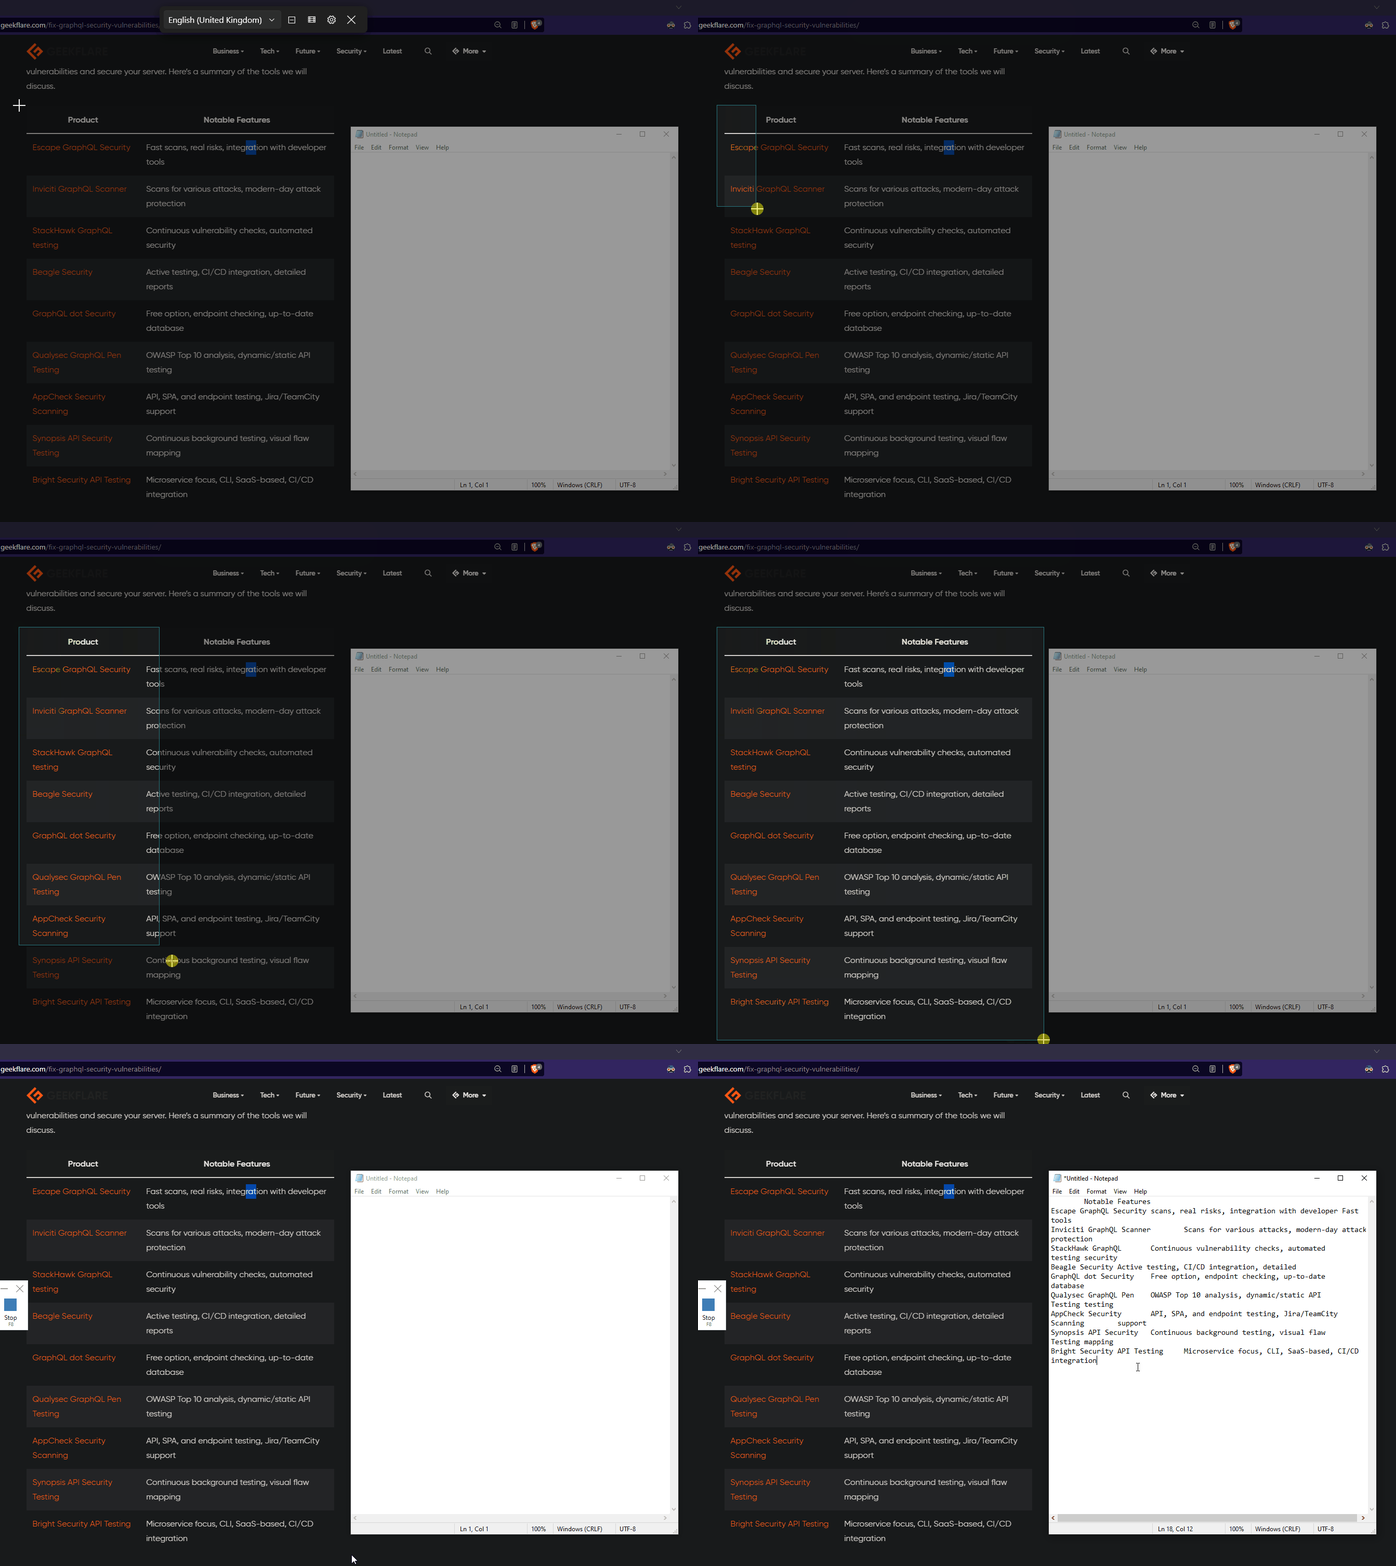

Pretty easy. Right?
Video Conference Mute
Using this utility, you can mute the mic, camera, or both with a single shortcut, irrespective of what software you are using.
To use this utility, first, go to the General section and press Restart PowerToys as administrator button:
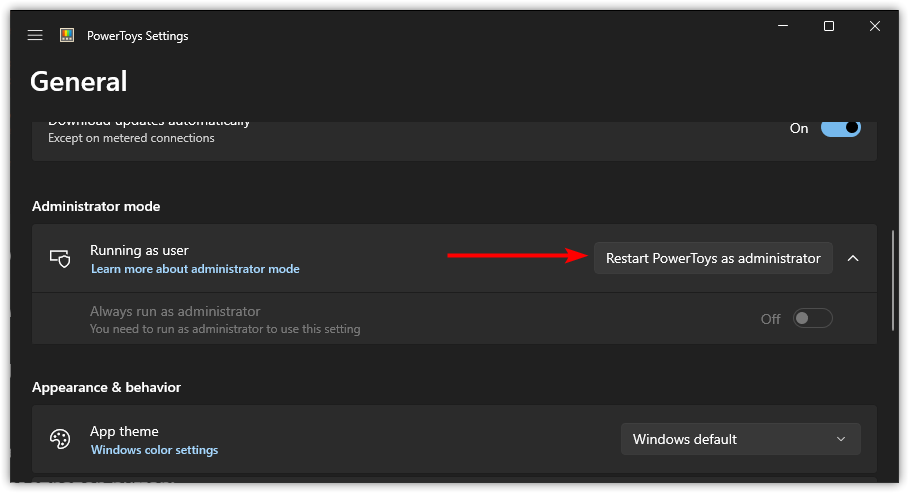

Once done, you can enable the Video Conference Mute from the PowerToys.
Now, make sure the PowerToys Video Conference Mute is selected as a source for video and audio in the respective software to make shortcuts work:
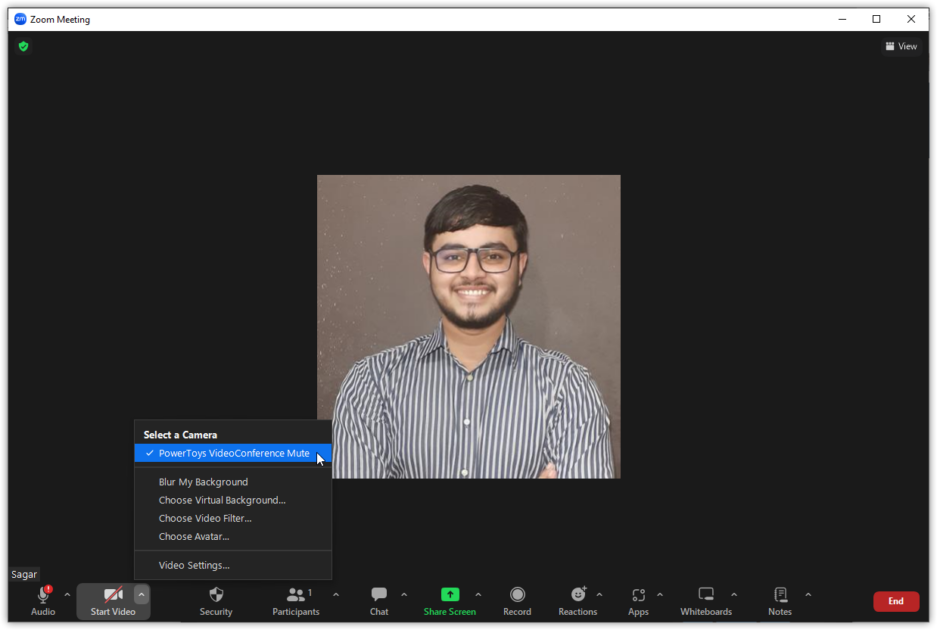

From here on, you can use the following shortcuts to control audio and video:
Win + Shift + Q: Mute camera and microphone.Win + Shift + A: Mute the microphone only.Win + Shift + O: Mute the camera only.Win + Shift + I: Push to talk.
A simple yet effective solution for daily meetings.
Wrapping Up
Through this tutorial, I covered all the utilities you get in PowerToys and explained their key features so you can utilize them to elevate your experience.
Sure, you may not find every utility in this list of your use, but I’m pretty sure you will find a few that would solve tiny issues that bugged you off.
I hope you will find this guide helpful.
Si quiere puede hacernos una donación por el trabajo que hacemos, lo apreciaremos mucho.
Direcciones de Billetera:
- BTC: 14xsuQRtT3Abek4zgDWZxJXs9VRdwxyPUS
- USDT: TQmV9FyrcpeaZMro3M1yeEHnNjv7xKZDNe
- BNB: 0x2fdb9034507b6d505d351a6f59d877040d0edb0f
- DOGE: D5SZesmFQGYVkE5trYYLF8hNPBgXgYcmrx
También puede seguirnos en nuestras Redes sociales para mantenerse al tanto de los últimos post de la web:
- Telegram
Disclaimer: En Cryptoshitcompra.com no nos hacemos responsables de ninguna inversión de ningún visitante, nosotros simplemente damos información sobre Tokens, juegos NFT y criptomonedas, no recomendamos inversiones

