WordPress, the most popular CMS, is expanding its territory massively in the domain of website development.
The versatility and flexibility of this website builder attract web developers and entrepreneurs to create exceptional websites effortlessly. But among all the personalization choices, one important component of the website is overlooked, which is the footer.
The footer has a significant impact when it comes to user interaction and makes a lasting impression. It’s the final thing a visitor sees before leaving your website, which includes links, some crucial information, and even call-to-action buttons.
Moreover, it summarizes your website with your brand’s essence and navigational instructions. Therefore, a strategic representation of a footer improves usability, establishes trust, and creates a stronger connection with the visitors.
In this article, I’ll present how to edit and alter the footer in your WordPress footer. This will help create a lasting impression on your visitors.
The WordPress theme customizer offers a range of customization tools, which you will find in your dashboard. With this option, you can easily tailor your site’s look, modify header and footer elements, adjust titles, and manage various universal settings. It is the most user-friendly method when it comes to editing the footer, and here are the steps to follow:
- Access your WordPress dashboard and sign in.
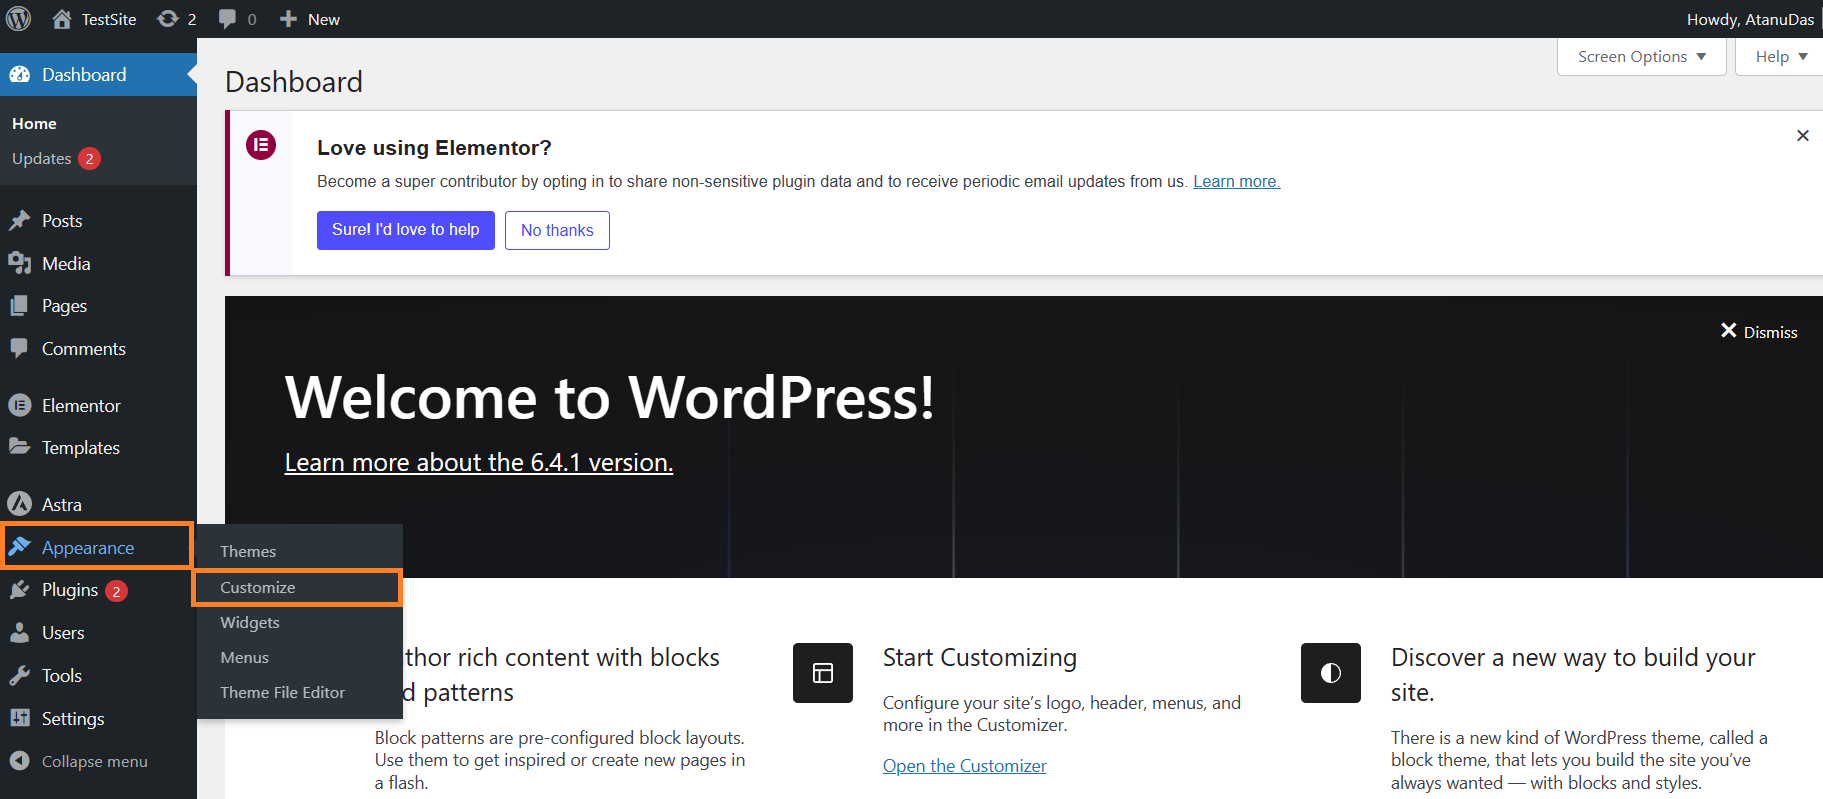
- Navigate to the Appearance tab and click Customize.

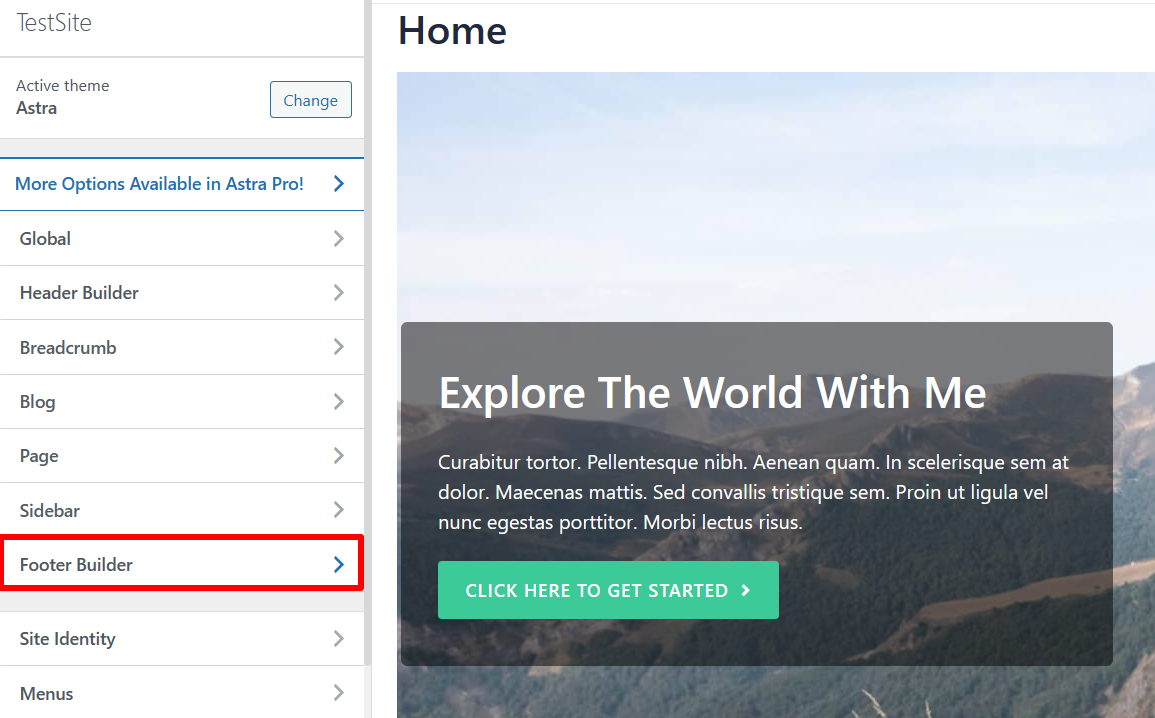
- Within the Customizer menu, locate and click on Footer Builder.

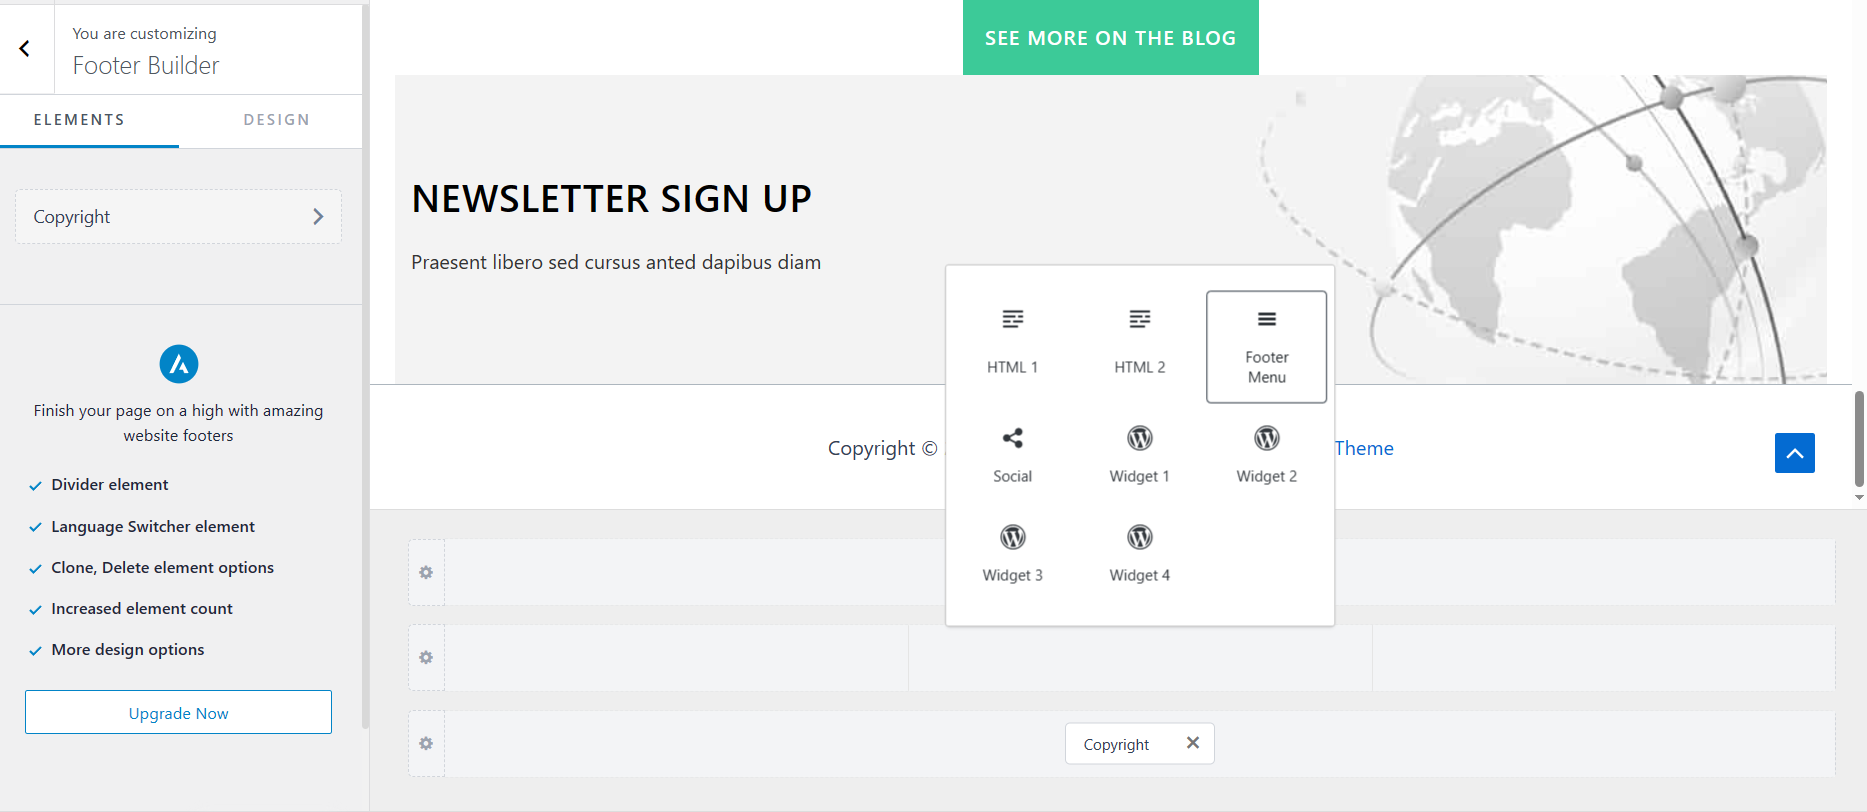
- In Footer Builder, you can click and add elements to the footer section.
- For example, I’ve added a footer menu in the footer section. After selecting the menu, don’t forget to click publish.

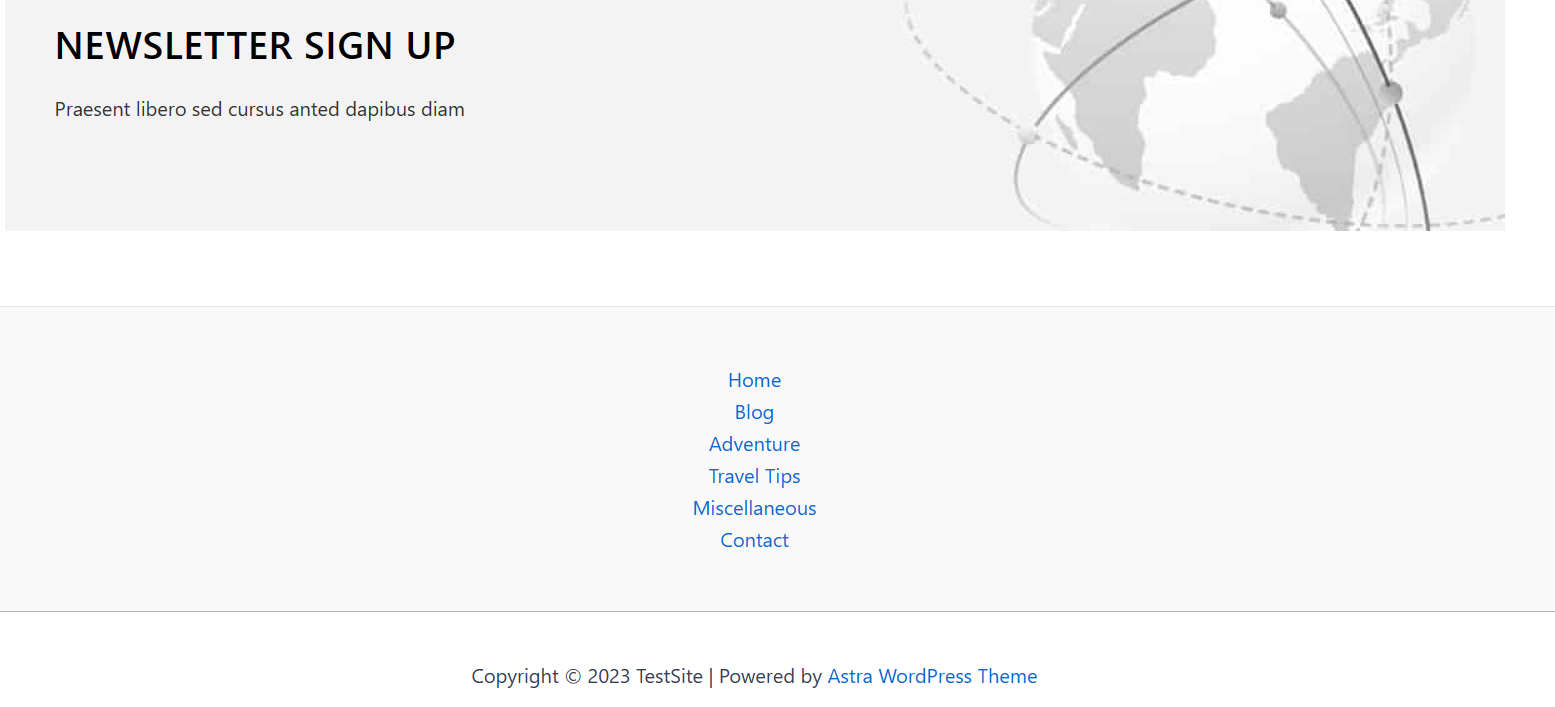
- Scroll down to your homepage to view the changes.

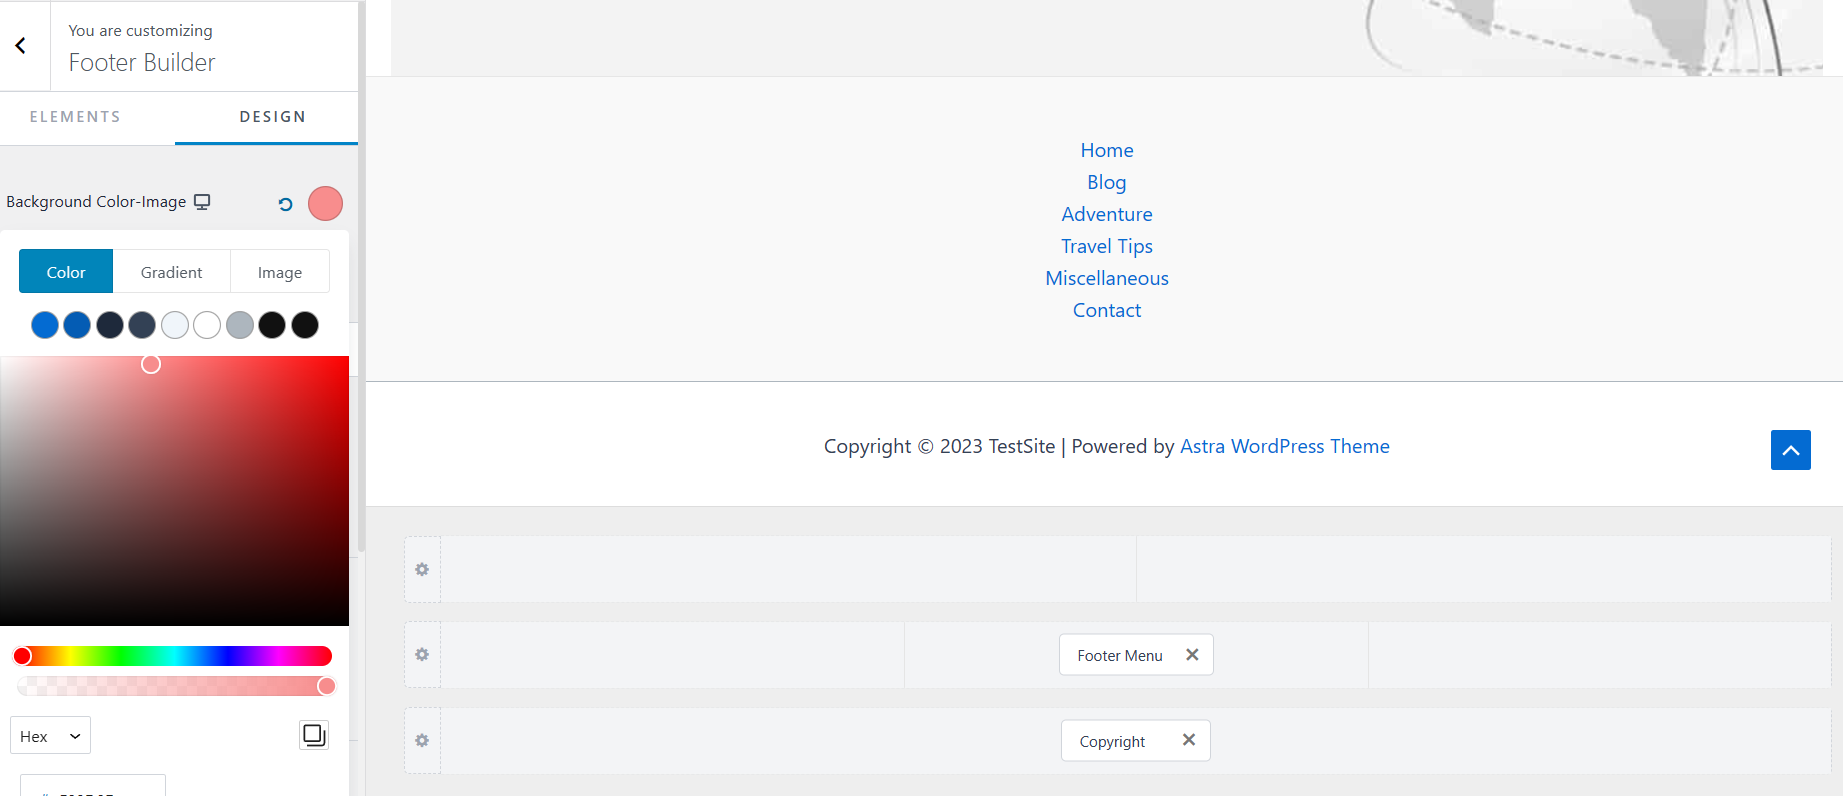
- From the design tab, you will get options to change the Footer background color.

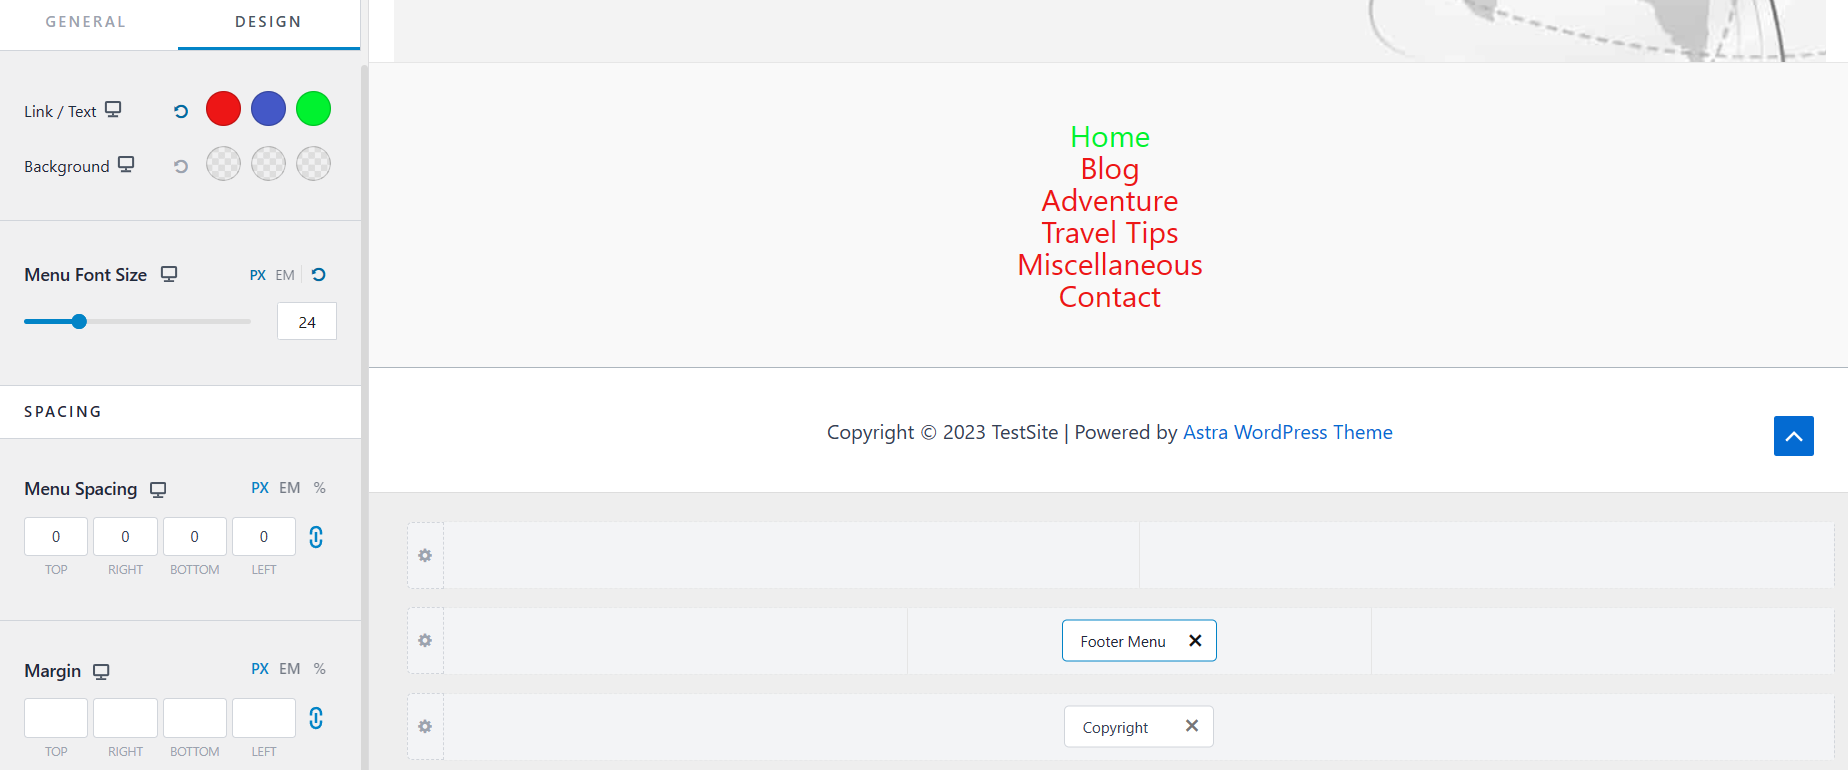
- To change the text, color, font size, and more options, simply click the footer menu. You will get all the options on the left-hand side of your screen to customize it.
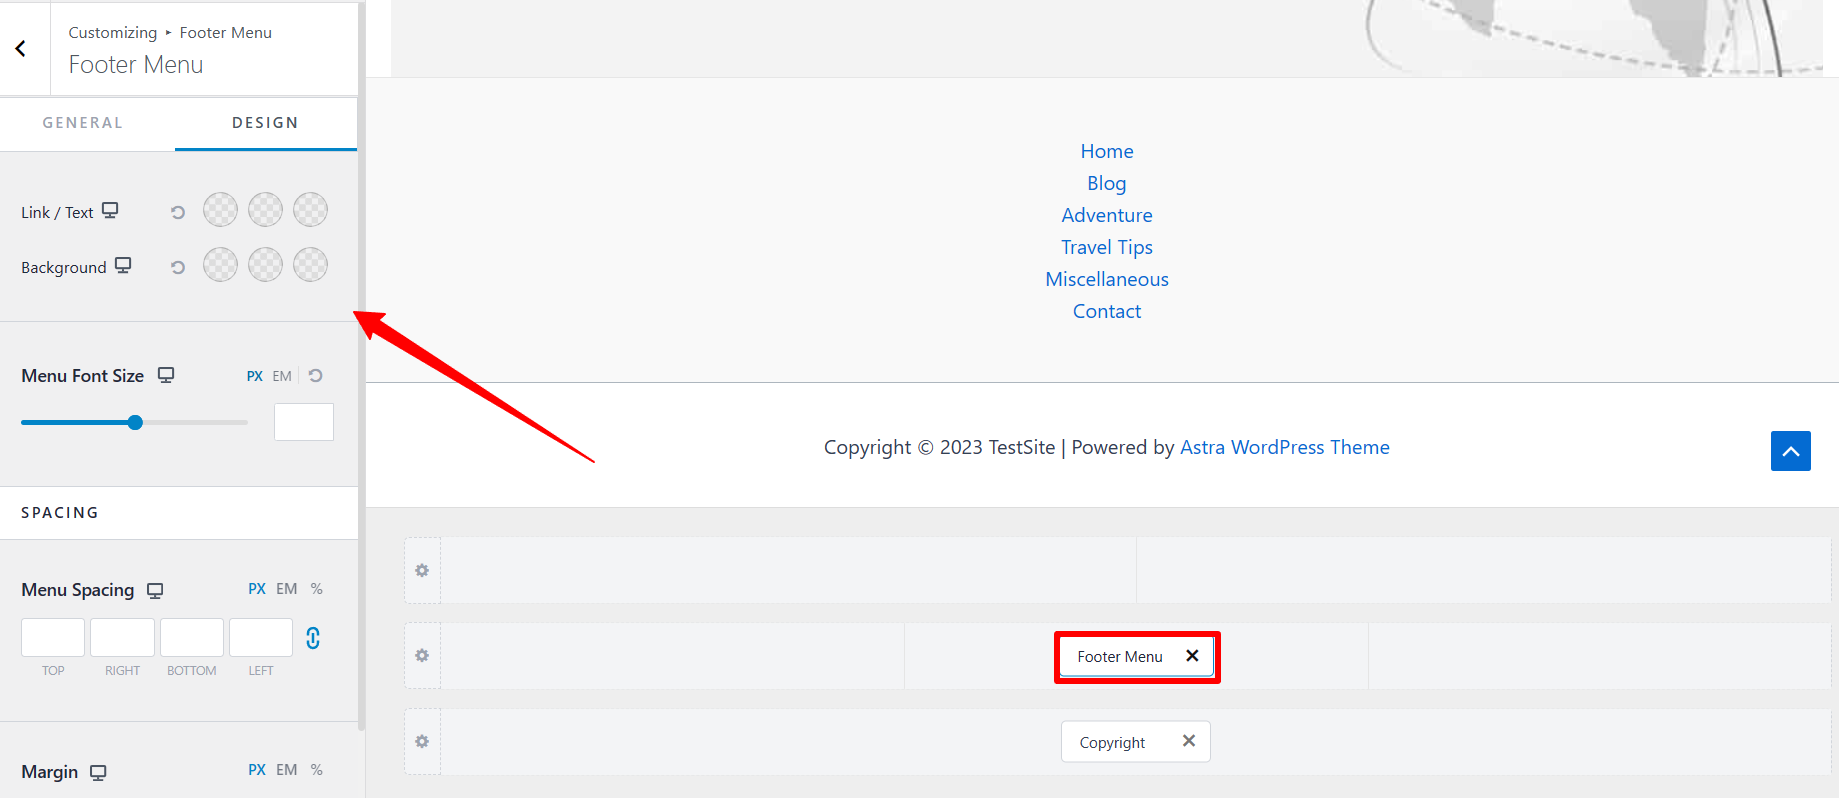

- I’ve changed the Menu Text’s font size and the different color options, and here is how it looks.

- Congratulations! You’ve successfully edited your WordPress site’s footer using the Theme Customizer.
If you need to make further adjustments or want to add or remove elements from the footer in the future, you can always revisit this section within the WordPress Theme Customizer.
Remember, this method provides a secure and user-friendly way to modify the footer of your website, and it’s applicable across various WordPress themes, ensuring a consistent editing experience.
You can also edit the footer section and add new blocks in it using the widget option of the WordPress customizer. Here is the step-by-step process to follow:
- Go to the WordPress Customizer and select the Footer Builder.
- In the footer section, click and add the Footer Widgets that you want on your site.
- I’ve selected the Footer Widget 1 and Footer Widget 4 on the Footer section.
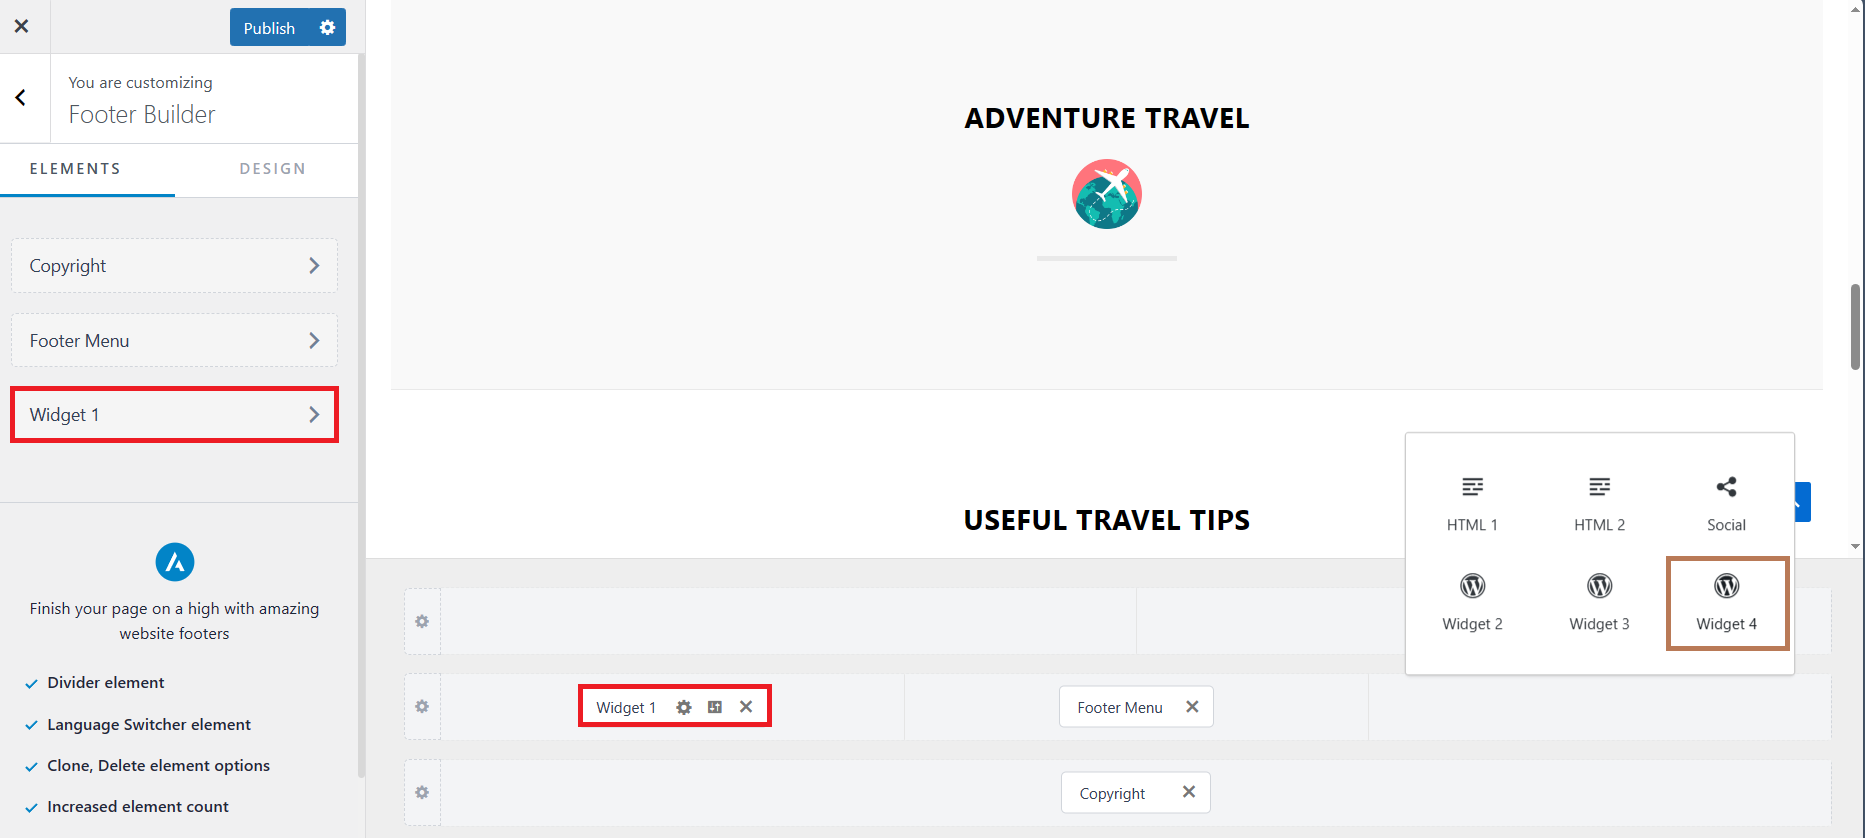

- These Widgets can be customized within the footer if you click it.
- Click on a Widget, and you will see the Widget will appear on the left-hand side screen.
- Alternatively, look for the blue pencil icon. Clicking this icon directly takes you to the Footer Widget Areas.
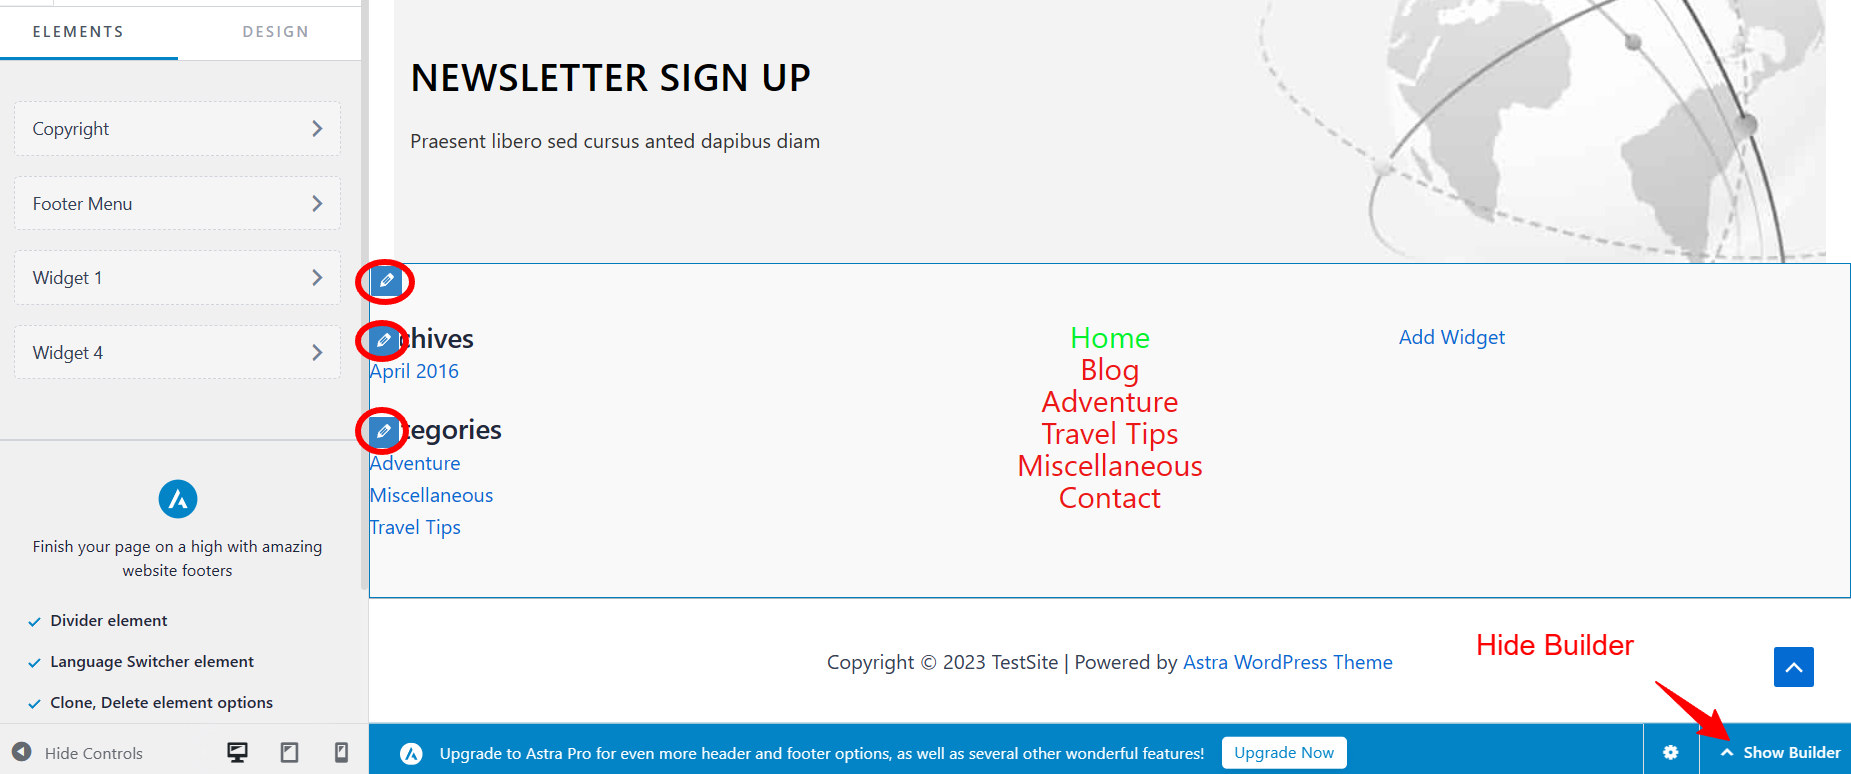

- The Footer Widget Areas can be edited using a simplified Block Editor interface.
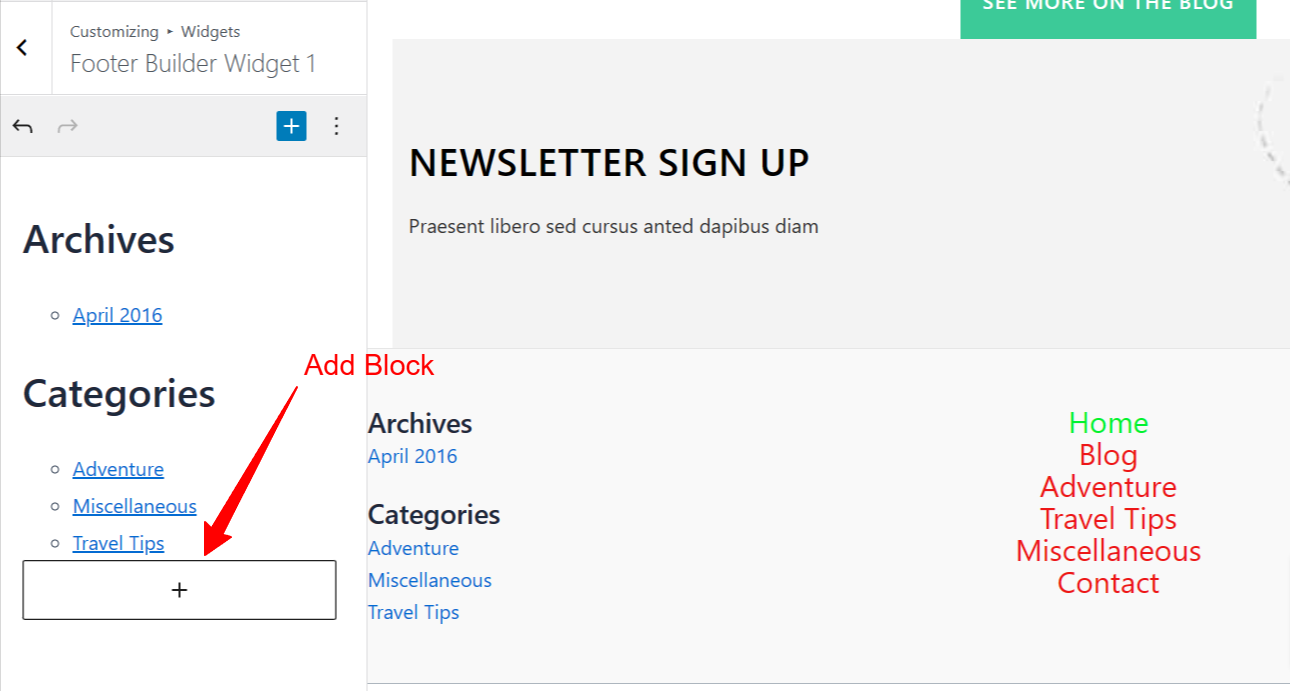

- Add or remove blocks within these widget areas based on your customization needs.
The above-mentioned steps make it simple to add and rearrange different blocks, such as navigation menus, so you can easily customize the footer to meet the needs of your website.
In most cases, you must manually define a footer menu on your WordPress site. For this, you must create a new menu and define where (Header or Footer )you want on your website. Here are the steps to create a menu for the footer:
- Inside your WordPress dashboard, go to Appearance > Menu.
- Then, click Create a new menu and provide a name for your menu.
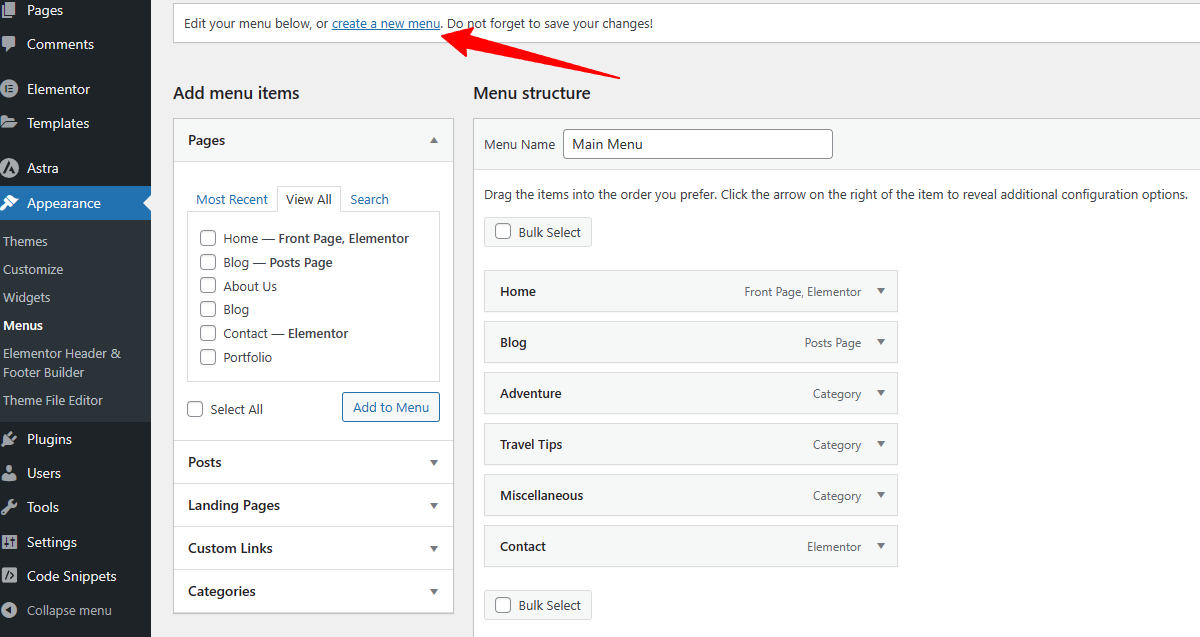

- Then, add the pages you’ve created on your website to the menu.
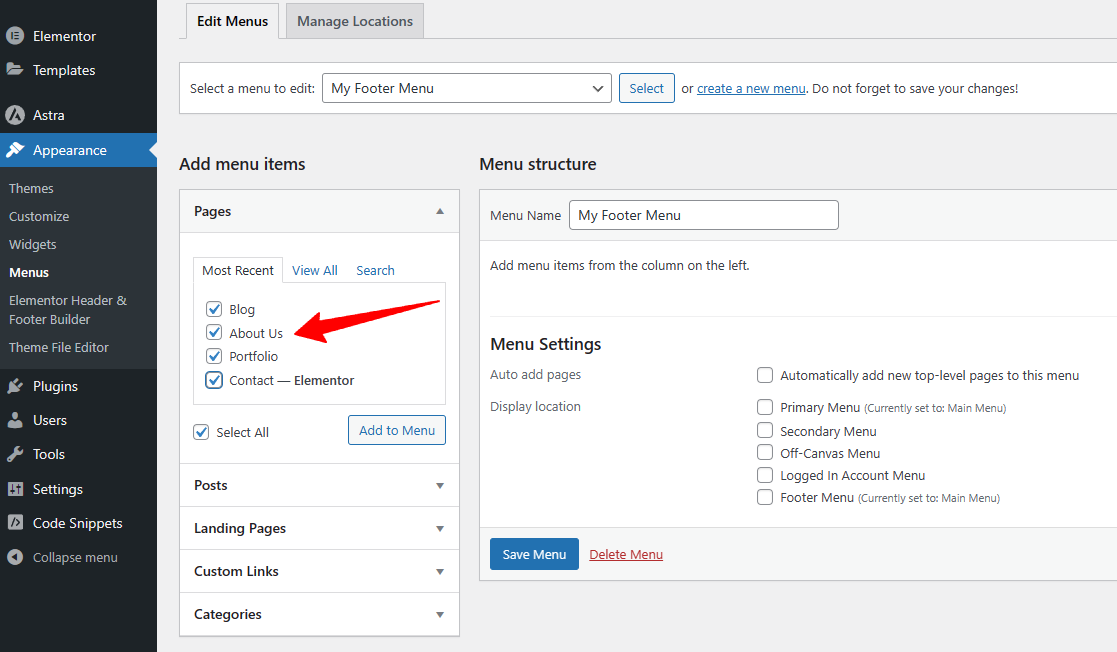

- When done, click the Save Menu button to create the Footer Menu.
- Now, set the location for the menu by going to the Manage Location Tab.
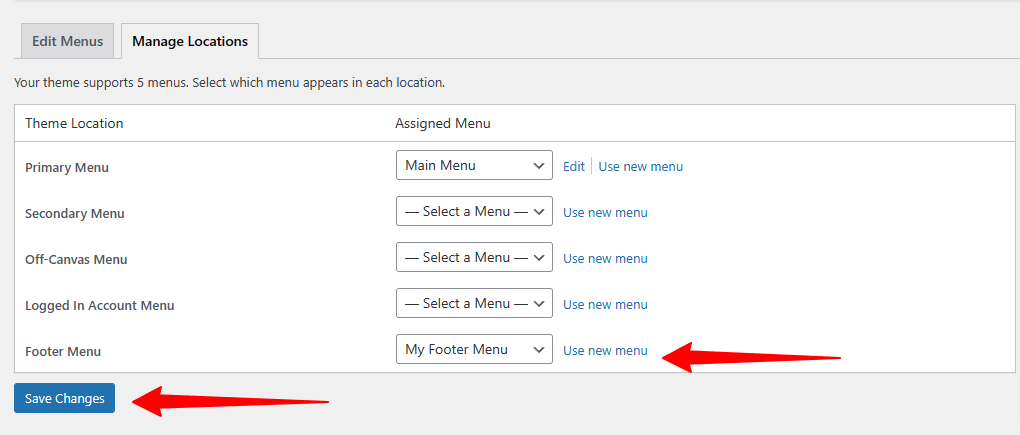

- In the Footer Menu section, select the menu you’ve just created.
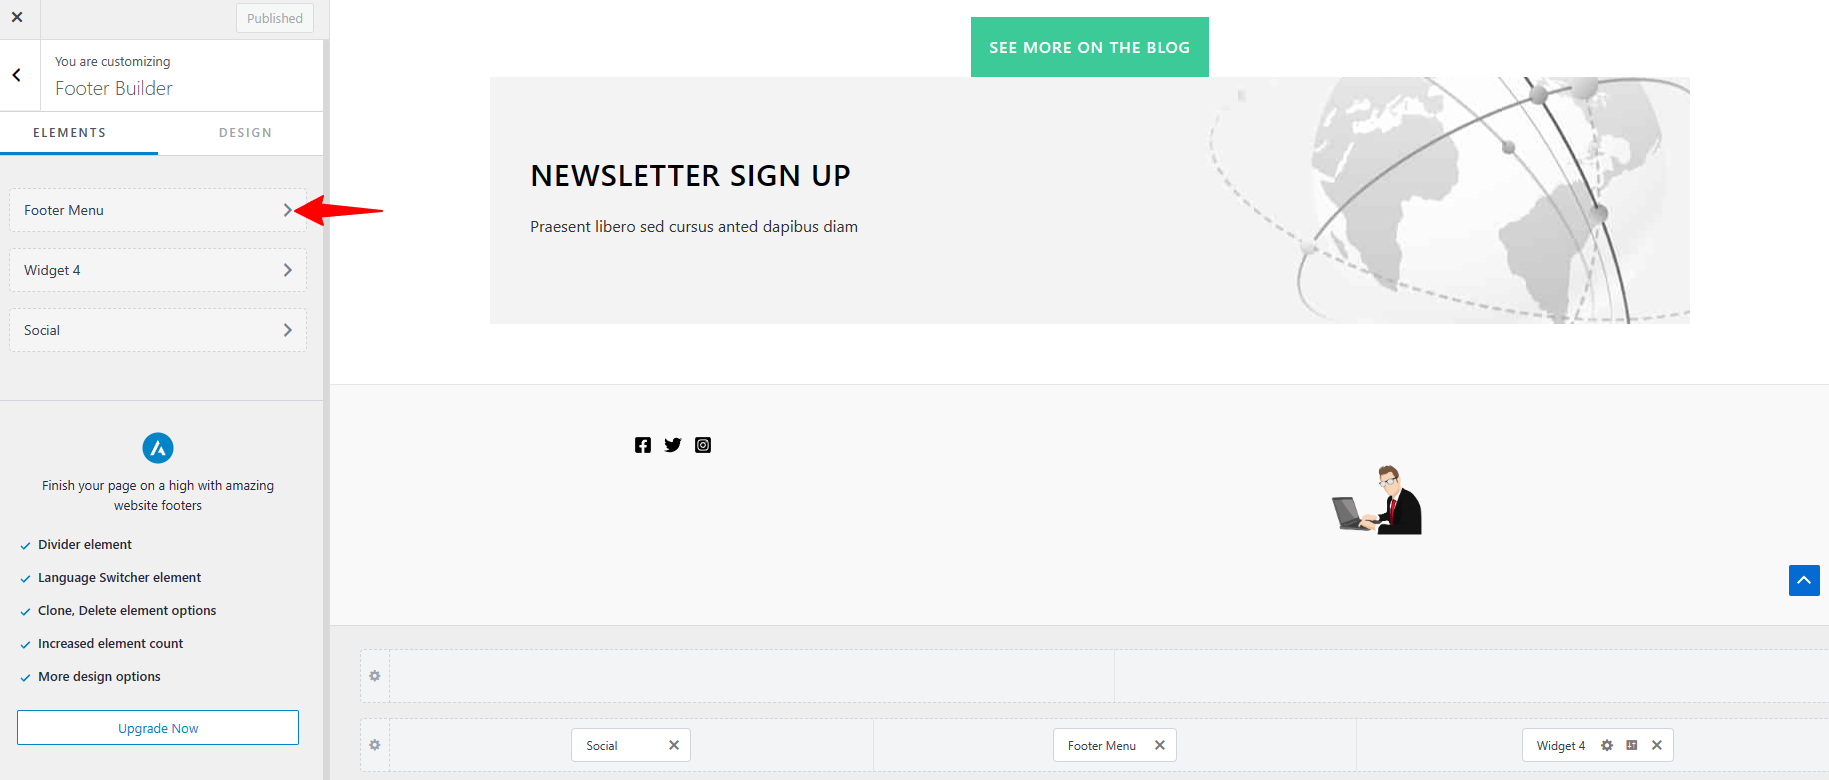

- Now go back to Appearance > Customize > Footer Builder. Now, place the footer menu in the footer section.
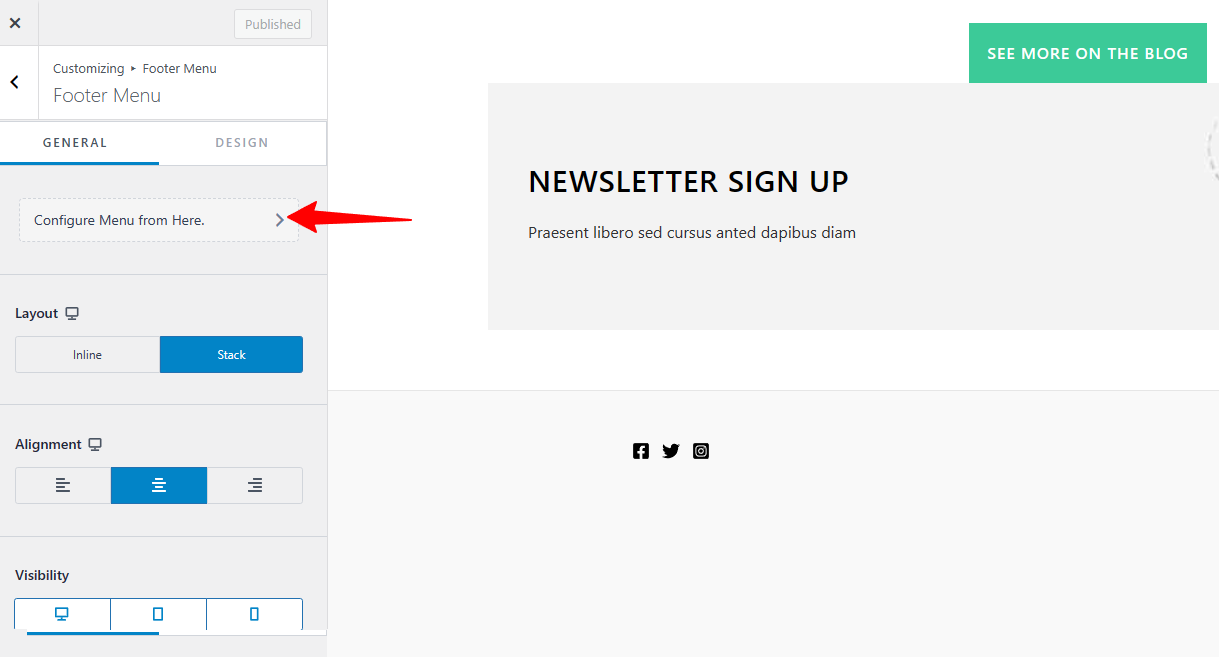

- Click the Menu and select the menu from the left-hand side screen to edit the menu.
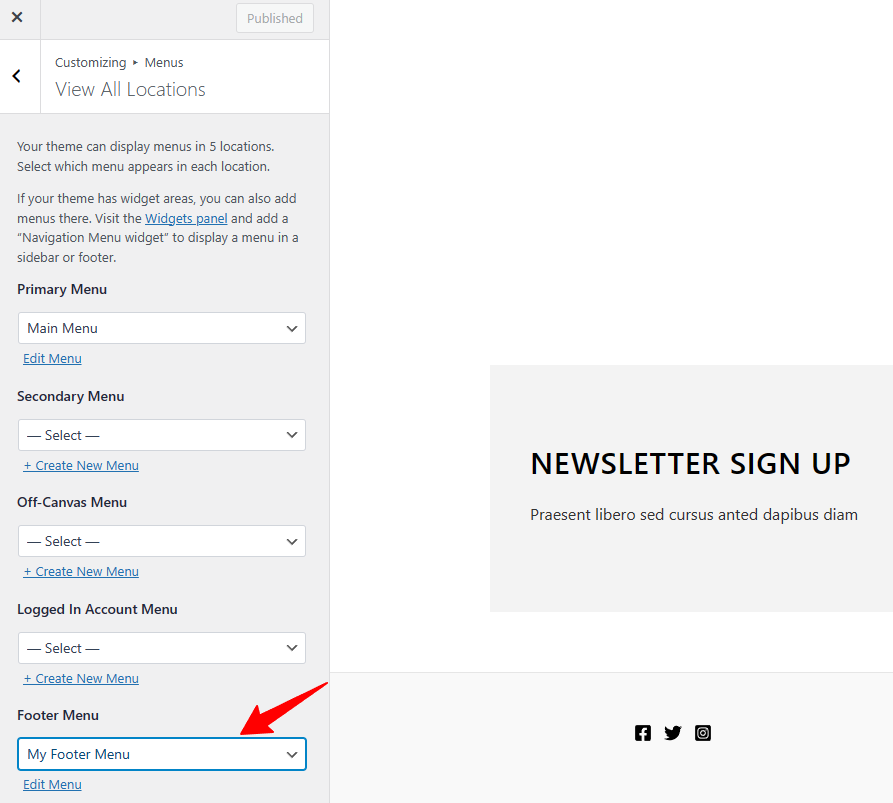

- Now, you have your footer menu ready to use for the footer section of your website.
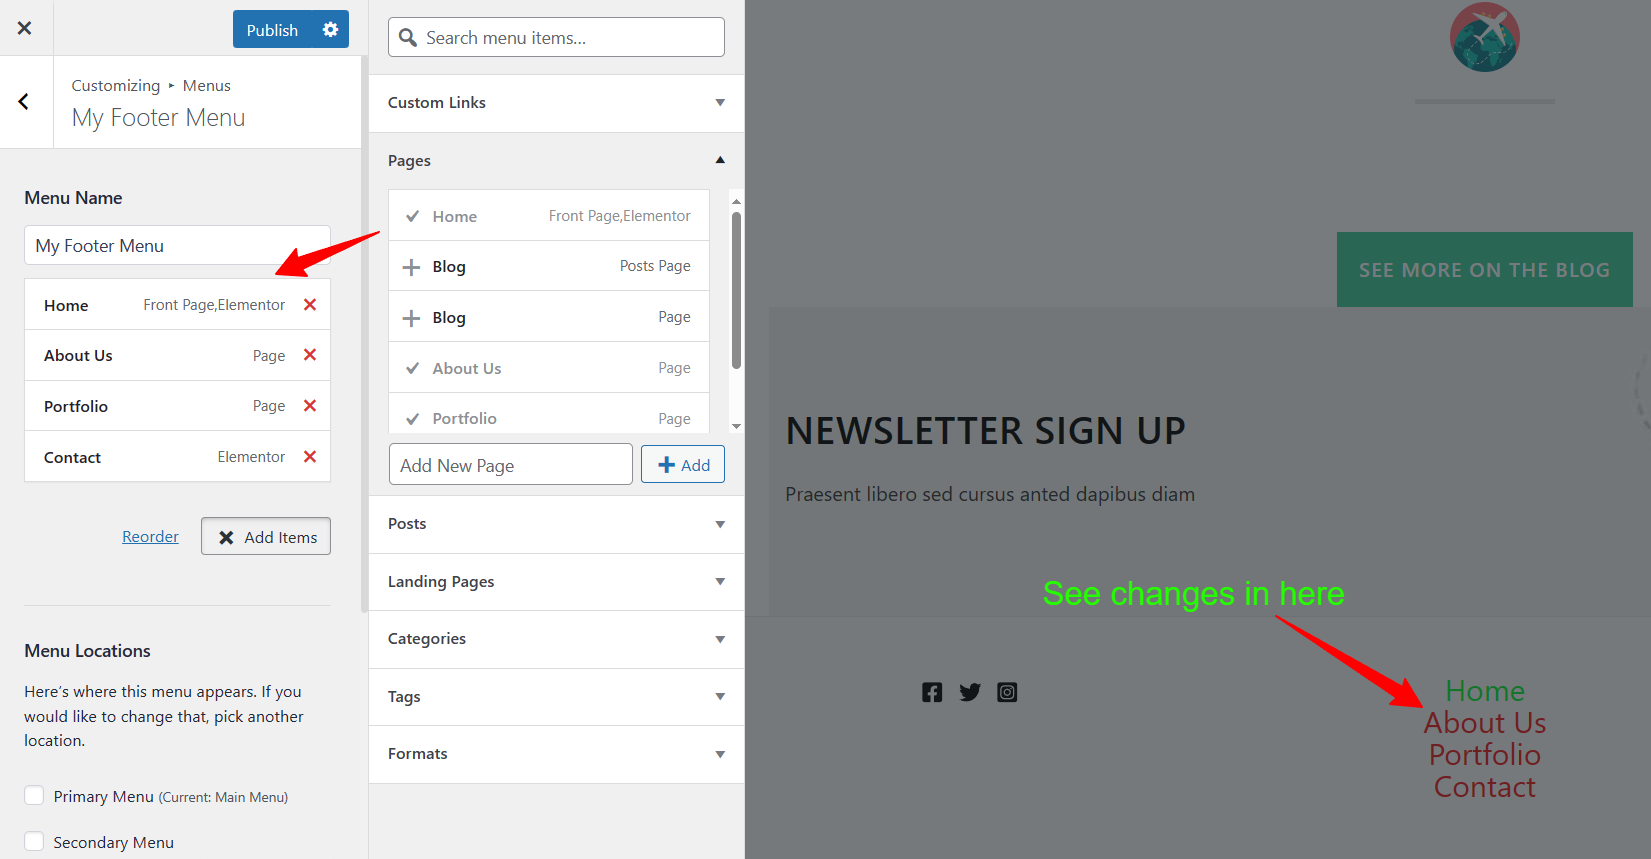

You can create more menus in this way, add them to the footer section, and edit the menu items via Customizer.
When it comes to block themes, you can utilize the WordPress block editor and simply edit the footer. I will use the default Twenty Twenty-Four Theme to modify a footer to demonstrate how easy the process is.
- Start by navigating to your WordPress dashboard and clicking on Appearance, then click Editor.
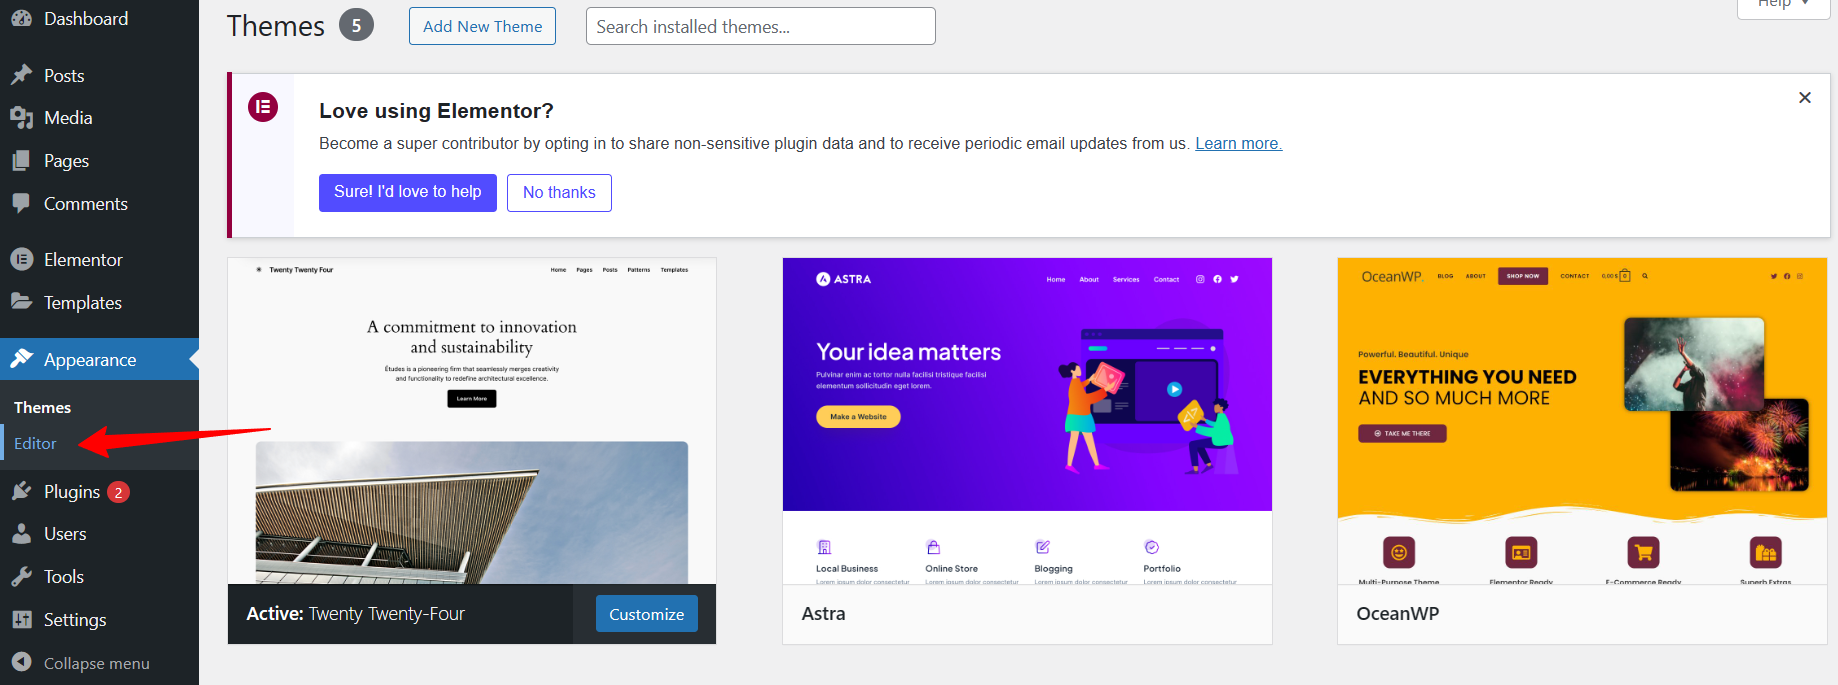

- This action loads your website’s homepage within the block editor interface.
- Scroll down on your homepage and go to the Footer Section.
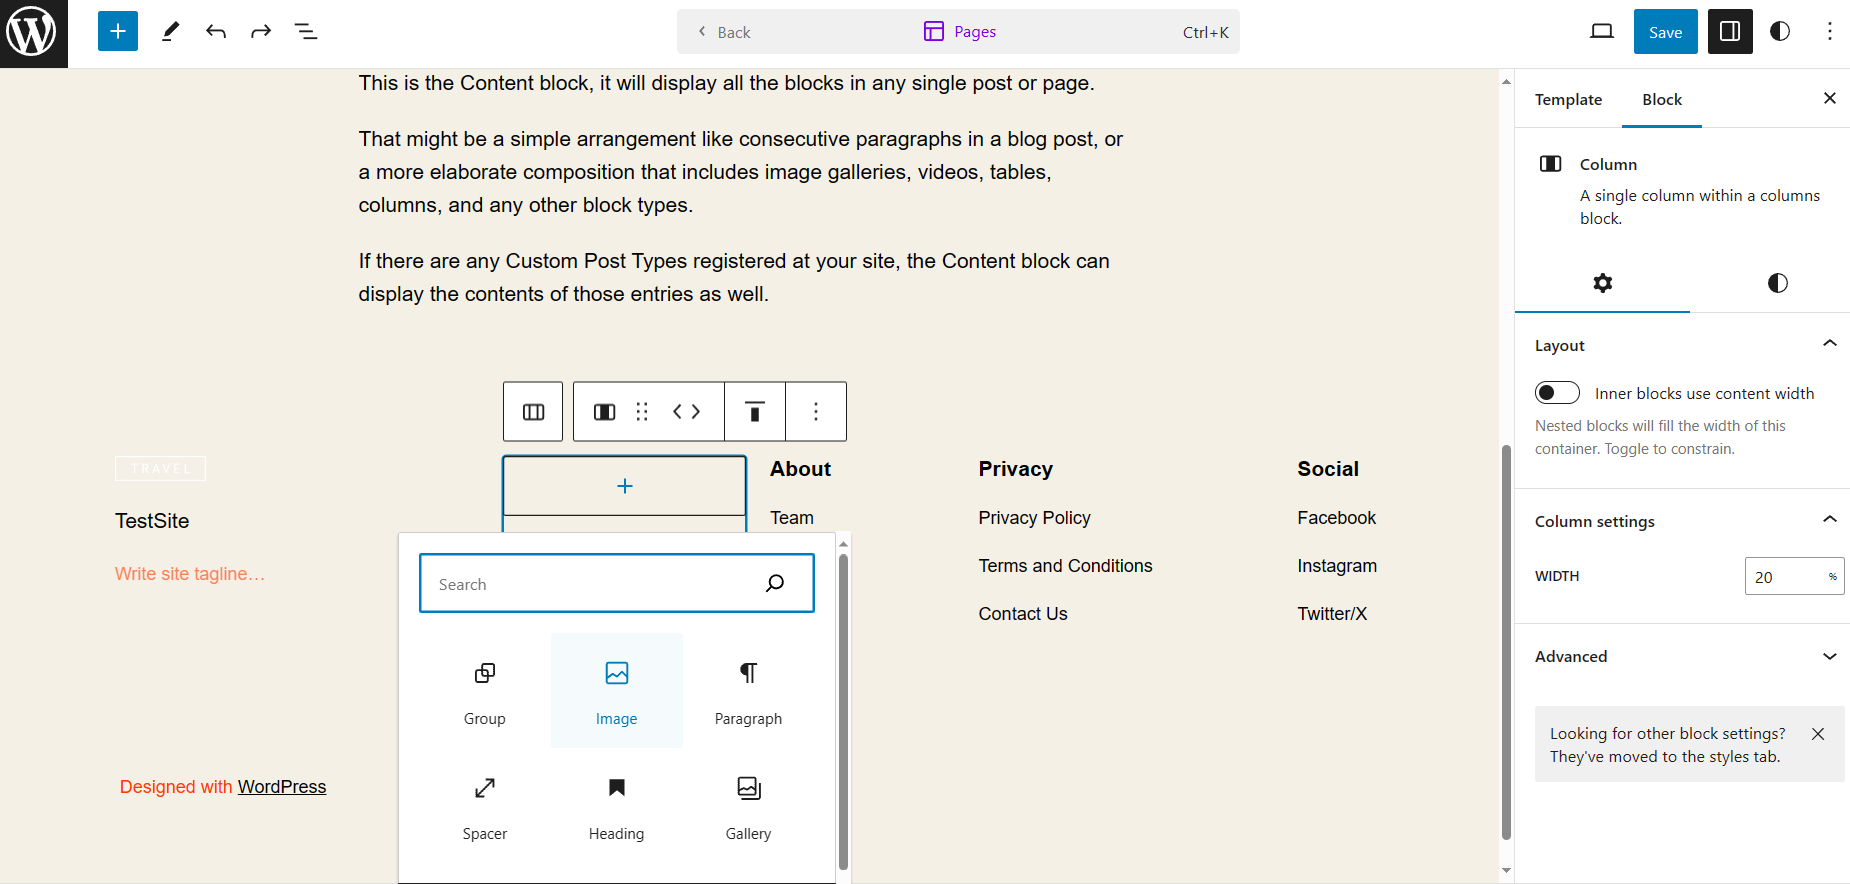

- Click on the footer section within the editor to initiate the editing process for the footer.
- The footer editing process is similar to editing a page or post within the block editor.
- Enhance your footer by incorporating various block elements. Experiment by adding a footer menu (Navigation block), an Image block for your logo, or Custom HTML for an external email subscriber form.
- For a more focused editing experience specifically tailored to the footer, access distraction-free editing easily.
- After Clicking the Appearance > Editor, the full site editing mode will turn on as usual.
- Then click on Patterns and scroll down until you see the Footer. In this section, you will get the footer you have created.
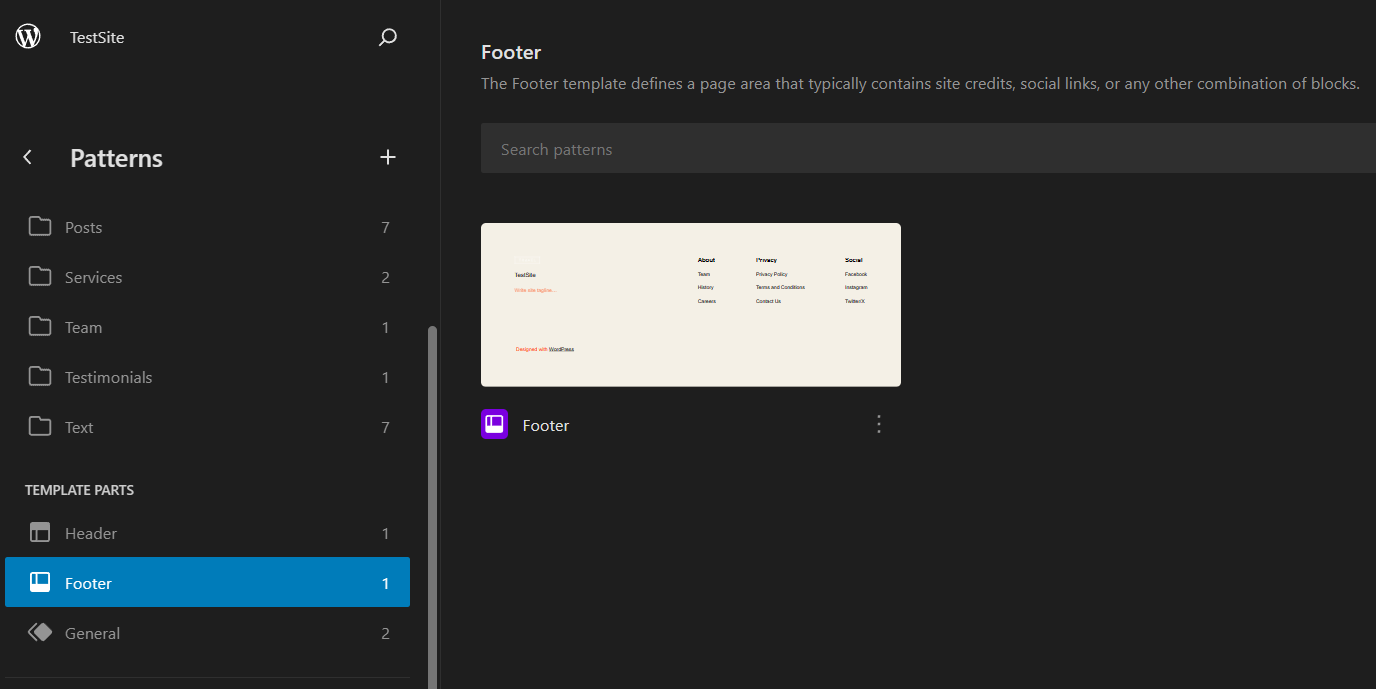

- This action opens a dedicated editing view that isolates the footer, removing all other page elements. The block editor within this focused view operates similarly, ensuring a more concentrated editing process for the footer.
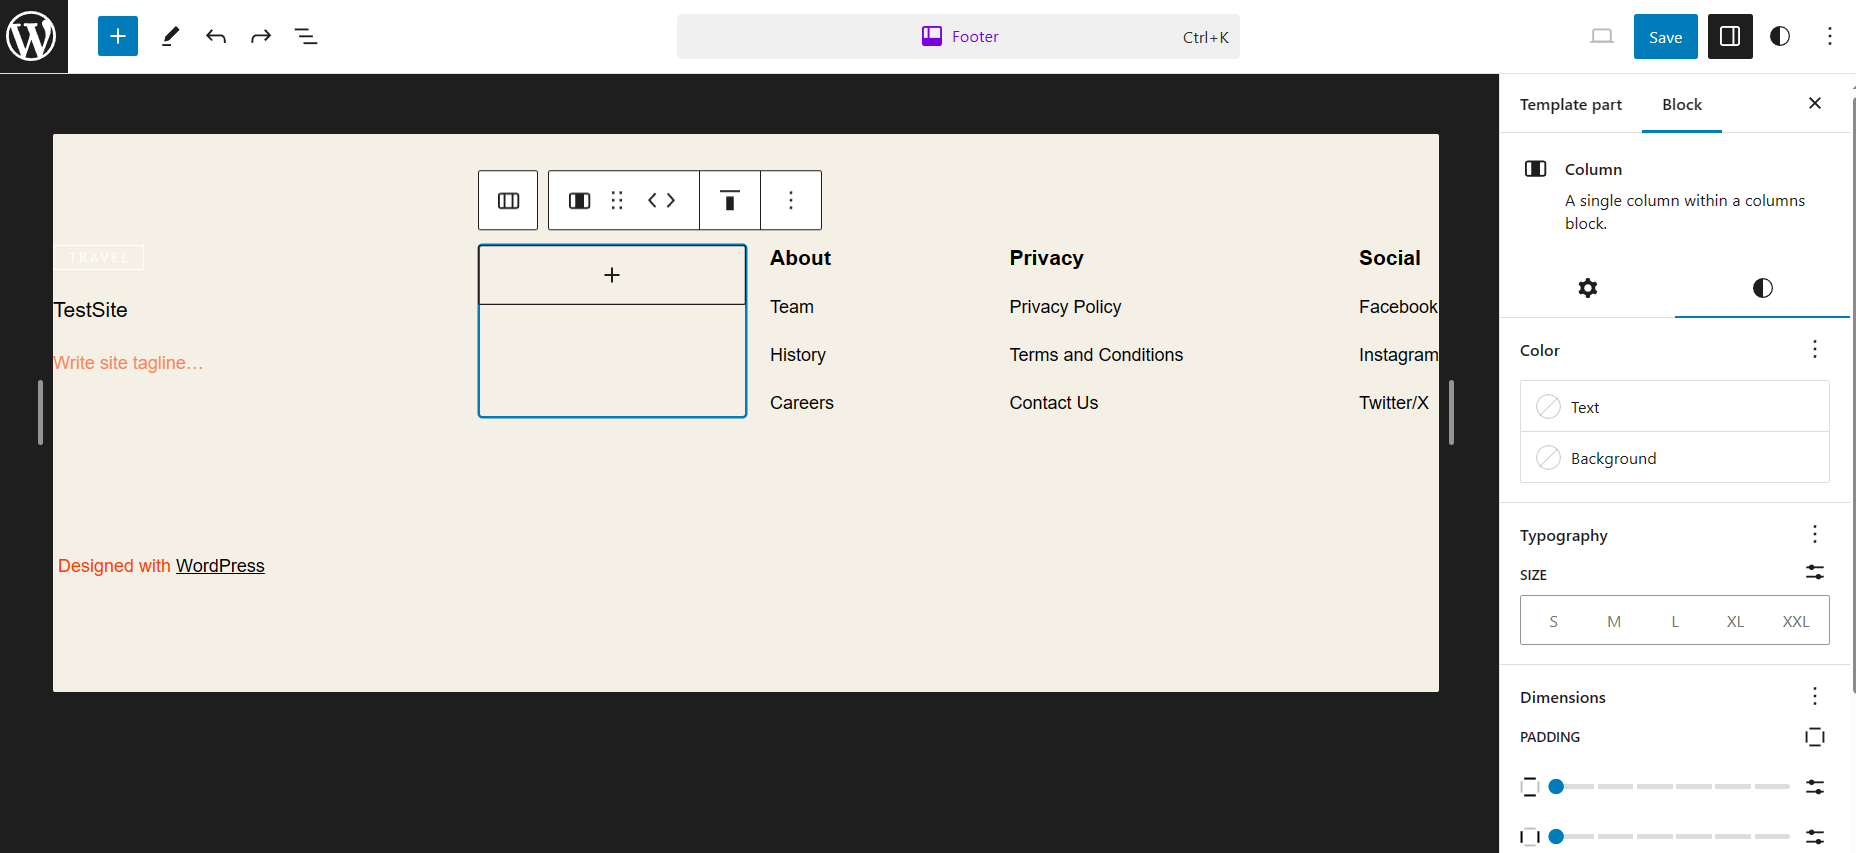

Utilizing WordPress’ built-in footer block patterns in the block editor is a great approach to simplify design and inject some originality into your website. Here’s how to use these patterns to your advantage:
- Navigate to the Block Pattern Directory in WordPress.org and click the pattern.
- Search specifically for footers to narrow down the available patterns.
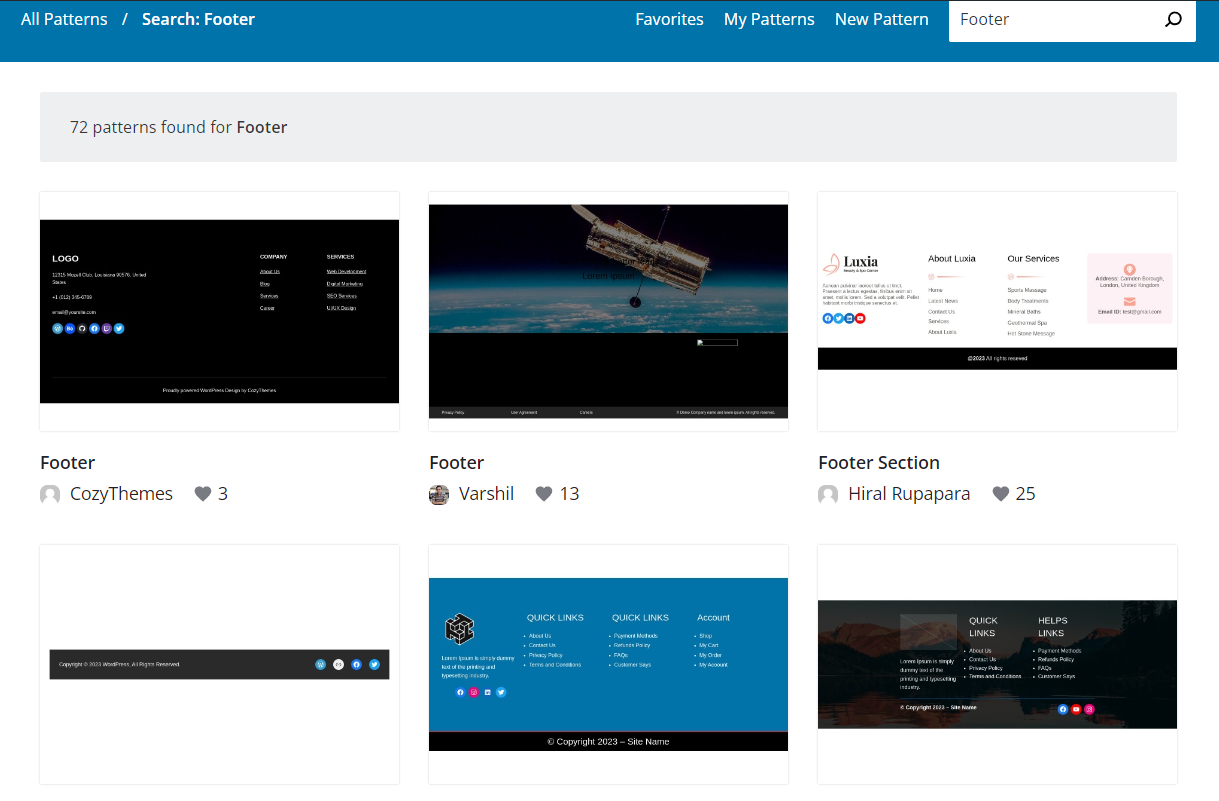

- Hover over the desired footer pattern, click on it, and select Copy. This action copies the pattern’s code to your clipboard.
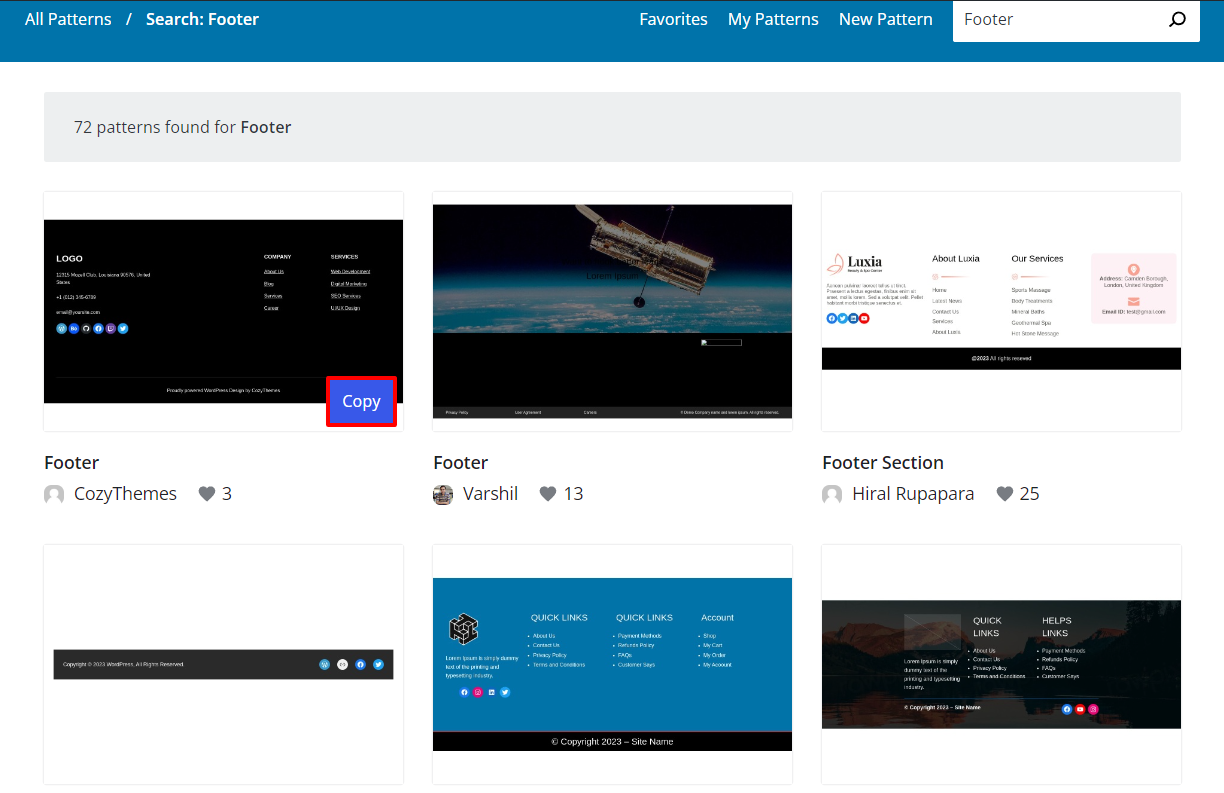

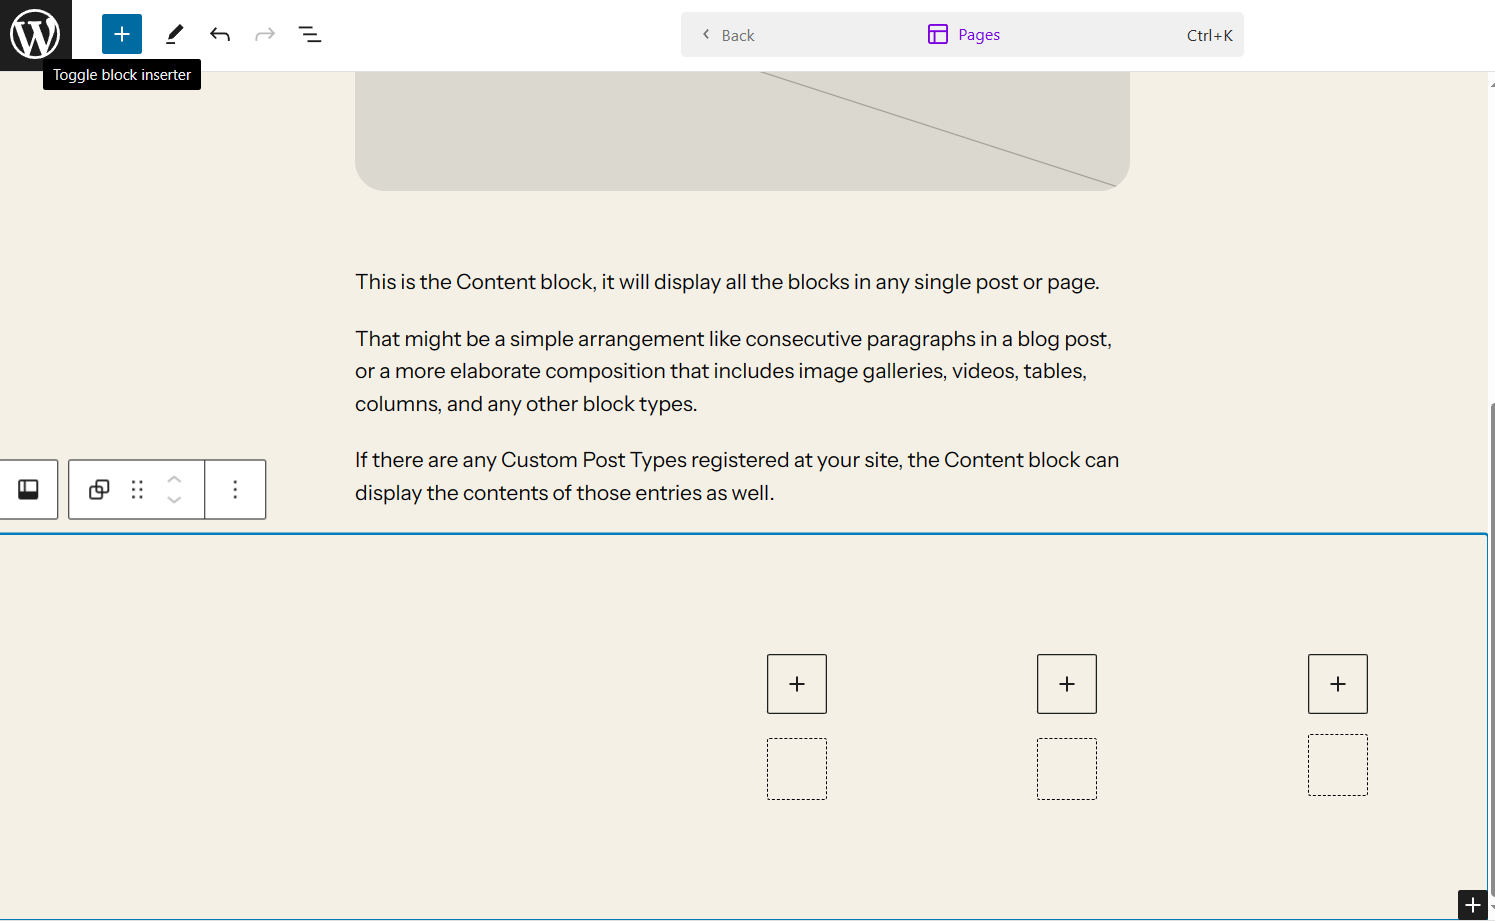
- Go to the footer section, click, and add an HTML block in it.

- In the HTML Block, paste the copied footer pattern code.
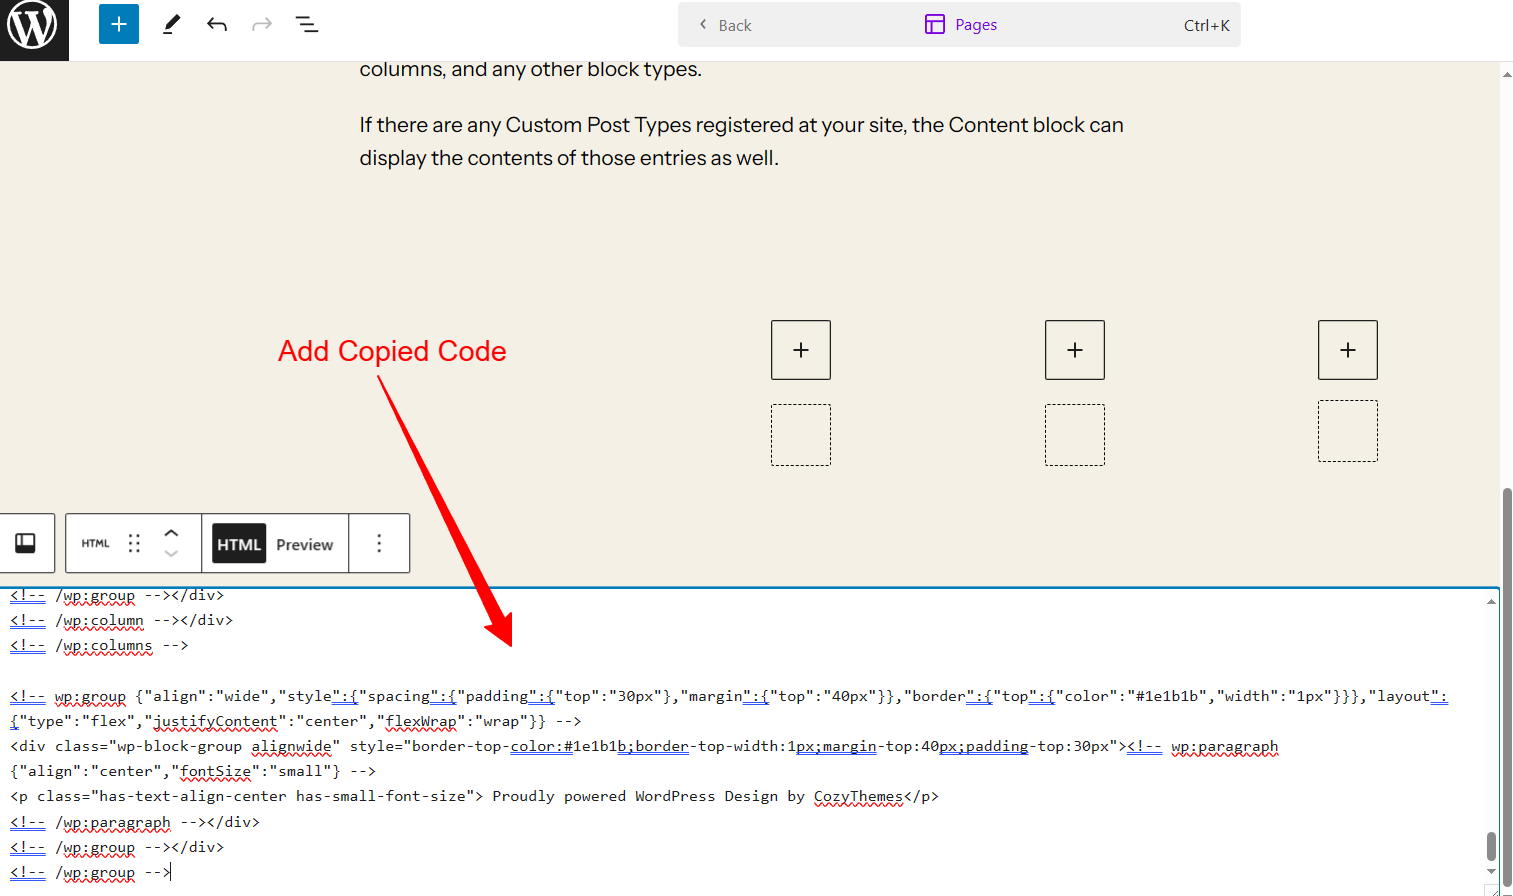

- After pasting the code, click the Save button in the top right corner.
- Within the editor, you will be able to see the codes. But once you visit your home page and scroll down, you can see the footer section created via HTML code.
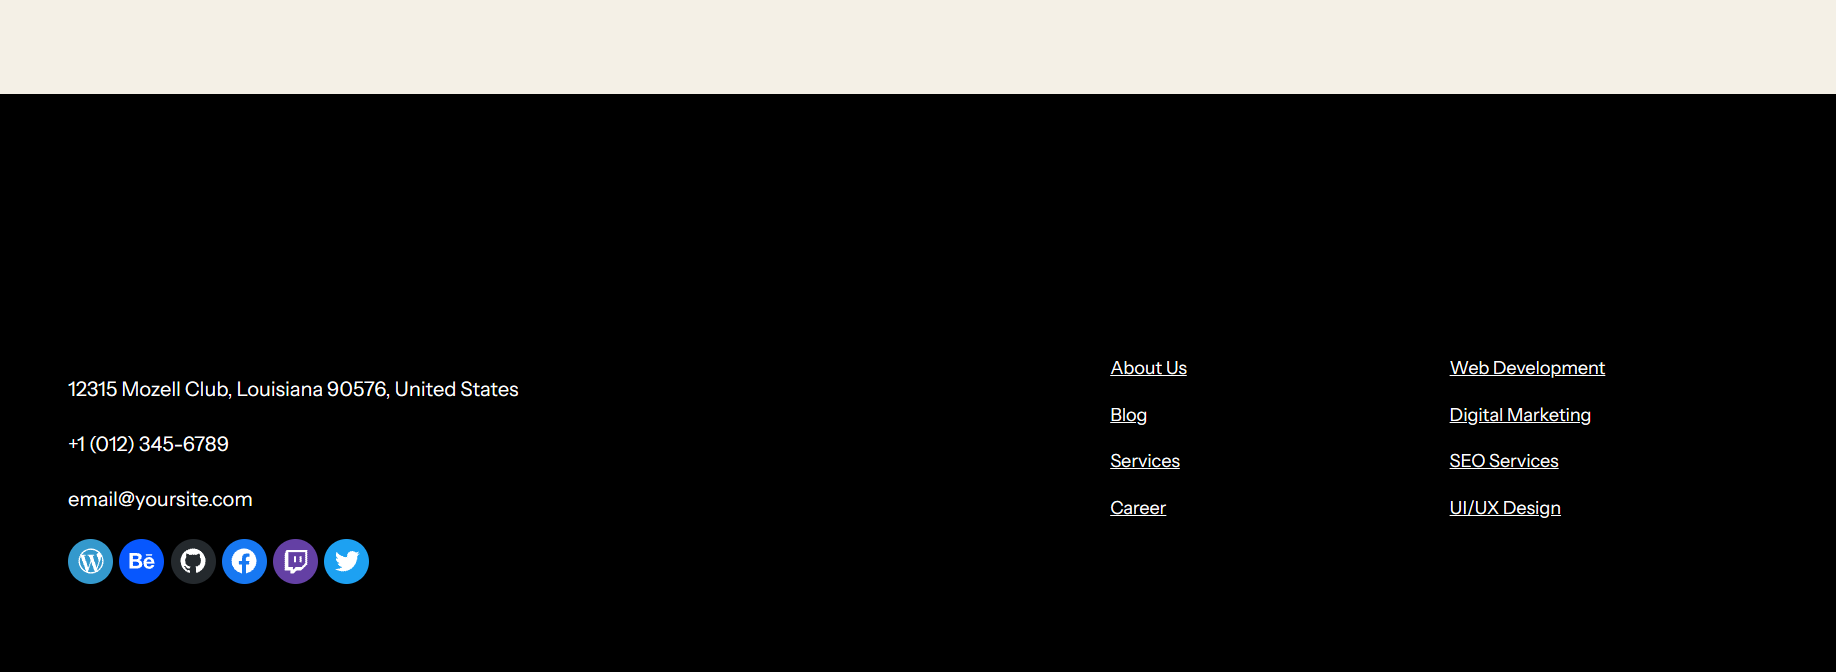

- Now, you’ve successfully created a footer section using the pre-made block pattern.
The patterns in the Block Pattern Directory are an excellent place to start, as they can be modified to fit the requirements and aesthetic of your website. But, if you want to keep your website’s aesthetic appeal, you may also employ page builders to get a simpler way to modify the footer.
With Elementor, editing the footer is an easy task that offers you total control over the bottom part of your page. This is a comprehensive how-to for viewing and editing your footer:
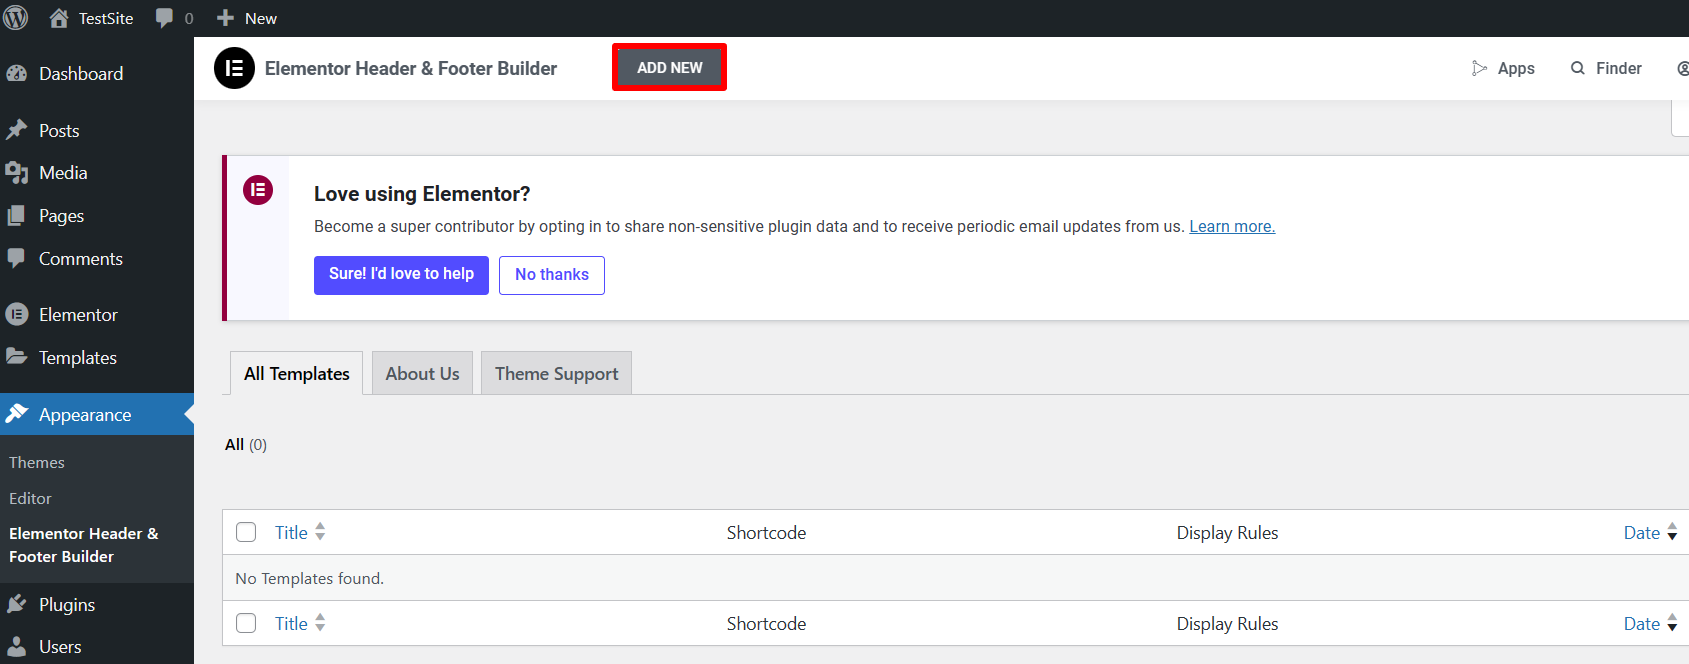
- In your dashboard, Go to Appearance > Elementor Header & Footer Builder and click Add New.

- I’ve set the template name as My Footer, Selected the type of Template as Footer, selected the display as Entire Website, and the User role as All.
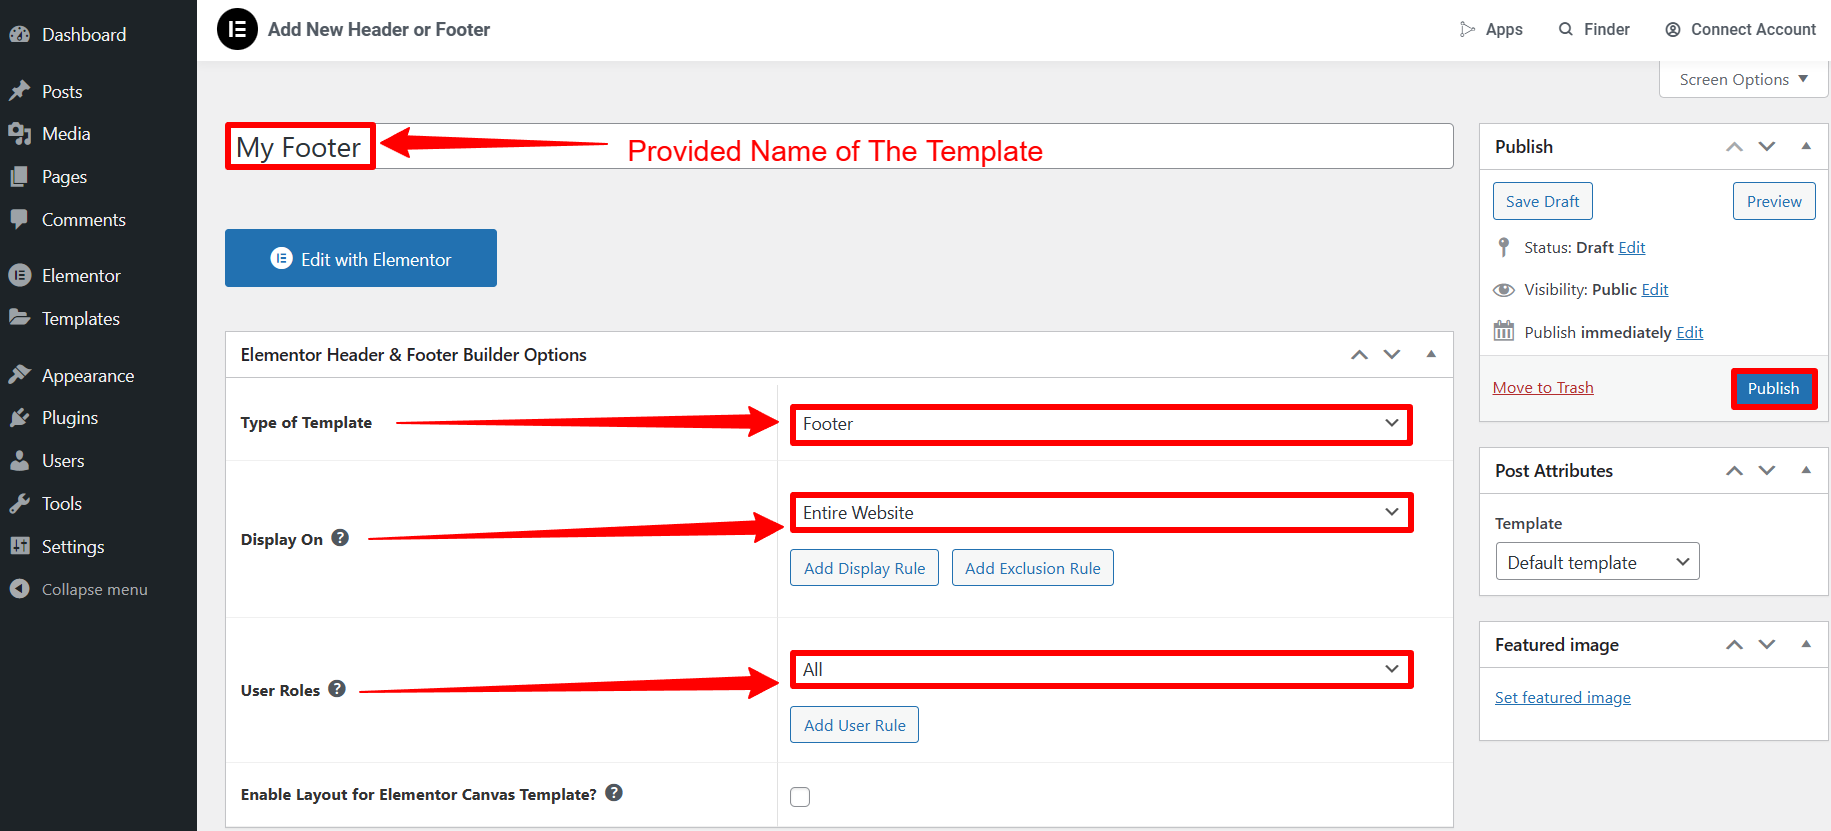

- Now hit the Publish button to finish creating the footer template, then click Edit With Elementor to create your footer.
- You will be redirected to Elementor Page Builder, where you need to scroll down on the left-hand side menu until you get the Header and Footer Builder.
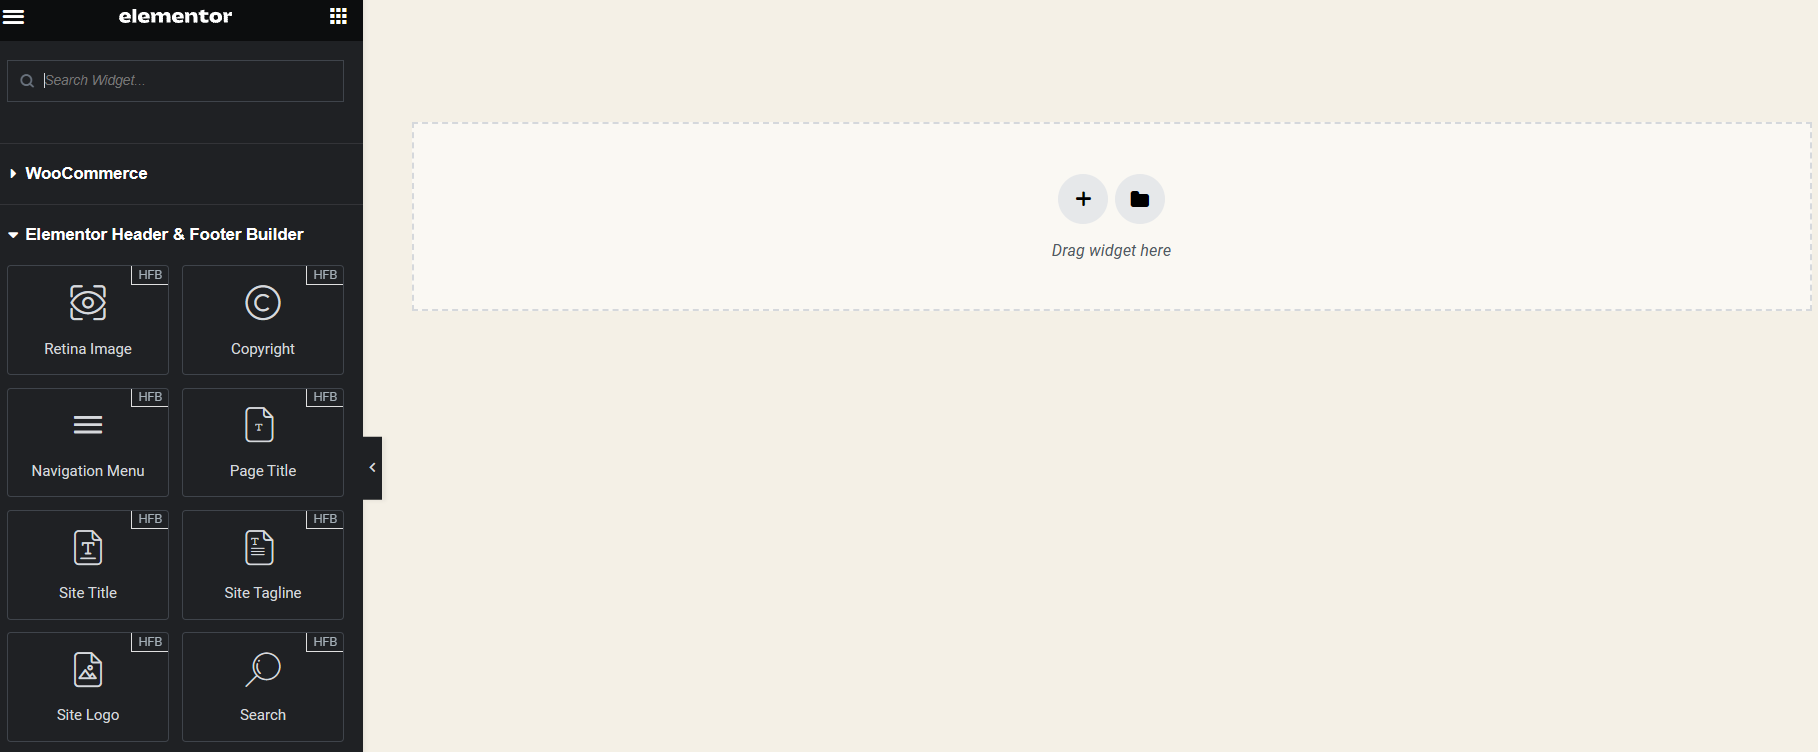

- Now, you can drag and drop elements from Header and Footer Builder to the right side of your screen. Add the elements that you want on your footer.
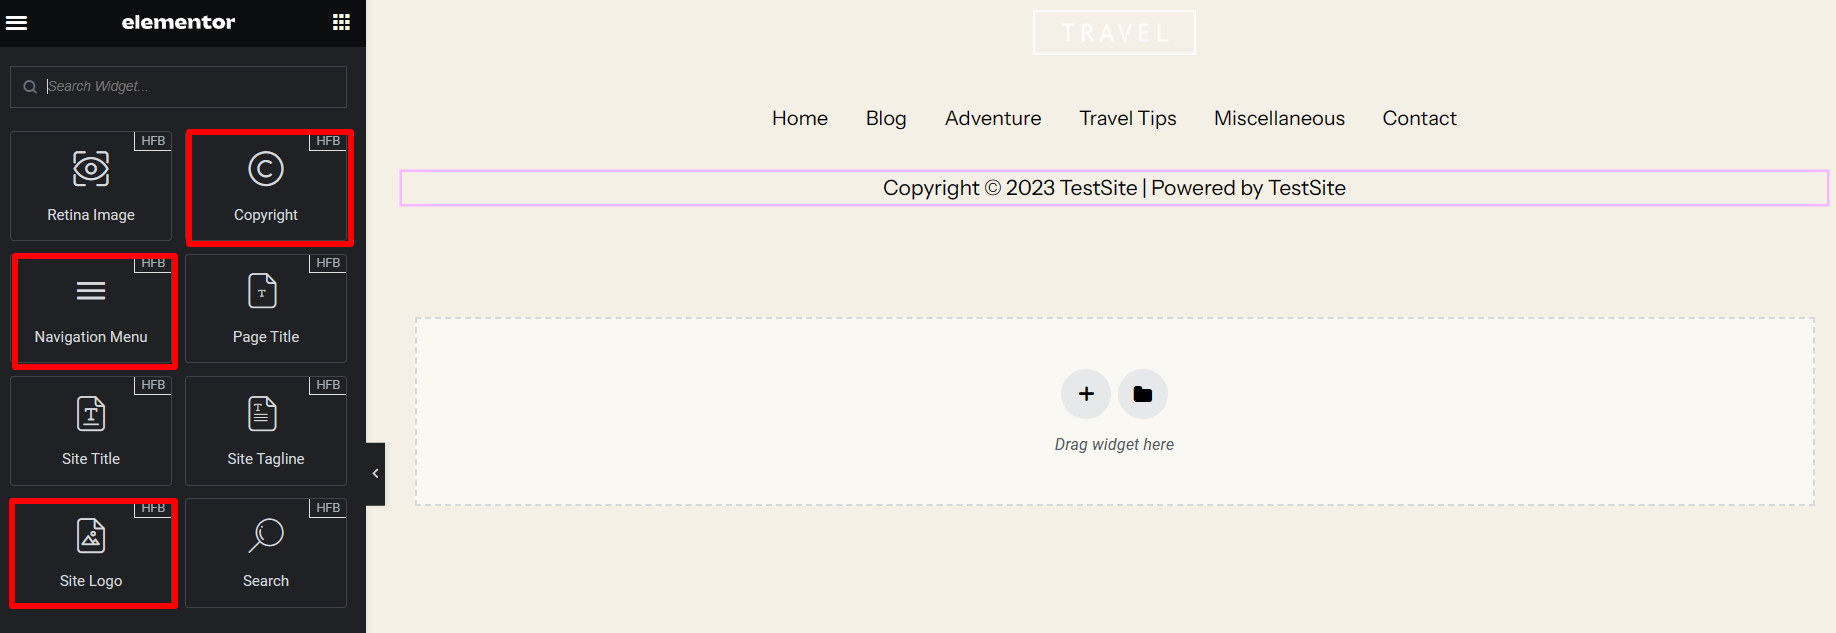

- I’ve dragged some elements, such as the Navigation Menu, Copyright, and Site Logo, on the right-hand side screen. Then I clicked Update to finalize the Footer.
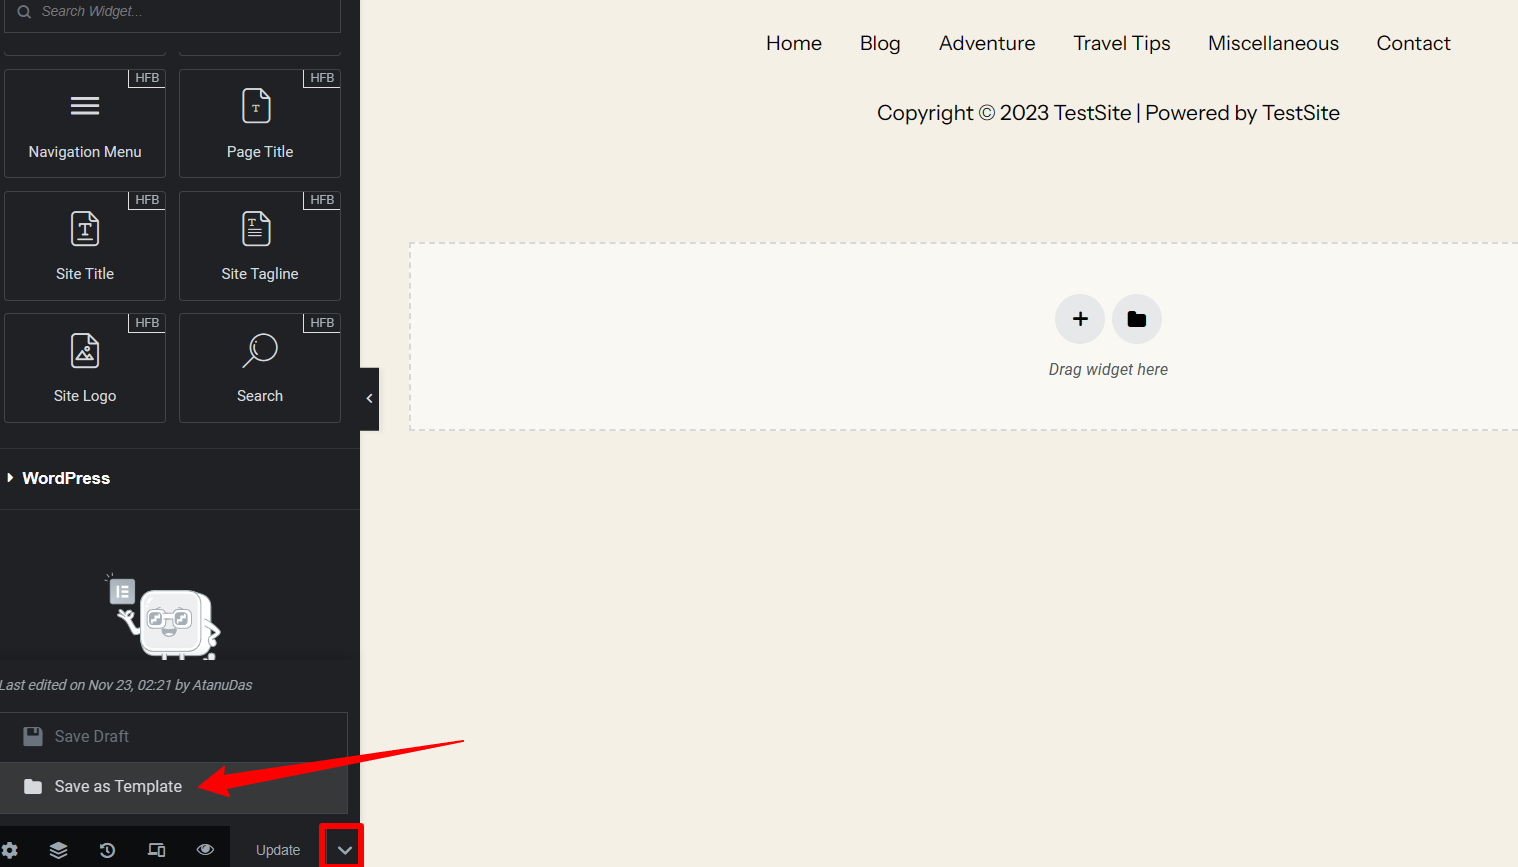

- Now look at the bottom side of the Editor on your left-hand side screen. Just beside the Update button, click the arrow icon and Save the Template.


- Go back to your homepage, click Edit with Elementror, and scroll down to the bottom of the page where you want your footer.
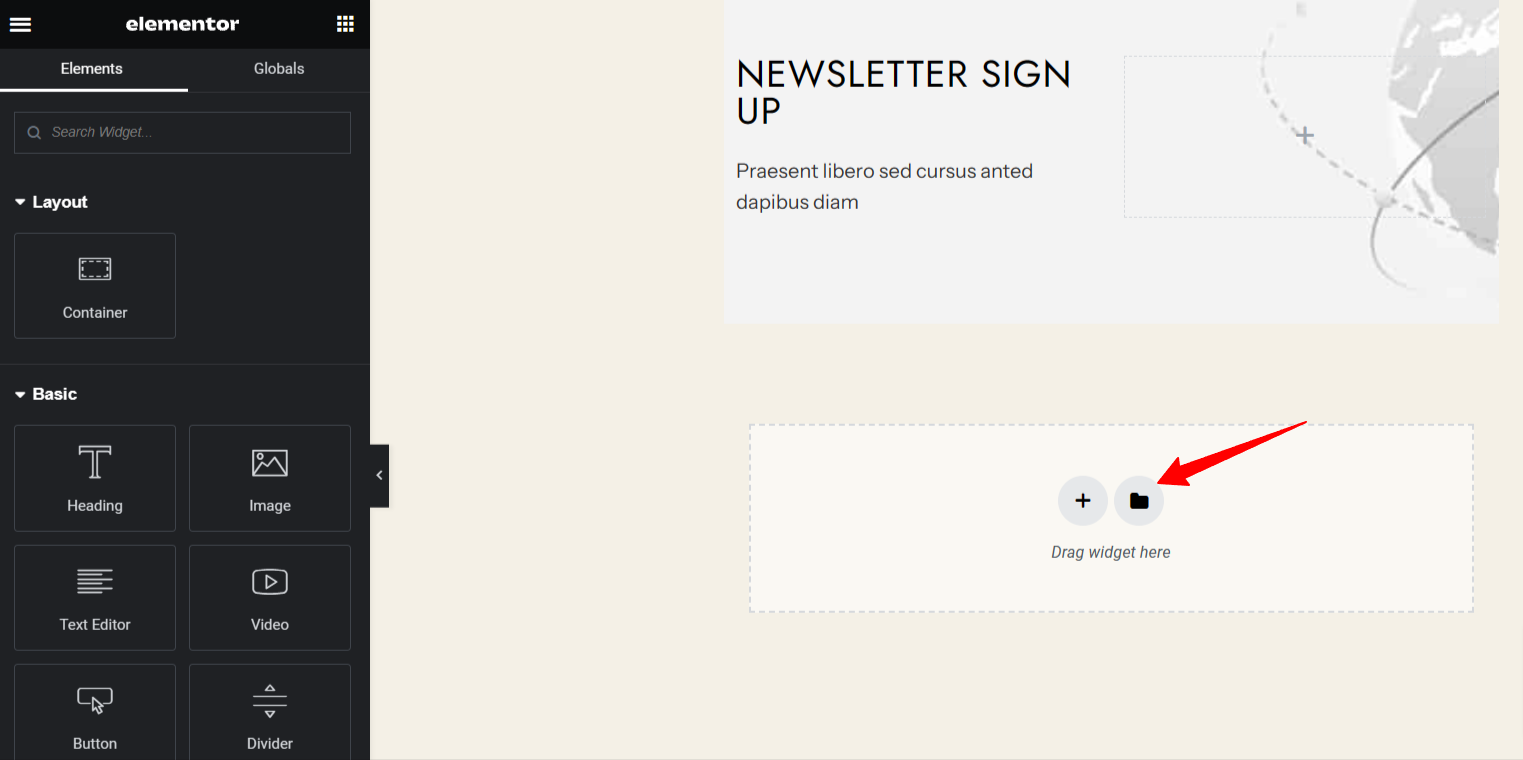

- Click the Folder Icon and insert the Footer Template from my template tab in the footer section. As you can see, the footer section is now available on your homepage.


- That’s it; your footer is ready and implemented on the website. You can easily edit the copyright section using this plugin.
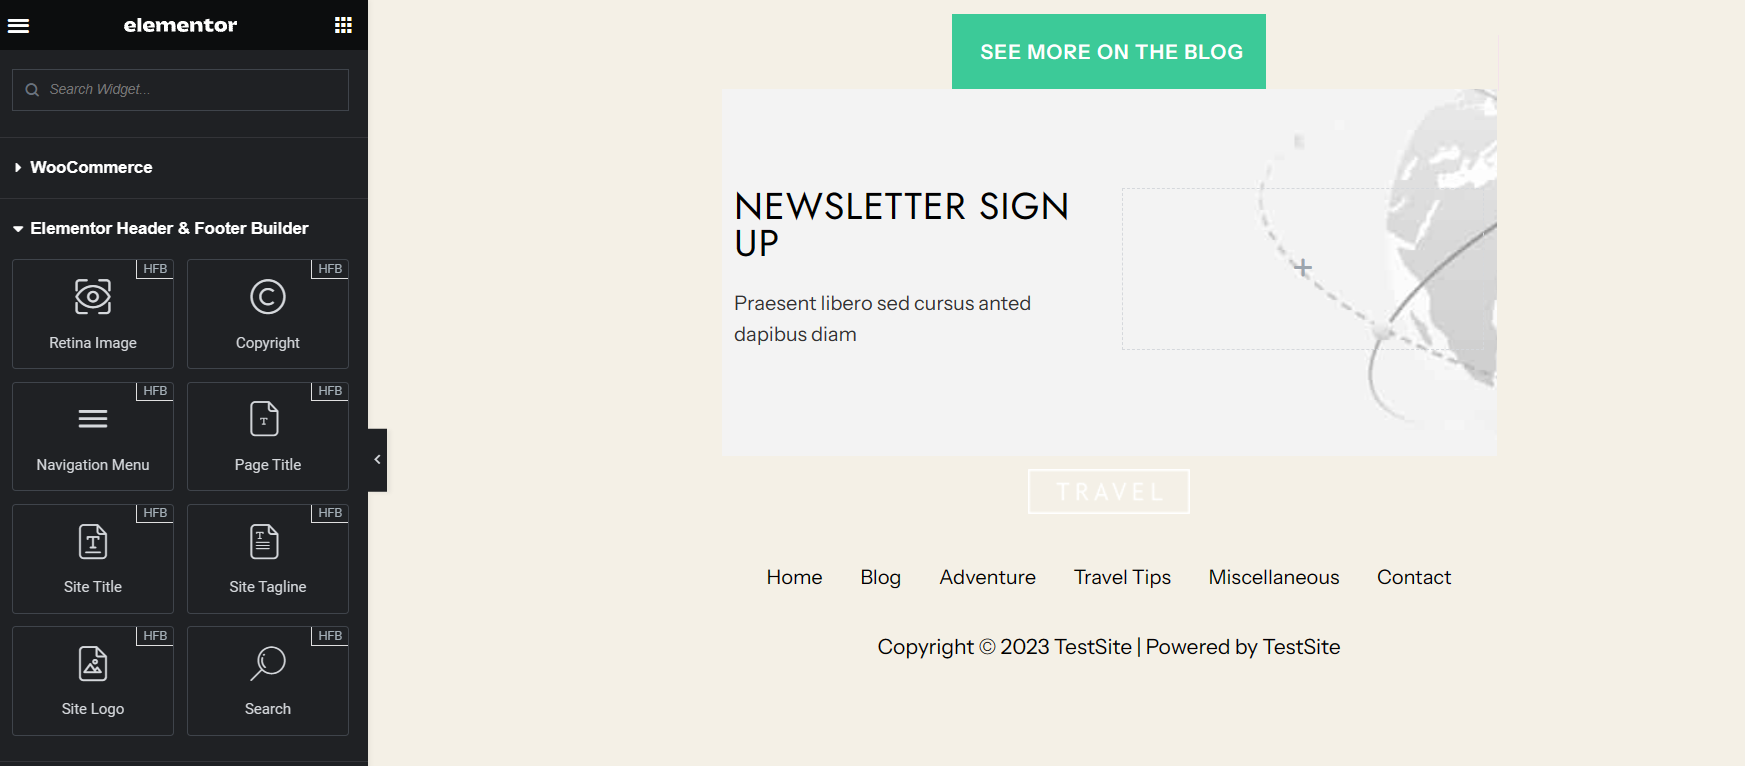

By using Elementor Header and Footer Builder to customize your footer, you are creating an exceptional user experience and a polished outlook.
If you are into coding and want to manually insert code in your WordPress site’s footer, this is the right approach for you. This can help you in tracking scripts and analytics and add extra Java scripts to your footer.
Using the Insert Header and Footer plugin, you won’t need to create any child theme or create a backup of your site. Here are a more detailed instructions and an example of a personalized footer code:
- Go to the WordPress dashboard and navigate to Plugins > Add New
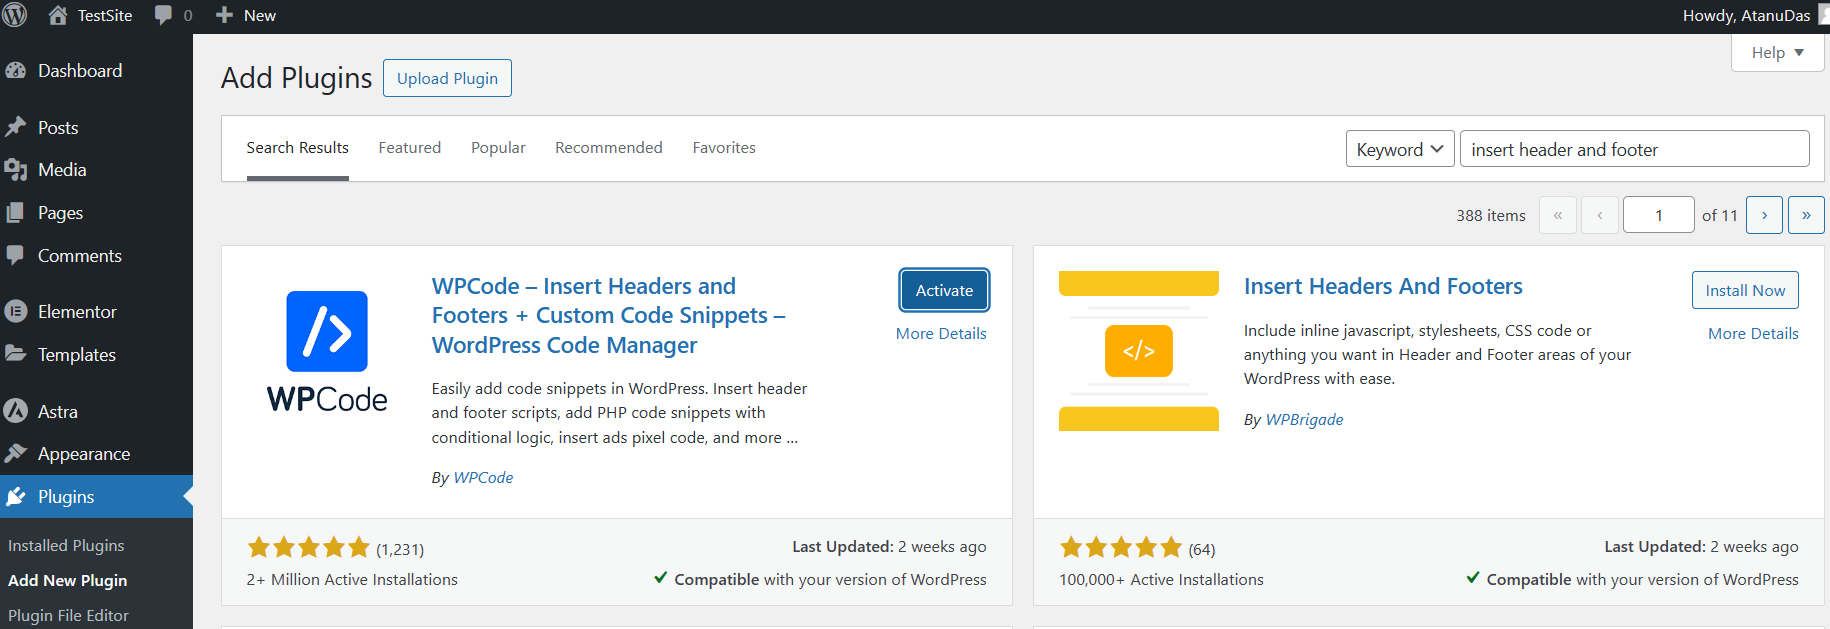

- Search for the Insert Headers and Footers plugin and click Install Now. Then, Activate the plugin.
- Now, from your dashboard, go to Code Snippets > Header & Footer.
- Scroll down, go to the Footer section, and paste your code into it. Then click the Save Changes button to keep the changes that you’ve made to your site’s footer.
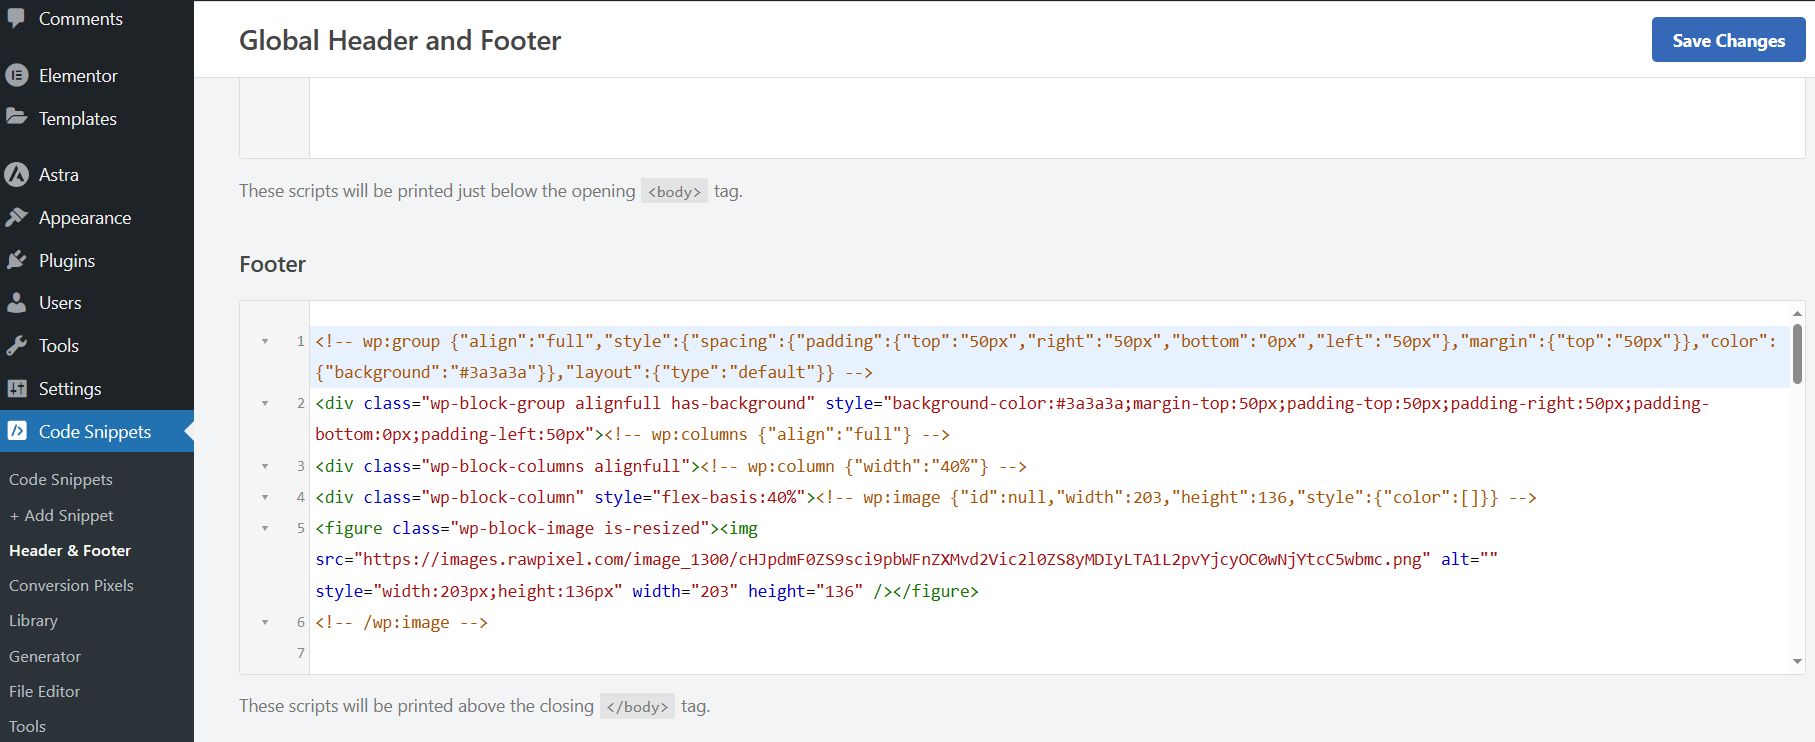

- Now, go back to your website’s homepage and scroll down to the footer section.
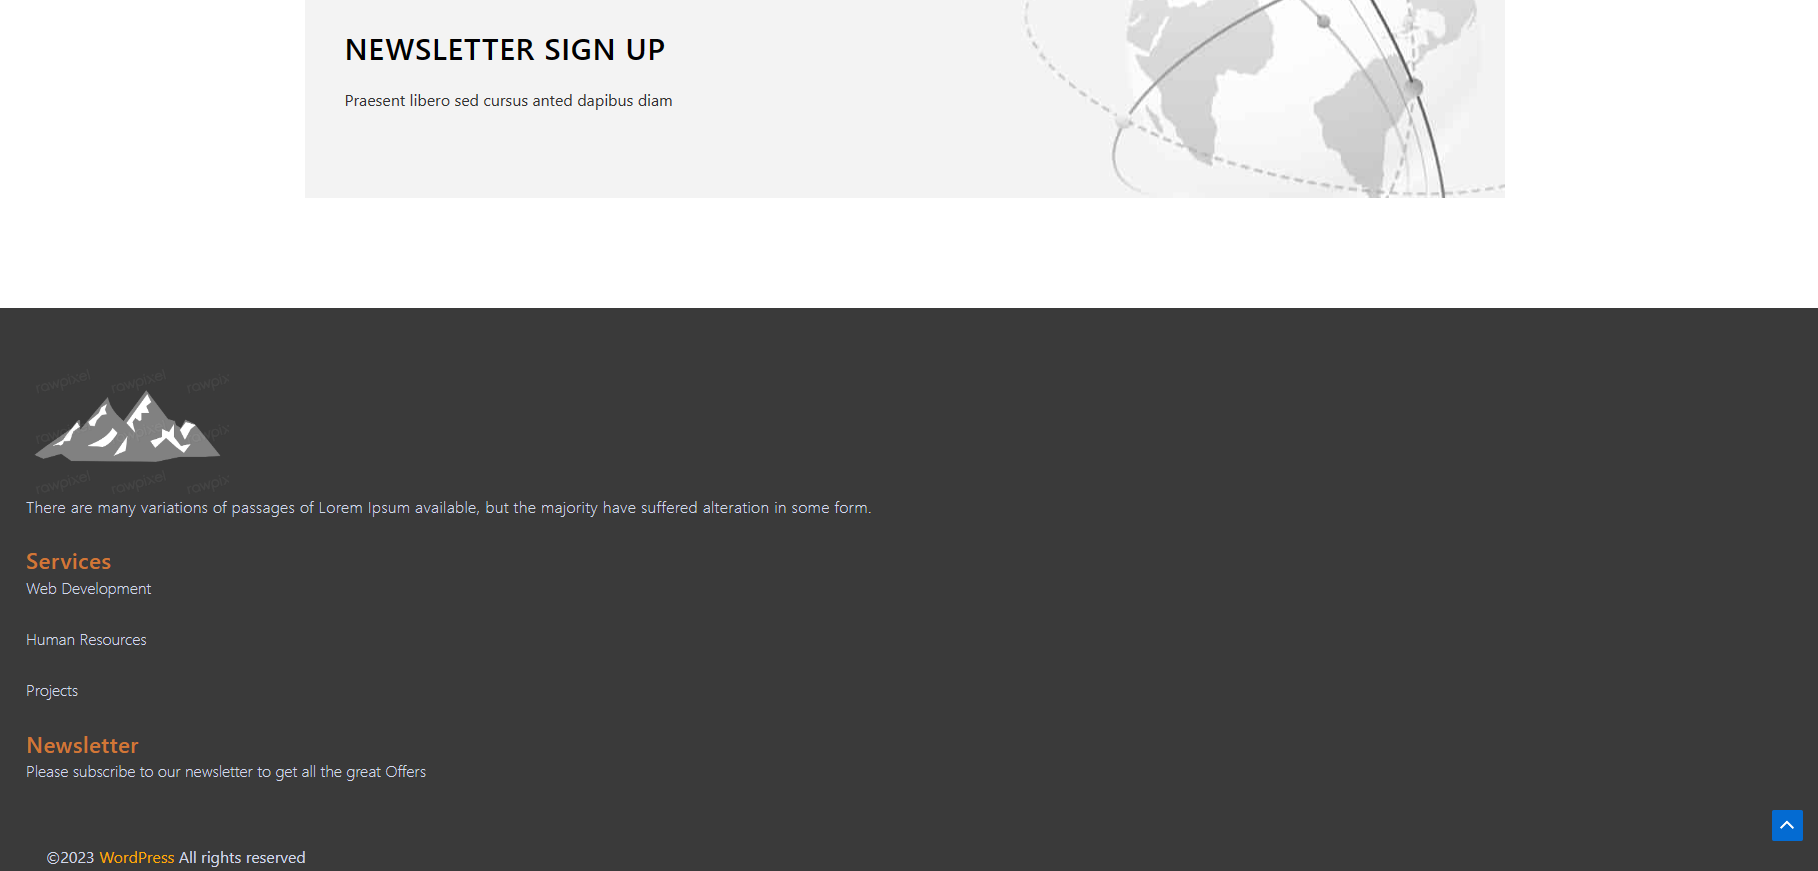

There you go, and your footer is ready according to the code snippet. Keep in mind that the footer will look exactly as you code it. So, if you are good at coding, the outlook of your footer will be lucrative. But before creating the code, don’t forget to maintain the quality of the footer by including the necessary features in it.
Tips to Organize a Clean and Organized Footer
A well-maintained footer has the potential to greatly improve both the user experience and the overall perception of a website.
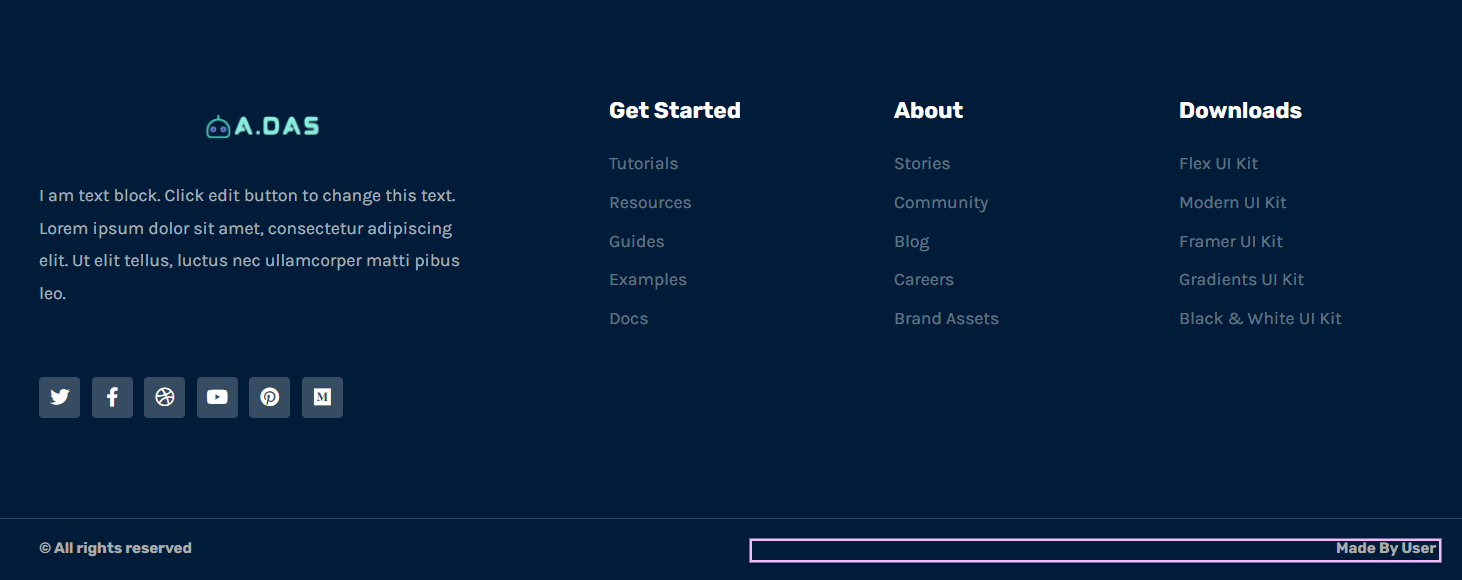

The following professional advice will help you get and keep a stunning footer:
✅ Simplicity is Crucial: A clutter-free and organized footer can attract visitors to navigate more and boost user experience. So, don’t put too many elements such as links, info, widgets, and so on, keeping white spaces and breathing space to facilitate simple navigation.
✅ Structure & Hierarchy: Clearly define all the content’s structure in the footer. Sort material into logical categories to prioritize more significant components, such as essential pages like contact info, by correctly dropping less essential details.
✅ Easy Navigation: Include a streamlined version of the footer’s navigation menu for the website. This helps people navigate the important pages with ease, particularly after they’ve read through a lot of content throughout the site.
✅ Visual Accuracy: Keep your website’s visual style consistent with the rest of the website. So, develop a design that maintains harmony and coherence using comparable color palettes, typefaces, and styles.
✅ Call-to-Action (CTA): Make a sensible placement of call-to-action buttons in the footer. This will entice readers to subscribe to the newsletter, draw attention to exclusive deals, or lead them to certain areas of the website.
✅ Put Essential Links: Place essential links on important pages such as the Service, FAQ, and About Us pages. This makes it possible for consumers to quickly obtain important info without having to browse the full website.
✅ Update Regularly: Make sure the material in the footer is still current and relevant by reviewing it regularly. Don’t forget to update copyright years, eliminate out-of-date elements, and reload links as needed.
✅ Check Responsiveness: Make sure the footer looks good and functions properly on a range of screen sizes and devices. So, examine its responsiveness to ensure smooth accessibility on mobile devices.
Due to the exponential increase in mobile users, mobile friendliness is crucial to providing outstanding user experience across different platforms. Here’s why it’s essential that you give a mobile-friendly footer high priority:
🔷 Touch-friendly Design: Mobile users mostly use their thumbs to navigate websites on mobile devices. Therefore, a mobile-friendly design of a footer will give users easy access to different links and info on a footer.
🔷 Content Presentation: A mobile-friendly footer means better visibility of the footer. This means an easy navigation style and clutter-free presentation of all information, making it easier for users to navigate.
🔷 SEO Effects: Maintaining mobile-friendliness directly impacts the SEO of your website. Search engines prioritize mobile responsive websites when it comes to search engine rankings on Google and give your site better exposure.
🔷 User Retention: Mobile-friendly footer designs usability and entices users to explore the site more. Thus, users stay at your site longer, giving you a better chance to convert them.
🔷 Visual Consistency: The beauty of a whole brand is maintained with a mobile-optimized footer that adheres to the design consistency. Plus, it enhances the website’s legitimacy and user confidence since it comes with professionalism as well as attention to detail.
By optimizing your footer for a mobile device, you can encourage user engagement, get SEO advantages, and maintain the standard. A concerned user can look into these facts and continue navigating your website.
Conclusion
At this point, the footer editing process has become less than overwhelming for you. Hopefully, you can create an engaging footer using one of the methods mentioned above. Plus, you can maintain its authenticity by adding essential elements and maintaining the mobile-friendliness.
However, add more elements such as maps, newsletters, search icons, and more to make your footer more attractive, which I’ve left for you.
Next, check out the beginner’s guide to building a WordPress website.
Si quiere puede hacernos una donación por el trabajo que hacemos, lo apreciaremos mucho.
Direcciones de Billetera:
- BTC: 14xsuQRtT3Abek4zgDWZxJXs9VRdwxyPUS
- USDT: TQmV9FyrcpeaZMro3M1yeEHnNjv7xKZDNe
- BNB: 0x2fdb9034507b6d505d351a6f59d877040d0edb0f
- DOGE: D5SZesmFQGYVkE5trYYLF8hNPBgXgYcmrx
También puede seguirnos en nuestras Redes sociales para mantenerse al tanto de los últimos post de la web:
- Telegram
Disclaimer: En Cryptoshitcompra.com no nos hacemos responsables de ninguna inversión de ningún visitante, nosotros simplemente damos información sobre Tokens, juegos NFT y criptomonedas, no recomendamos inversiones

